New editions are almost always a great time to pick up a game you've been wanting to play. Long time players are engaged and less sour than normal and the prospect of teaching and everyone is learning (or unlearning) things that have been taken for granted. For Age of Sigmar this edition represents a full ground up rewrite of the rules and a full indexing of all of the warscrolls. We have a full overview of the core and advanced rules, plus our thoughts on Spearhead generally, but the real star of the show for a new player is the Skaventide box.
There is a somewhat pedantic discussion on if boxes like Skaventide or Dominion or Leviathan are made for new players or are a starter box. They often have a high price but great value, come with a core rulebook, and use push-fit models that don't technically require any glue. However, the forces are often unbalanced from a competitive standpoint and the imagined first time purchaser (often two kids or roommates) are being set up for a bad experience since one side dominates the others. Worse, when the "better" player starts going to events or seeing other armies they can find that winning an unfair fight hasn't prepared them for a real challenge. Last edition, with the Dominion box, it quickly became clear that the Kruleboyz side was lacking.
Skaventide is actually one of the best boxes and systems for people who are brand new to Age of Sigmar and serves as a great entry point for the game. For returning players we recommend playing Spearhead to experience the new combat ranges, ability system, and terrain rules. It shouldn't take more than a game or two before you're going to be cooking up 2000 point lists or running a path to glory weekly game with friends. In any case, we're going to go through how to play Spearhead, the components you need from the Skaventide Box, and try to provide some limited guidance on what we have found is good and bad.
How to Play
Spearhead is a four round battle that uses the core rules of the new edition and significantly modifies the advanced rules. While a great deal of these advanced rules, like Magic and Army Construction, are often the biggest joys for many players. Cooking up a spicy list, countering something specific in the meta, or just seeing how many hobgrots you can legally fit in a list are all fun parts of Warhammer. However, when you're first starting having two more or less balanced forces is great. Contesting objectives, scoring battle tactics, and reinforcements are new or significantly different.The fundamental principle of Age of Sigmar – sit units on points and do side quests for other points – remains intact in the new edition. Spearhead, with the 12 card tactics deck, simplifies the process of "Battle Tactics" by letting you look at your cards prior to picking a tactic to score. In Matched Play you need to select a battle tactic each round and work towards scoring this tactic.
Build Select Your Army
Unlike prior launch boxes a subset of the Skaven and Stormcast Eternals form two Spearheads. Instead of attempting to figure out how many models make a balanced force you can choose one of the two spearheads. Each one gives a flavor of some of the abilities for the Skaven and Stormcast but both of these factions feature extensive rosters that can either be overwhelming or not generate the synergy needed on the table without the knowledge of list building.
The Vigilant Brotherhood
Our first spearhead, the Vigilant Brotherhood, is comprised of a general in the Lord-Vigilant on Gryph-stalker, a unit of 5 Liberators, a unit of 3 Prosecutors, and the Lord-Veritant. This is a highly mobile force that hits extremely hard. The Prosecutors and Liberators are able to come back as reinforcements but the real strength is being able to run and charge with a unit and charge with 3 dice using the Prosecutors. This army is made to get into combat, hit hard, and win the game. One note about the army is that you might be tempted to keep the Liberators back to take advantage of their bonus to control. Against the Gnawfeast Clawpack this is a disaster. You need to strike them and bring down entire units and the added attacks from the Liberators might make the difference between removing a unit and having it scurry away.Gnawfeast Clawpack
This Spearhead is is led by the Clawlord on Gnaw-beast as the general and has a Grey Seer, a Warlock Engineer, two units of ten Clanrats, and a unit of 3 Rat Ogors. The clanrats can return as reinforcements. This Spearhead has a lot of bodies, some strong fighters in the Rat Ogors and Clawlord, and some extra bodies to compete on all of the points. Protecting your heros with the Rat Ogors while your clanrats scurry on points will allow you to take advantage of your superior numbers. and avoid letting your hero unit get outnumbered.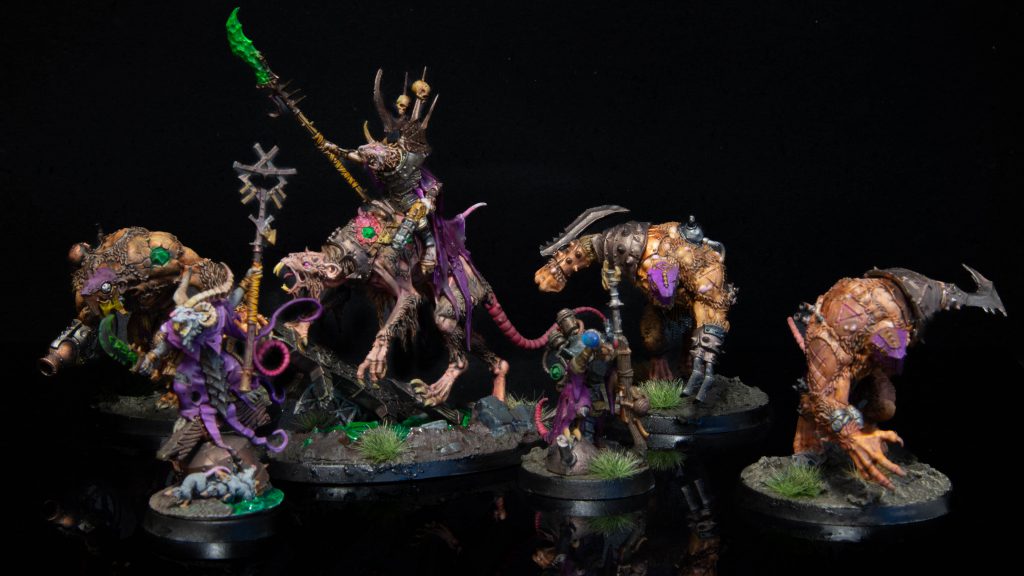 Skaventide Ratties
Set Up
Once you've picked your army, players roll off and the attacker can pick a regiment ability and enhancement followed by the defender. For the Stormcast, retreat and charge is extremely powerful on the small board and playing into Skaven makes the vengeance roll from Blaze to Glory not an effective way of fighting them. On the Skaven side the ability to retreat without taking mortal wounds is exceptional but all true Skaven players will take the ability to do Crit (Mortal) wounds once per game with your general's shooting attack. It's the big red button to press.Each General can pick one of four enhancements. Stormcast's enhancements give a 5+ ward, strike first, Crit (Mortal) to the Generals Greataxe, or reduce the control of every enemy unit contesting an objective once per battle. The Skaven can get a 5+ ward, do 2D6 shots with the pistol, subtract 1 from save rolls for enemy units, or setup reinforcements wholly within 13" of the general. In both cases the ward is a tempting pick to keep your general alive but since both generals are some of the best units to put into action something offensive, like reducing opponents save or strike first, is a better choice in the long run.
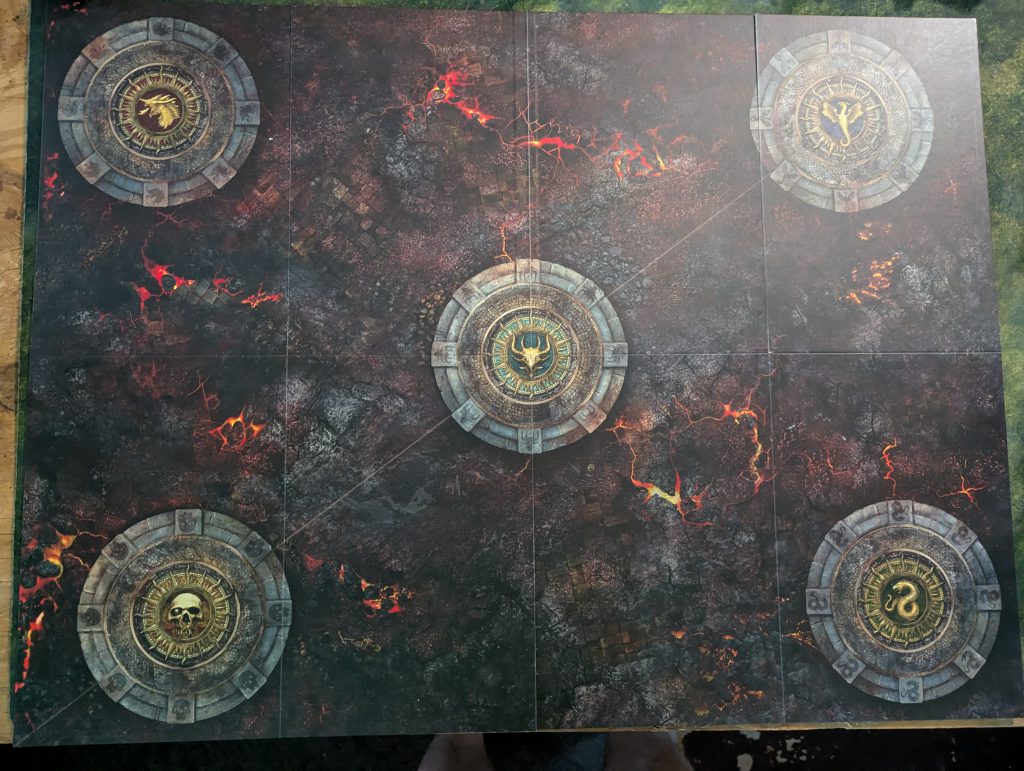 Spearhead Aqshy
The Spearhead board has two sides, Aqshy or Ghyran, and the defender chooses the map and the deployment map. One deployment divides the board in half parallel to the long edge while the other makes a diagonal split. Each player sets up two terrain pieces, deploys, and the game begins.
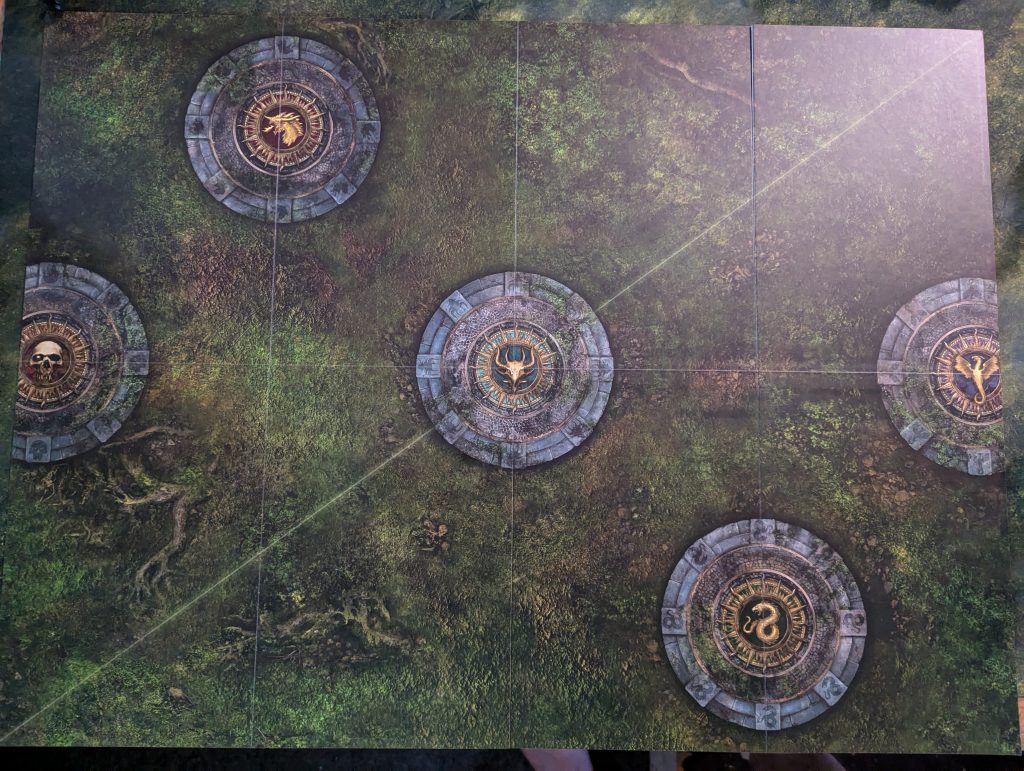 Spearhead Ghyran
At the start of each turn a twist card from the Aqshy or Ghyran deck is drawn that impacts the game in some way. An underdog is picked (or determined if both players are tied and the twist card requires it) and the players draw three tactics/command cards.
In the first round the attacker chooses who goes first and after that the priority roll is used to determine who goes first. If you went second in the prior turn and win the priority roll and go first (the "double turn") you can't draw any tactics/command cards unless you're losing by 5 or more points.
Moving
- You can't move within 3" of your opponents models.
- If you run you can go a little farther, but can't charge or shoot.
- You're allowed to premeasure movement.
We've talked about reinforcements a few times. For The Vigilant Brotherhood the unit of Liberators and Prosecutors are able to be reinforced. Skaven, however, only have the two units of 10 clanrats. Once per turn, in your movement phase, you can bring a reinforced unit back wholly within 6" of the battlefield edge and wholly within friendly territory. You can't replace a reinforced unit a second time.
Shooting
- You're allowed to shoot on your turn with as many units in range as you can.
- Shooting uses the combat sequence.
- You're unable to shoot if your unit is in combat range.
The active player rolls a number of dice equal to the attacks X Models in range. On each weapon profile there will be an indication of what hit roll you need to equal or exceed. Then, those successes are rolled again against the wound on the same weapon profile. Core rules state that hit and wound rolls cannot be modified more 1 net of all the modifiers.
After this your opponent will roll a save, reduced by any rend in your weapon profile. Any failed saves will result in damage that is allocated to units. All damage spills over, so if you do 2 damage to a unit with 1 health models you will kill two of them.
Charge Phase
- You can declare a charge if you didn't retreat or run.
- You need to finish a charge within 1/2" of an enemy model.
Some of the best tactics cards, counter-charge and reroll charges, are used in this phase because the charge roll is so critical.
Combat Phase
- The active player uses non-fight abilities. Then, the opponent does the same.
- Players alternate using fight abilities until they have both fought with all eligible units.
- Units within the 3" combat range must fight and use all of their attacks if able.
It might be tempting to hit back at a unit that fought you. However, most times you're going to want to select a different combat and try to reduce the number of incoming attacks to one of your units.
Scoring
After combat is over we move to the end of the turn where any final abilities (often doing additional mortal damage or impacting the control stat) are triggered and scoring is counted up. Much like the main game when you are the active player you score for holding an objective, holding a second objective, and then holding more objectives than your opponent. Now you can look at your cards and see if you accomplished any of the tactics. If you did you can put those cards down for some extra points.Even if Spearhead isn't the same experience as Age of Sigmar it introduces many of the concepts that are used in the main game. Age of Sigmar has historically had difficulty scaling games down and a real benefit of learning a new game at a smaller scale is the ability to rerack. With the reinforcement mechanics and four round structure it's almost IMPOSSIBLE to be so far behind that you can't catch up until he last turn.
 Credit: Robert "TheChirurgeon" Jones
Spearhead Contents
Tactics and Command Cards
Each player has a tactical deck with 12 cards that serve as battle tactics and command abilities. Below, we have used the first bullet to indicate the tactic and the second to indicate the command. Since spearhead doesn't take advantage of the advanced rules for commands some of the old reliable methods of changing the odds, like rerolling a charge or all out defense, are located on the cards. With 12 cards, and drawing up to 3 each turn, you will always have 3 cards at the start of a turn over the 4 round game. It might be tempting to keep a card that you know you can score later but learning the tactics deck and remembering your outs will help you determine if you can discard or not. It is ALWAYS better to use an ability during the second battle round than just have a card sit in your hand that you discard the next turn anyway. We played our Spearhead games using the two armies in the Skaventide box so our evaluation of the cards is based on how they performed between those factions.The Behemat Dias / Scroll of Arcane Bolt
- Complete the tactic if you control the Behemat objective at the end of your turn.
- Arcane Bolt (Any Hero Phase) Pick a friendly Hero to use this ability and pick a visible enemy unit within 12" of them then roll a dice. on a 2+ inflict D3 mortal damage.
Take the Flanks / Redeploy
- You complete this battle tactic at the end of your turn if there are any friendly units within 3" of each short battlefield edge.
- Redeploy (enemy movement phase) - Pick a friendly unit not in combat - you can move up to D6 but cannot move into combat.
Hold Ground / Rise to the Challenge:
- Complete this battle tactic if there are more friendly models contesting the Large Terrain Feature in your territory than there are enemy models contesting it.
- Any Combat Phase - Declare a friendly hero to use this ability, Heal (D6) that Hero.
War of Attrition / Stand Guard
- You complete this battle tactic if any enemy units were destroyed and more enemy units than friendly units were destroyed this turn.
- Enemy Hero Phase - Pick a friendly unit to get Strike First this turn.
The Dracothion Dais / Go to Ground
- You complete this battle tactic if you control the Dracothion objective at the end of your turn.
- Reaction - Opponent declared a shoot ability: Until the end of the phase only unmodified hits of 6 successfully hit. This unit has Strike-Last this turn.
Do Not Waver/ Fall Back and Rally
- You complete this battle tactic at the end of your turn if any friendly units used a fight ability and no friendly units were destroyed this turn.
- Reaction - You declare a retreat ability - No mortal damage is inflicted on the unit that used the retreat ability. In addition, after the ability is resolved, roll 1 dice for each slain model from that unit. For each 5+ you can return 1 slain model to that unit.
Raid / Steel Defense
- Have a unit wholly within enemy territory and not in combat.
- Reaction - Opponent declared an attack ability. Ignore the Rend characteristic of attacks that target that unit.
The Ignax Dais / Forward to Victory
- Hold the Ignax Dais
- Reroll a Charge Roll
Raze / Inspiring Presence
- Complete this tactic if there are any friendly units within 3" of the long battlefield edge in enemy territory.
- Any Hero Phase - Roll a dice for the rest of the turn add the number rolled to the control score of that hero.
Attack on Two Fronts / Call Reinforcements
- Complete this battle tactic if you control 2 objectives that were controlled by your opponent at the start of the turn.
- Call Reinforcements (Any Movement Phase) Pick a friendly infantry or Calvary unit with 5 or more models that has been destroyed and not already replaced. Set up a replacement unit with D3 models from that unit anywhere on the battlefield more than 6" from all enemy units.
Cut Off the Head / Counter-Charge
- You complete this battle tactic at the end of your turn if the enemy general was slain this turn or if the general was slain prior to this turn and any enemy units were destroyed.
- Enemy Charge Phase - Use a charge ability as if it were your charge phase.
Take Without Warning / Fight to the Last
- Gain control of an objective controlled by your opponent and none of the units contesting it used a fight ability.
- Reaction - Opponent declared an attack ability - get a 5+ war this phase.
Overall you should be able to pick up 5-6 extra points using the battle tactics in a game. On the turns you're not you should be using the command abilities to get an upper hand in the fight. Only the most powerful commands, like Counter-Charge or Rise to the Challenge, should be kept when a turn starts.
Gyran Twist Cards
Ghyran twists focus healing and movement debuffs reflecting the constant struggle between Alarielle and Nurgle. * indicates that players roll off for the underdog if both players are tied.- Take The Land: Each player scores 1 extra victory point at the end of their turn if there are more friendly models contesting the large terrain feature in enemy territory than there are enemy models contesting it. In addition, the underdog adds 1 to wound rolls for attacks made by friendly units that target a unit contesting the a large terrain feature.
- Alarielle's Blessing*: The underdog can pick one of the effects 1) Shield of Thorns: Pick a friendly unit on the battlefield. That unit has Ward (6+) this battle round. Add 1 to the ward if this unit already had a ward. 2) Rain of Jade: Pick up to 3 different friendly units on the battlefield. Heal (D3) each of those units
- The Grandfather's Blessing*: The underdog can pick one of the effects 1) Pick an enemy unit on the battlefield. Subtract 1 from save rolls for that unit this battle round. 2) Pick an enemy unit on the battlefield. Ward Rolls cannot be made for that unit this battle round.
- Grasping Vines*: The underdog picks an enemy unit on the battlefield. Until the end of the battle round halve its move characteristic and roll 1 fewer dice when making a charge roll.
- Lifespring*: The underdog picks 1 objective on the battlefield for the battle round. Each player scores 1 extra victory point and Heal (1) at the end of each turn.
- Reclaim Ghyran: The underdog picks 2 objectives that score an extra victory point. If there is no underdog each player picks 1 objective.
Aqshy Twist Cards
Aqshy twist cards focus on fire (doing damage) and smoke (blocking visibility or objective control). * indicates that players roll off for the underdog if both players are tied.- Mount the Attack: Each player scores 1 extra victory point at the end of their turn for each objective they control that was controlled by their opponent at the start of their turn. The underdog picks 1 friendly unit to get Charge (+1 Damage) for this battle round.
- Wreathed in Smoke*: The underdog picks 1 objective. Until the end of the battle round only unmodified hit rolls of 6 that target a unit contesting that objective are successful.
- Ring of Fire*: The underdog picks 1 objective. This objective can no longer be contested or controlled this battle round. At the end of each turn inflict D3 mortal damage on each unit that has models on the objective.
- Bloodmarked: The underdog picks 2 enemy units that score a victory point when destroyed. If there is no underdog each player picks 1 unit.
- Let the Blood Flow: Each player scores an extra victory point for each enemy unit destroyed. The underdog picks 1 unit to get +1 to hit for the battle round.
- Reclaim Aqshy: The underdog picks 2 objectives that score an extra victory point. If there is no underdog each player picks 1 objective.
Next Steps
After a game or two of Spearhead there is nothing wrong with taking the rest of the models in the Skaventide box and playing one of the matched play missions using the cards included in the box. An even better situation would be playing a full 2,000 point game. But if that's still too daunting, no worries - Spearhead is a solid game and one we think has legs to stand on its own long-term.Have any questions or feedback? Drop us a note in the comments below or email us at contact@goonhammer.com. Want articles like this linked in your inbox every Monday morning? Sign up for our newsletter. And don't forget that you can support us on Patreon for backer rewards like early video content, Administratum access, an ad-free experience on our website and more.