The Flesh-Eater Courts are a twisted force of cannibalistic ghouls, humans who have succumbed to a cannibalistic curse which caused their bodies and minds to atrophy, driving them slowly insane. The most horrific part of the curse however is not what it does to their bodies, but to their sanity: Due to the horrible curse placed upon them, the former nobles of the Flesh-Eater Courts believe they are still noble nights and aristocrats. Where others see rags and flayed flesh, they see noble armor and silken finery. Where sane beings see piles of viscera and offal, the flesh-eater courts see grand feasts of cooked food. And while the decrepit ghouls of the courts believe they are speaking honeyed words and eloquent poetry, they are in fact just delivering guttural howls and horrific screeching.
This all translates to one of the game's most interesting armies, with some really cool visuals that emphasize the shared insanity of the faction lurking beneath the surface. From a painting standpoint, the faction offers a ton of interesting details and challenges, from painting fresh gore to ghoulish flesh. But it's also a faction which offers a lot of variety, from interesting techniques to units which are visually very different.
Where to Read More
There aren't a ton of books which feature the Flesh-Eater Courts, but of those the most highly recommended is Ghoulslayer by Darius Hinks, which includes some sections written from the perspective of the faction. The Dawnbringers series of campaign books from the end of Age of Sigmar's third edition also has a fair amount of lore to read about the faction, and coincided with the faction's big re-launch.Covered in This Article
- How to paint the ghoulish bodies of the Flesh-Eater Courts
- How to paint rotting and gross flesh
- Notes on painting gore and viscera
- How to paint rusted metal
- Different ways to paint ghoul flesh
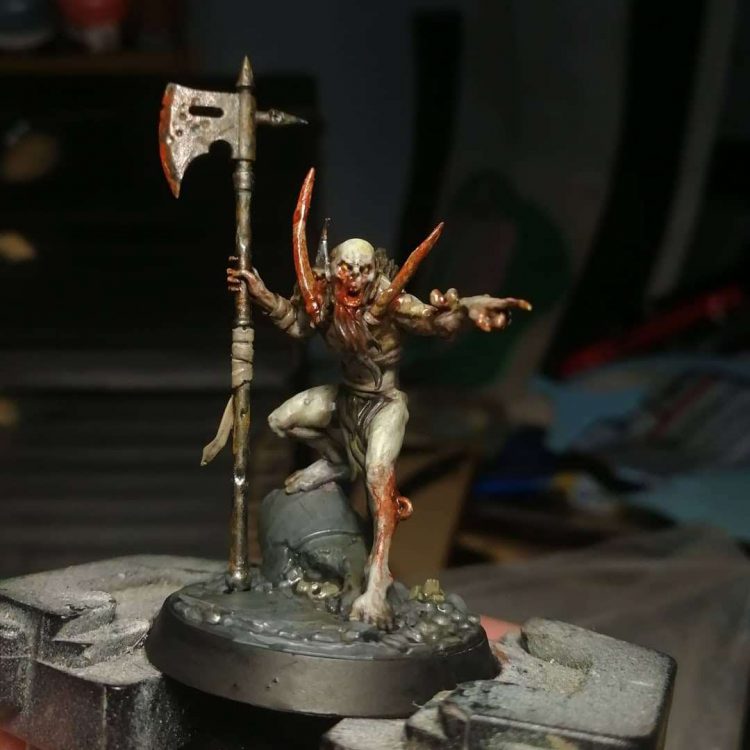
The ghoulish legions of the Flesh-Eater Courts may think they're wielding shiny, pristine lances into battle, but the reality is they're typically seen carrying rusted and gore-soaked implements, neglected and mis-used.
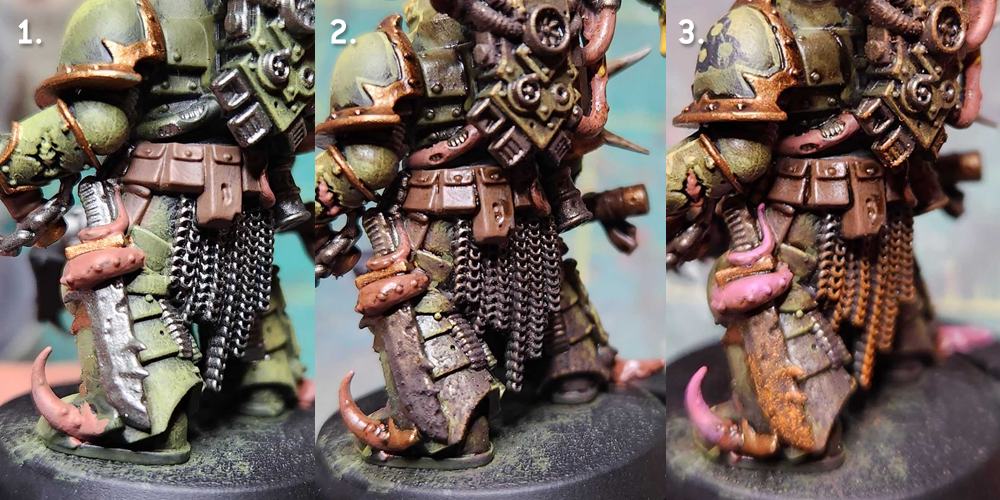
TheChirurgeon: There's a fairly simple three-step process for painting rusty metal you can use. First you pain the metal object using Leadbelcher or another appropriately dark silver. Next you wash the metal with Agrax Eartshade and once that's dry you coat it down with Typhus Corrosion. This will both give it a nasty patina but also a gritty texture, with larger grit for more paint applied. Once that dries you can drybrush it with Ryza Rust and boom - easy rusted metal.
There are a few other things you can do after this. You can pick out the sharp edges with Runefang Steel to show areas where the object has still been in use and the rust shaken off. You can also just coat the whole thing in Nurgle's Rot to give it a sickly green sheen that makes it look wet, like it's dripping with venom, if you want to make the weapon look coated in poison or venom.

Maxi_the_Pigasus: Depending on how you feel, there are three classic, primary ways to paint ghoul flesh: pale or white, bluish gray, or sickly green. In this section I'm going to run through methods for painting all three.
All of this is done over a basecoat of Grey Seer primer, so you can batch the army all at once and then break up your project into piles for each color, so you can really stretch the model line of your Flesh Eater Courts. They’re lovely models, but with only three unit kits, you need something to break it all up. These tutorials are using layering techniques, but you could also drybrush this and at the end there’s some examples of this on Crypt Horrors.
Pale Green
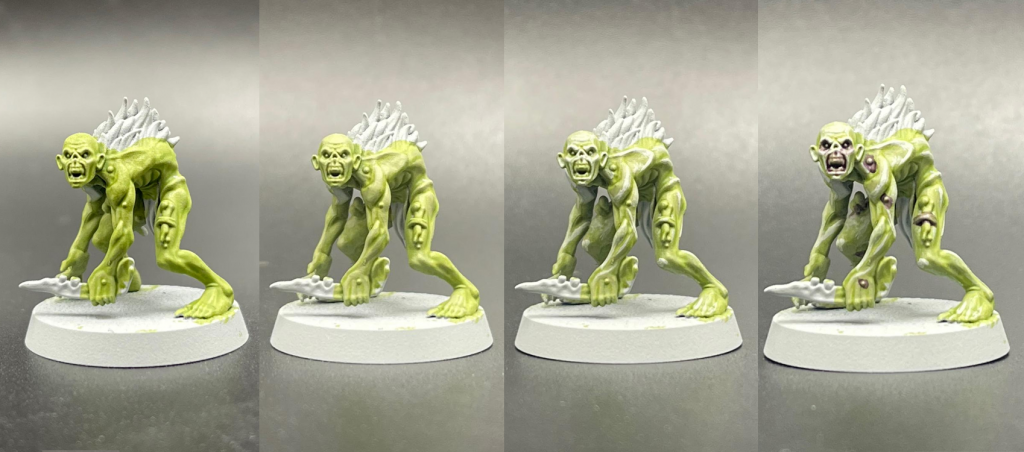 Basecoat: Starting from a basecoat of Gray Seer, apply a layer of Gutrippa Flesh contrast across the model. Don’t worry about any splotching, as the next two steps of layering will fix this.
 Layering: Working up from the basecoat, apply a layer of Nurgling Green across the model leaving the contrast in the recesses. This color isn’t too much different from the basecoat, but once you have the highlight on you will see the distinction.
Highlights: Apply a highlight of Deepkin Flesh across all the raised edges of the ghouls skin. With this on, you can really start to see the difference in color from the previous steps.
Washing: Now to the fun part, for this scheme I used Druchii Violet to pick out the eye sockets, inside of the mouth, all the skin that’s pierced, and all the pustules and scars across the skin.
Pale Blue/Grey
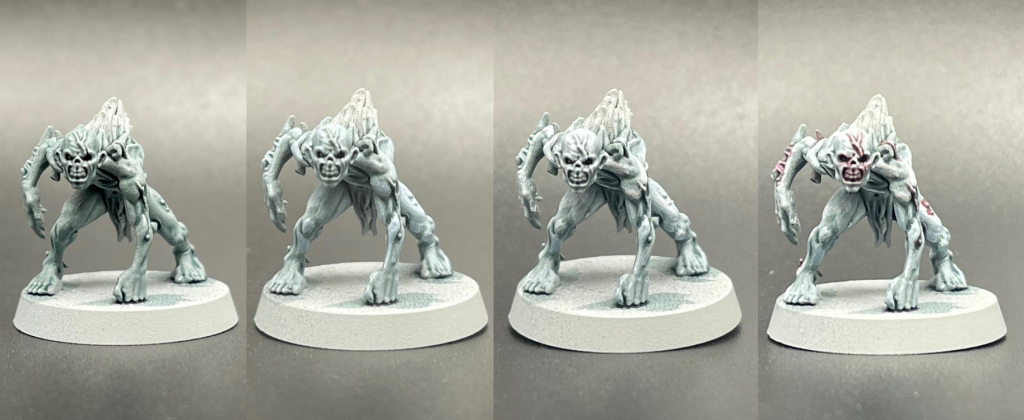
Basecoat: Starting with Grey Seer primer, apply Gryph-Charger Grey across the model. Again, don’t worry about splotching as we will cover all the raised areas in the next steps.
Layering: Hit all the raised muscles with Blue Horror, which is usually super bright but thinned just a tad goes over wonderfully overtop the Gryph-Charger.
Highlights: Hit the raised edges around the model with White Scar, again thinned just a bit so you can fade it in.
Washes: Apply Carroburg Crimson over the eye sockets, inside of the mouth, scars, pustules, and the pierced skin.
Dirty Pale
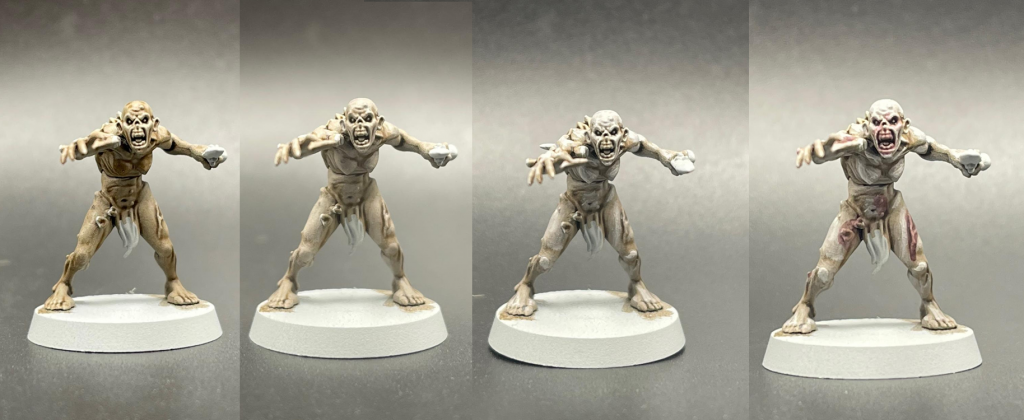
Base coat: Over the Grey Seer primer, apply Agrax Earthshade. The new formula is great for this as it’s thinner than before, leading to less tea-stains across the model.
Layer: Go across the skin with Rakarth Flesh, leaving the shade in the recesses.
Highlight: Apply thinned Pallid Wych Flesh across the edges of the model, fading it from the points of the muscles back.
Washes: Carroburg Crimson into the eye sockets, mouth, pustules, scars, and piercings.
All three of these took an hour total bouncing between all three, if you batch these steps for just one scheme you can get your questing force of heroic knights done pretty quick. On average it takes me about three hours to get a twenty man ghoul unit done, with some quick contrast over the hair/fur.
As promised, here’s some pictures of the horrors showing the same colors, just drybrushed:
 Credit: Maxi_The_Pigasus
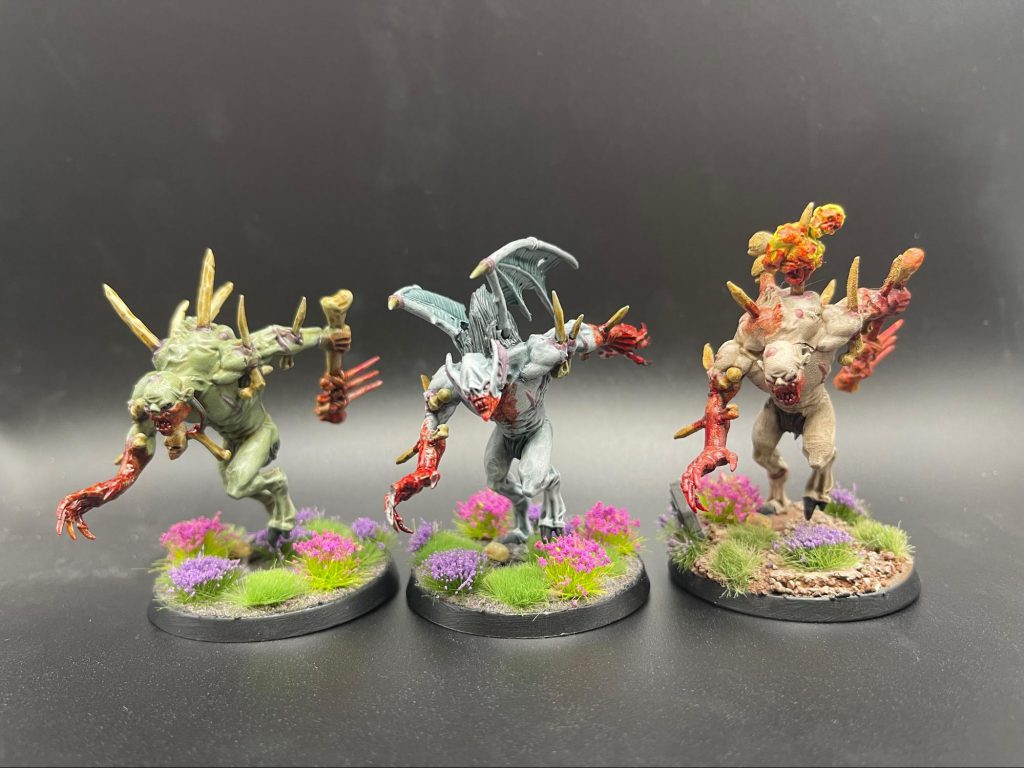
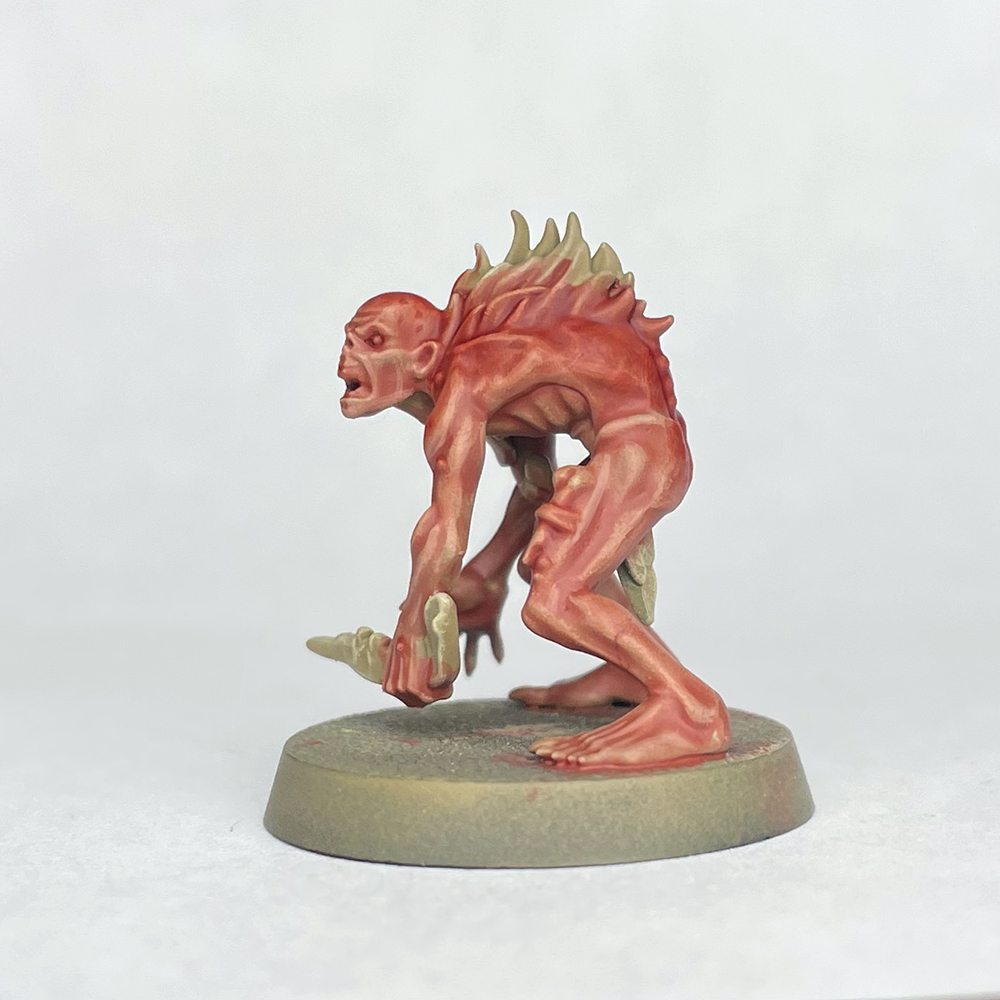
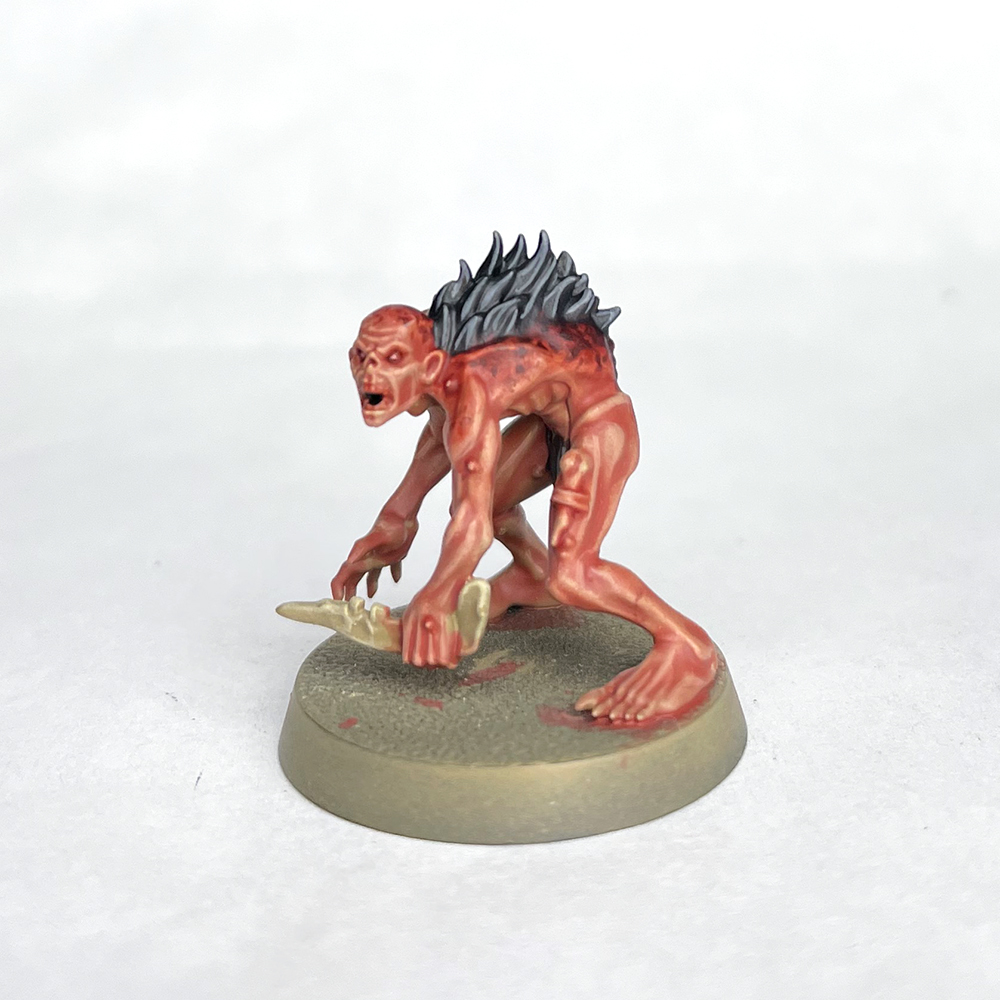
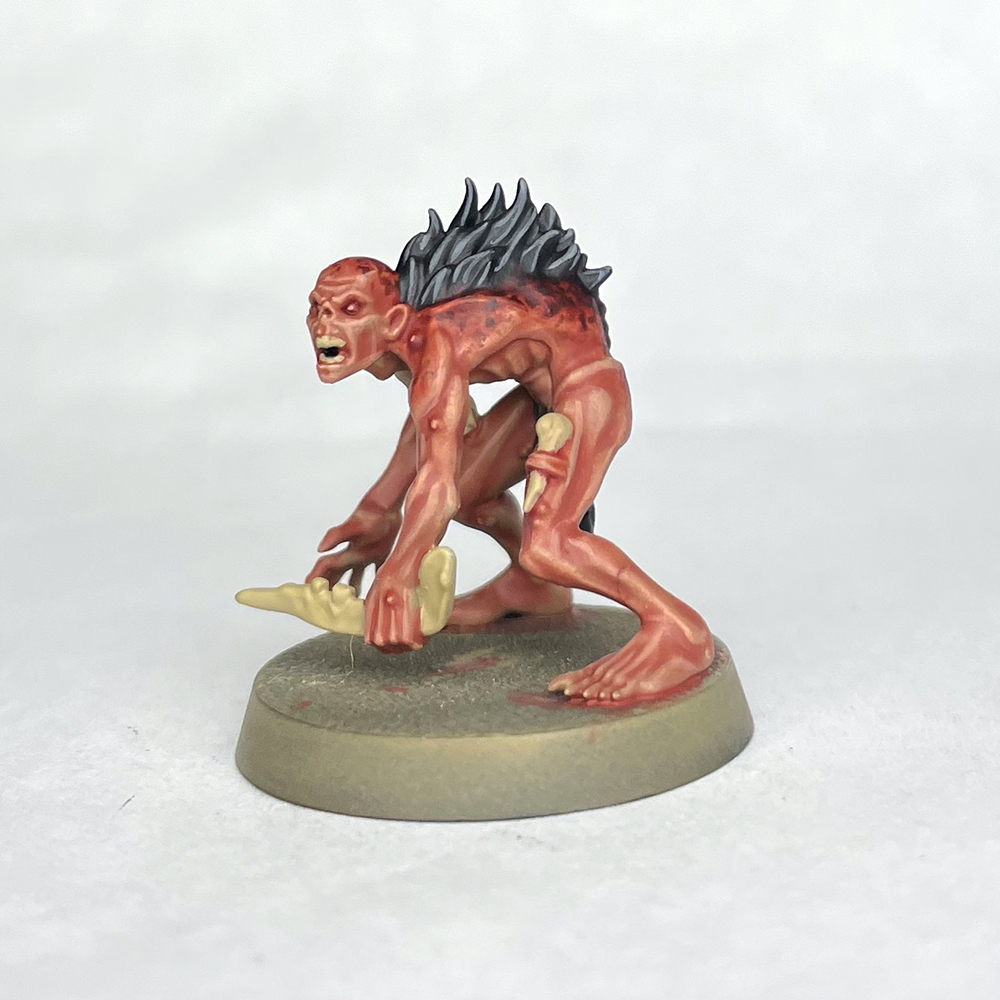
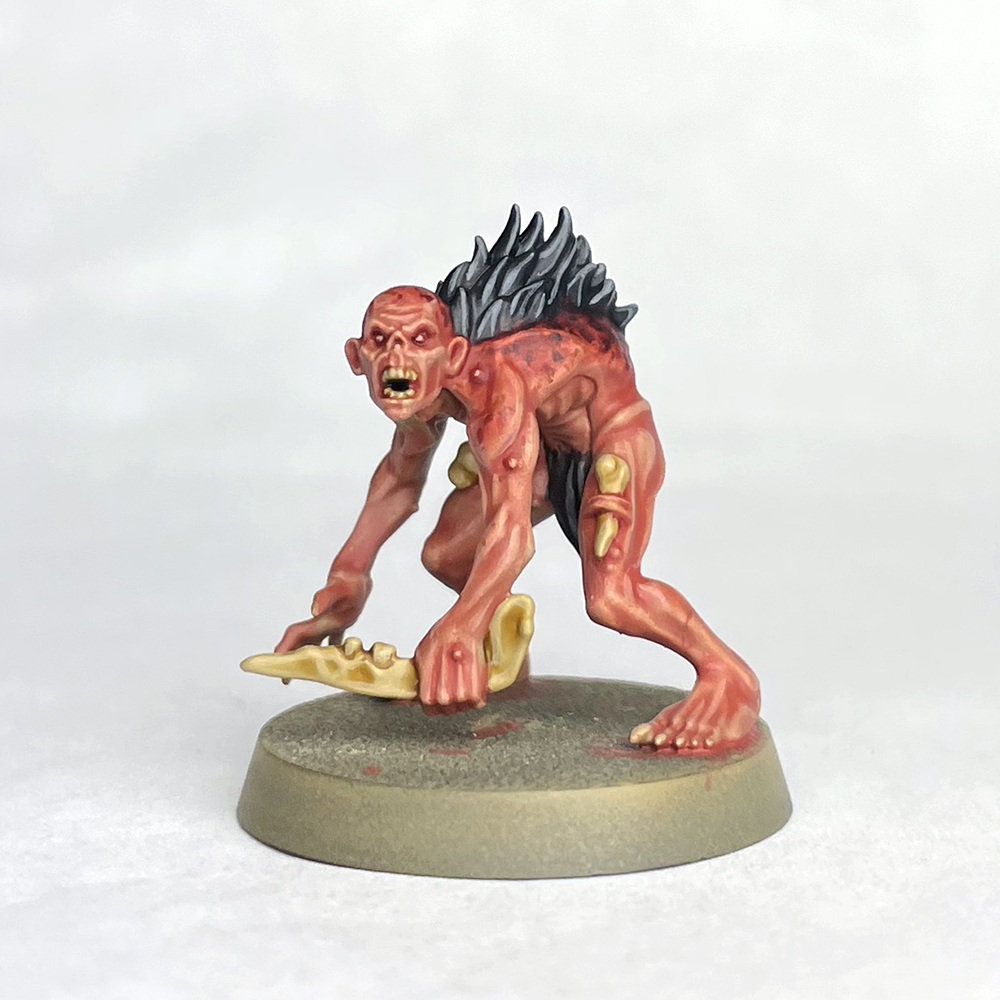
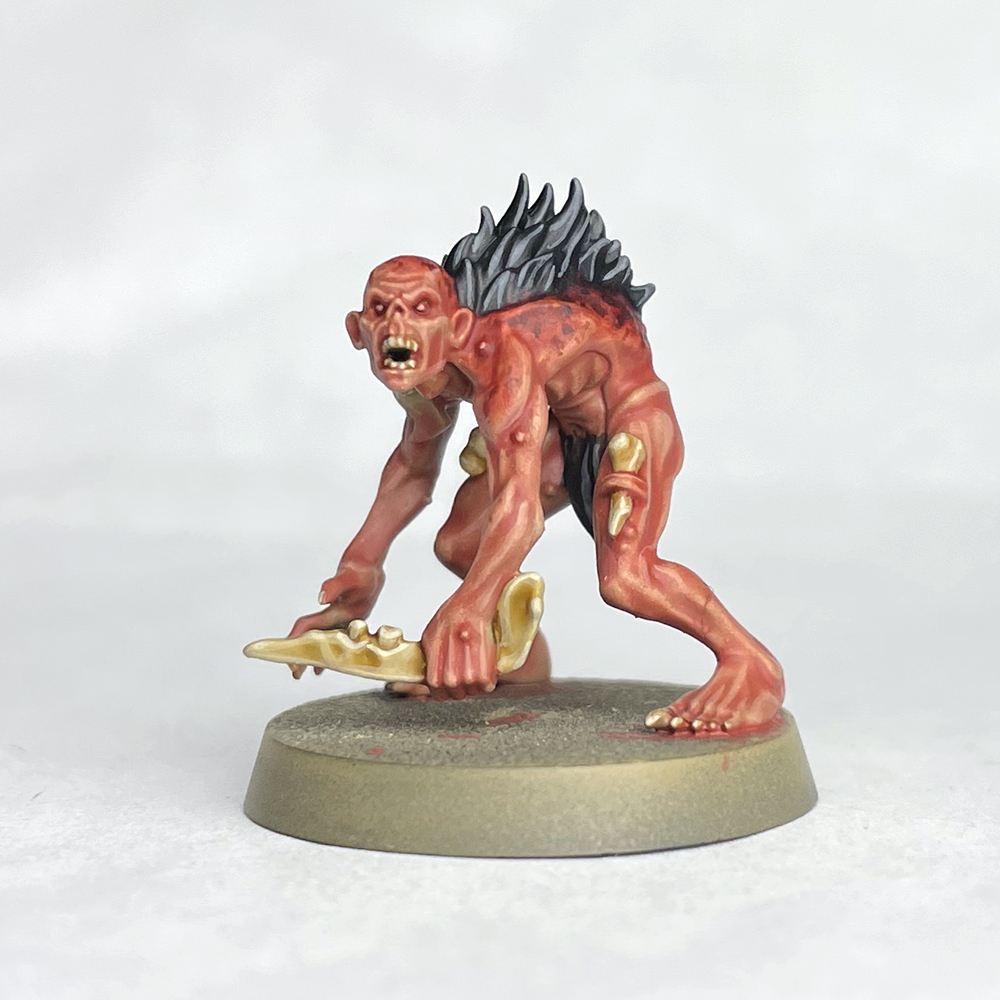
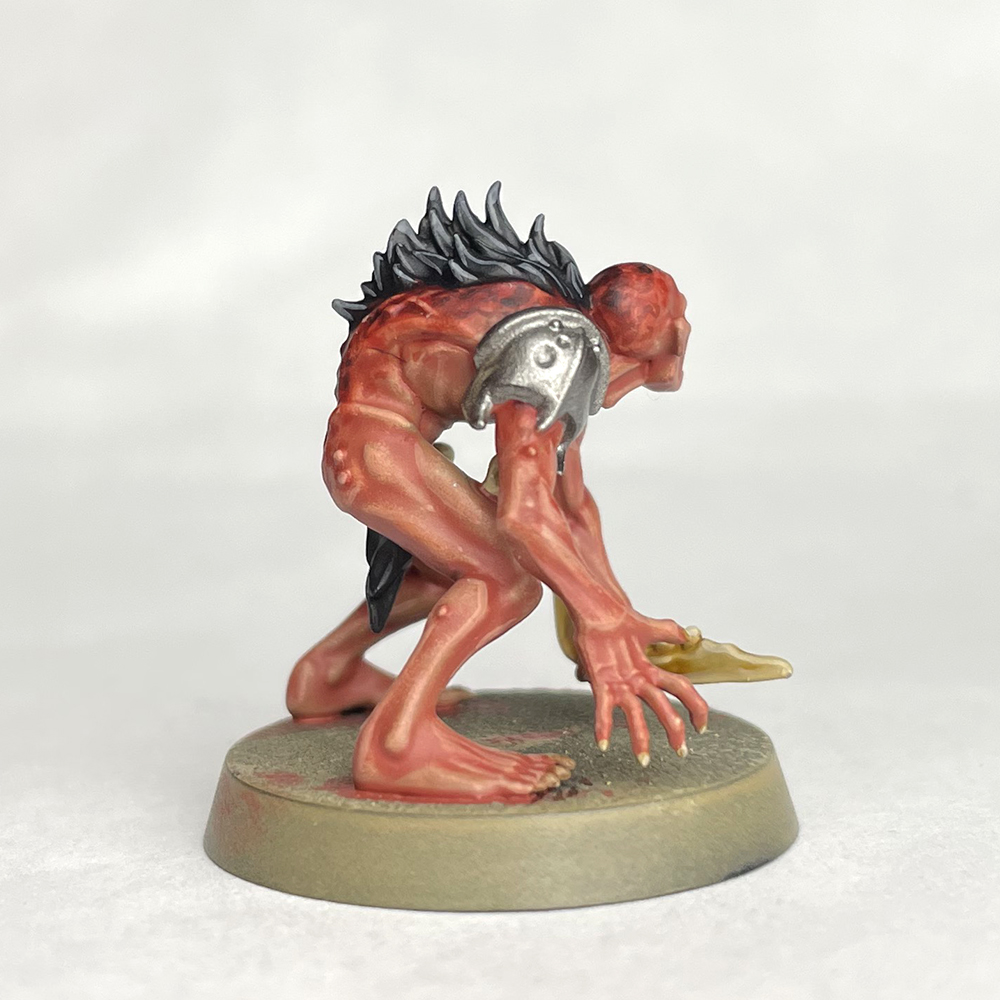
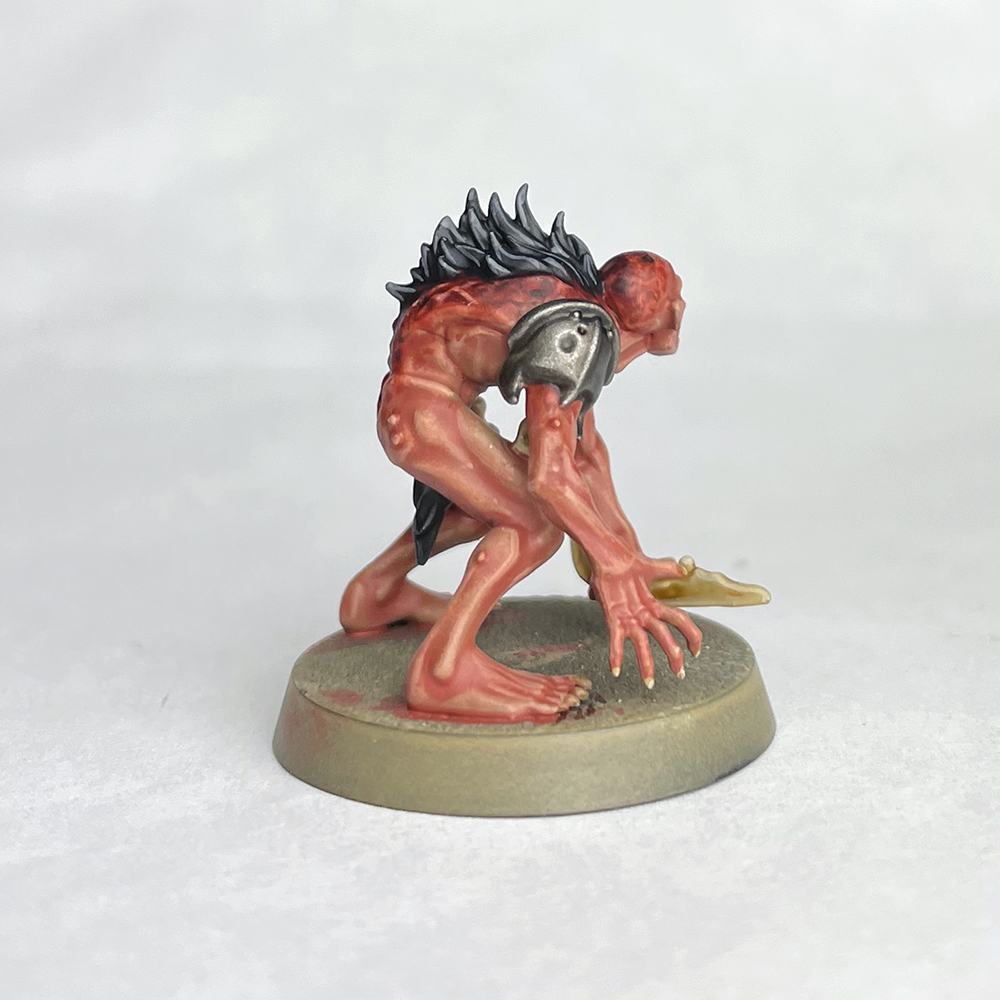
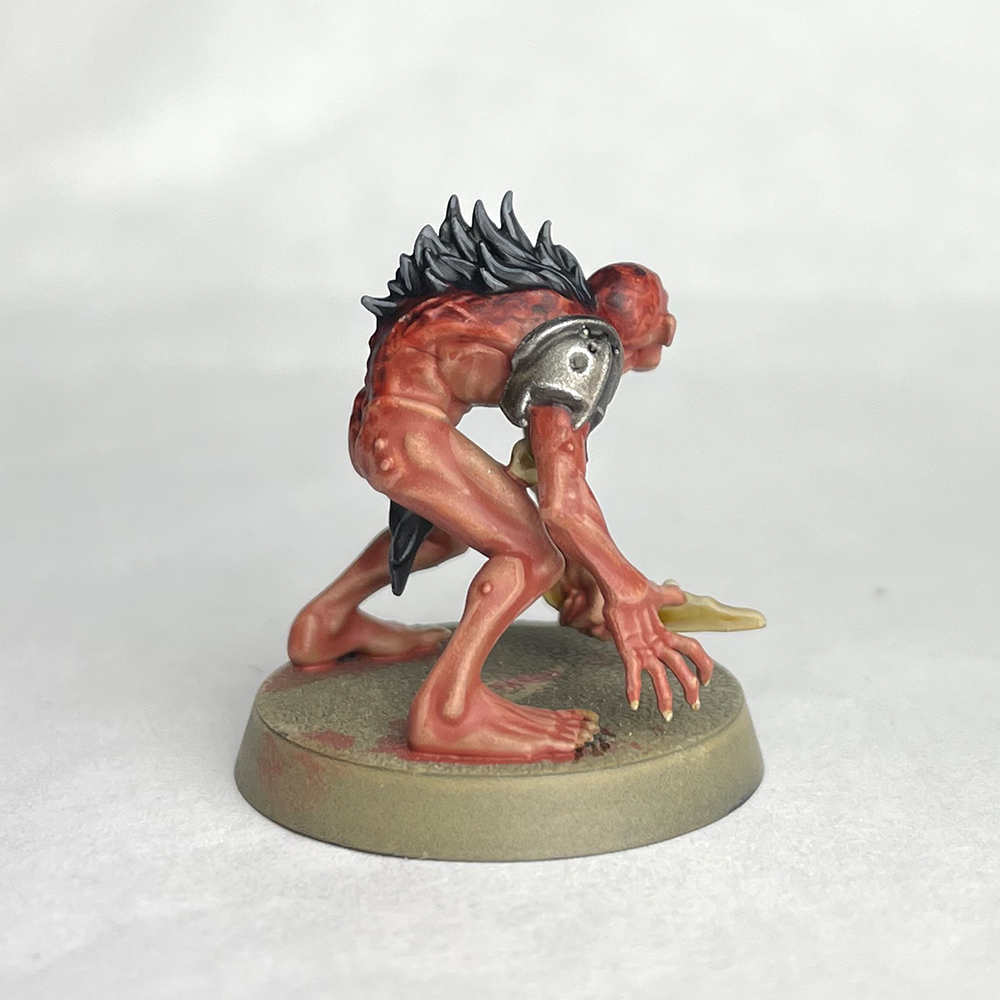
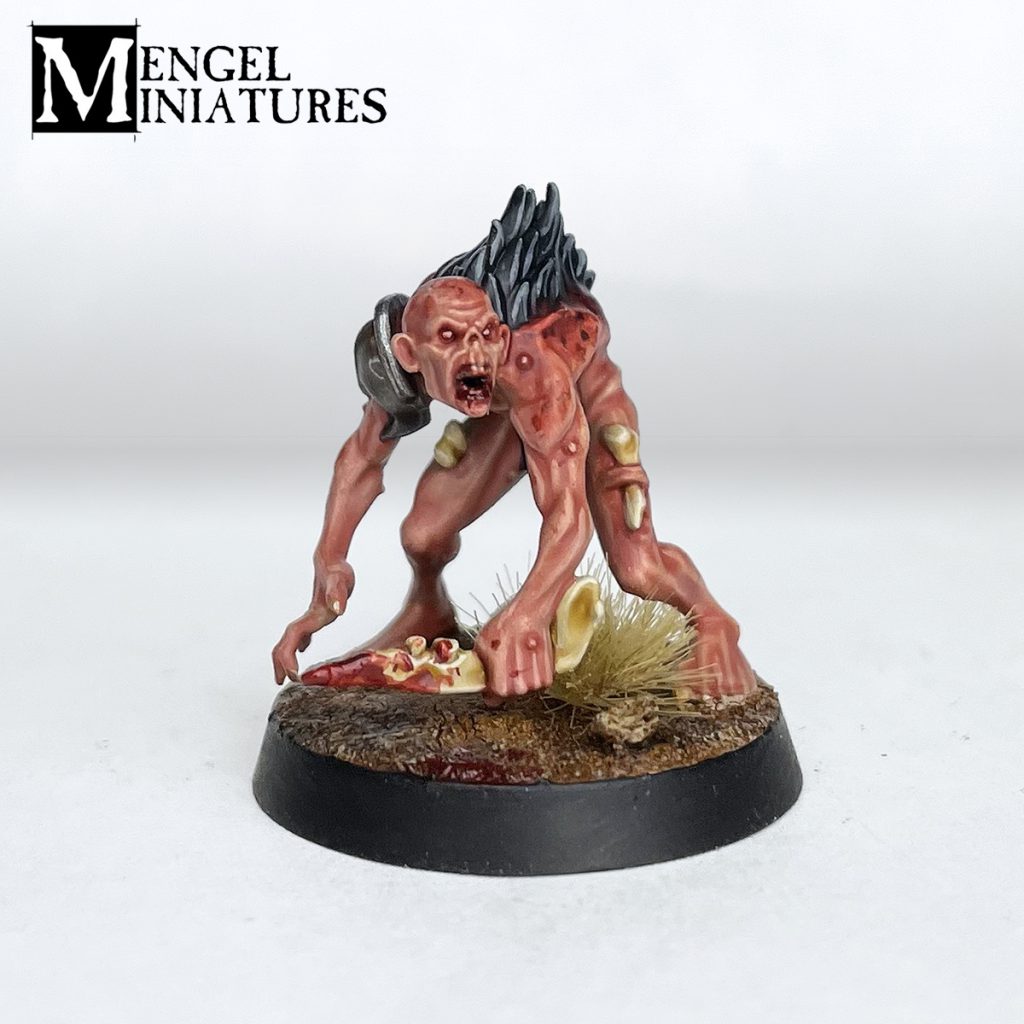
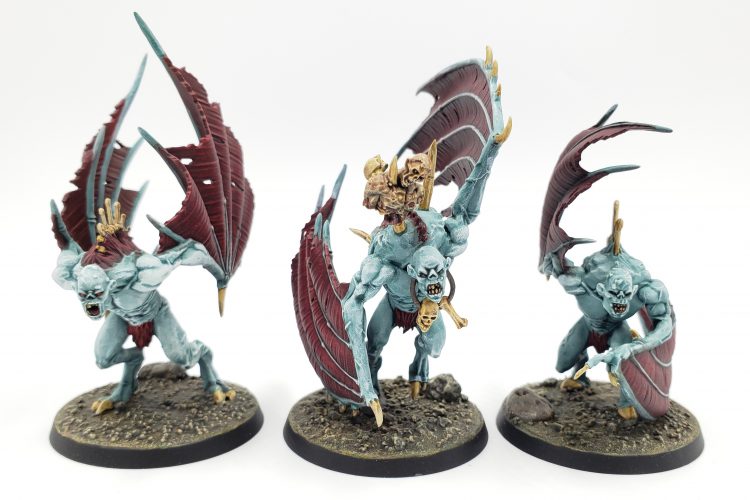
The Flesh-eater Courts have been a staple of the Age of Sigmar since very early in its life. The lore behind these delusional ghouls has been a fan favorite ever since as well. While typically depicted in either pale or rotting green colors, as is appropriate for the denizens of Shyish, the Realm of Death, there has been one color scheme that's bucked this trend ever since their 2nd Edition Battletome, the Blisterskin! These cannibalistic knights live in the blindingly bright realm of Hysh, the Realm of Light, and are also fans of taking to the air. What they're not fans of though, is applying the appropriate amount of Sun Screen before going outside, giving them a decidedly crispy appearance. This slightly orange look with plenty of burnt skin is unlike anything else in the Death range, and something that I've been a fan of ever since I first saw them. Having never painted any before, this seemed like the perfect time to rectify that. I also wanted to figure out a way to paint this scheme using as much Contrast paint as I could, since their almost wholly organic look is perfect for it. Without further ado, don your sunglasses, find a hat with a big brim, and venture into the wilds of Hysh with me to paint up some Blisterskin ghouls!
The Skin
 Credit: Tyler Mengel - Mengel Miniatures
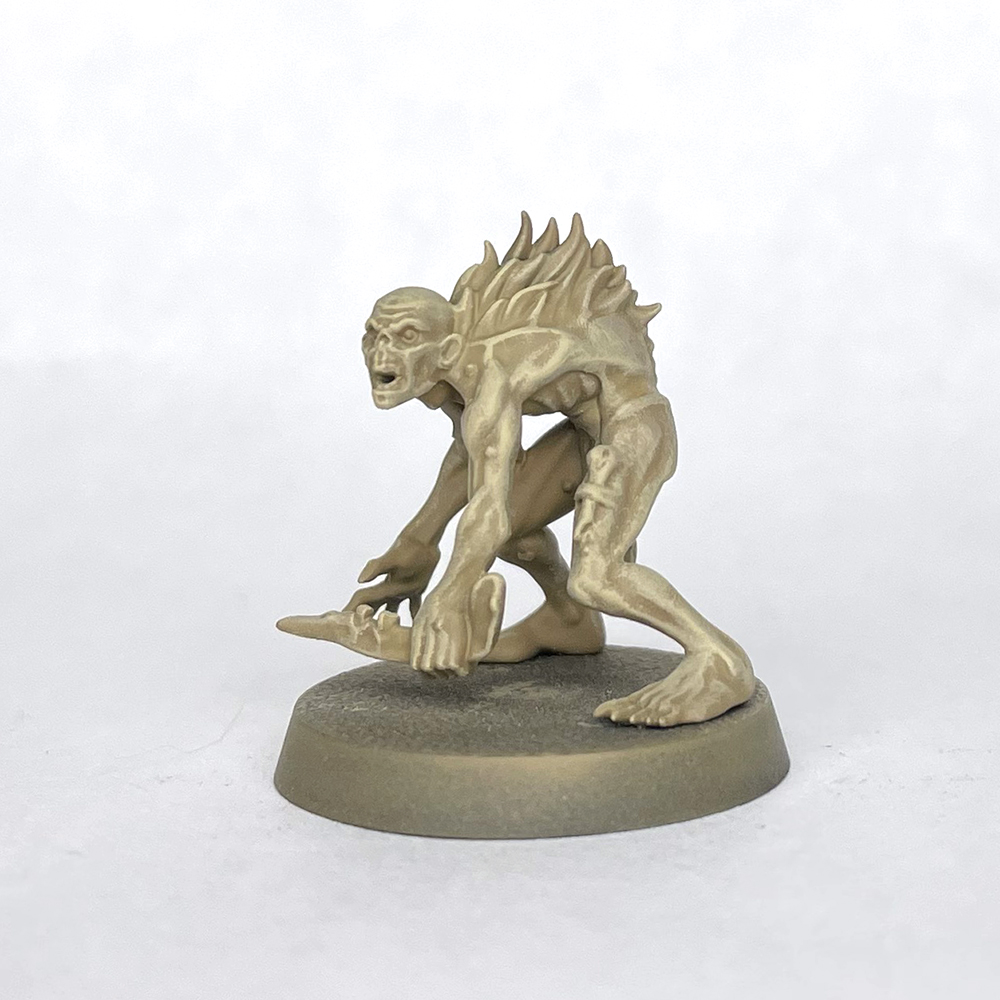
Step 1.
The model was primed with Zandri Dust spray and then given an all over drybrush of Ushabti Bone.
 Credit: Tyler Mengel - Mengel Miniatures
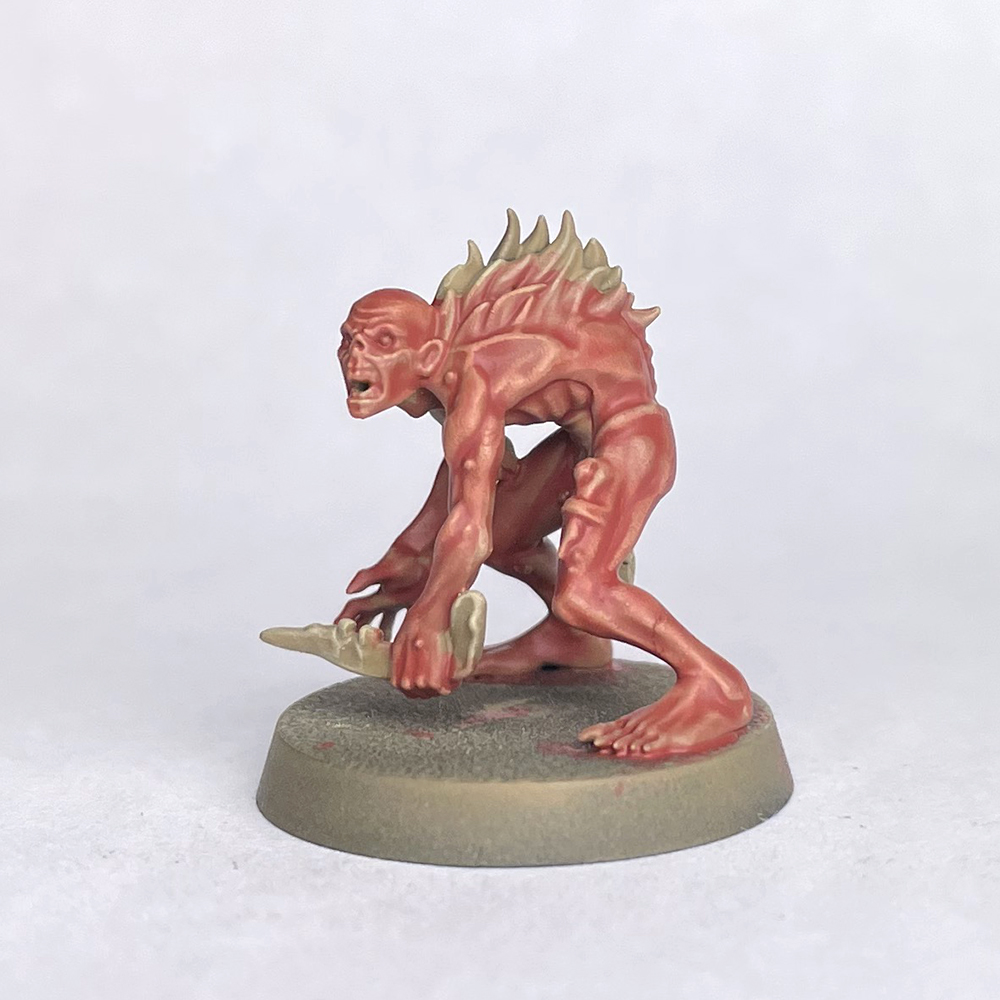
Step 2.
Now comes the fun and unusual part. I could describe this mixture with a mathematical formula, but I think it's easier if I just break it down in a more natural way. I start off with a 50/50 mix of Bugman's Glow and Gryph-hound Orange. Next I add just a touch of Magamadroth Flame. This is what gives it the majority of the orange tint. It's also a really strong color, so start off with just a little bit, mix it in, and then add more of if you need to. I just did a little dab of the brush tip basically for mine. Once that's all mixed I added in Contrast Medium until it was all the the consistency of Contrast paint, then slather it all over the skin of the model! Like all Contrast paint, you want to make sure it doesn't dry in weird pools. I ended up doing 2 coats on the larger model because I made the mixture too thin on accident for him. If you're doing a whole army of these I would recommend mixing up a big batch of this in a spare paint bottle.
 Credit: Tyler Mengel - Mengel Miniatures
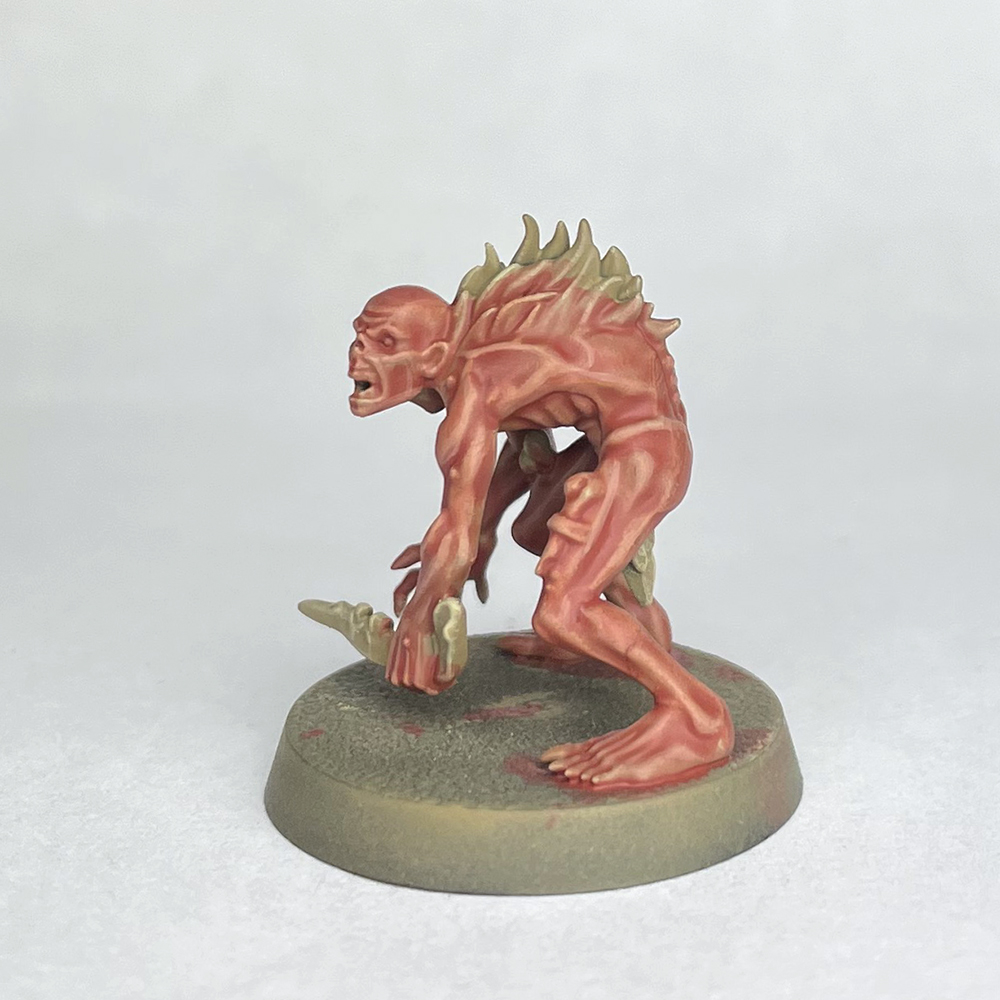
Step 3.
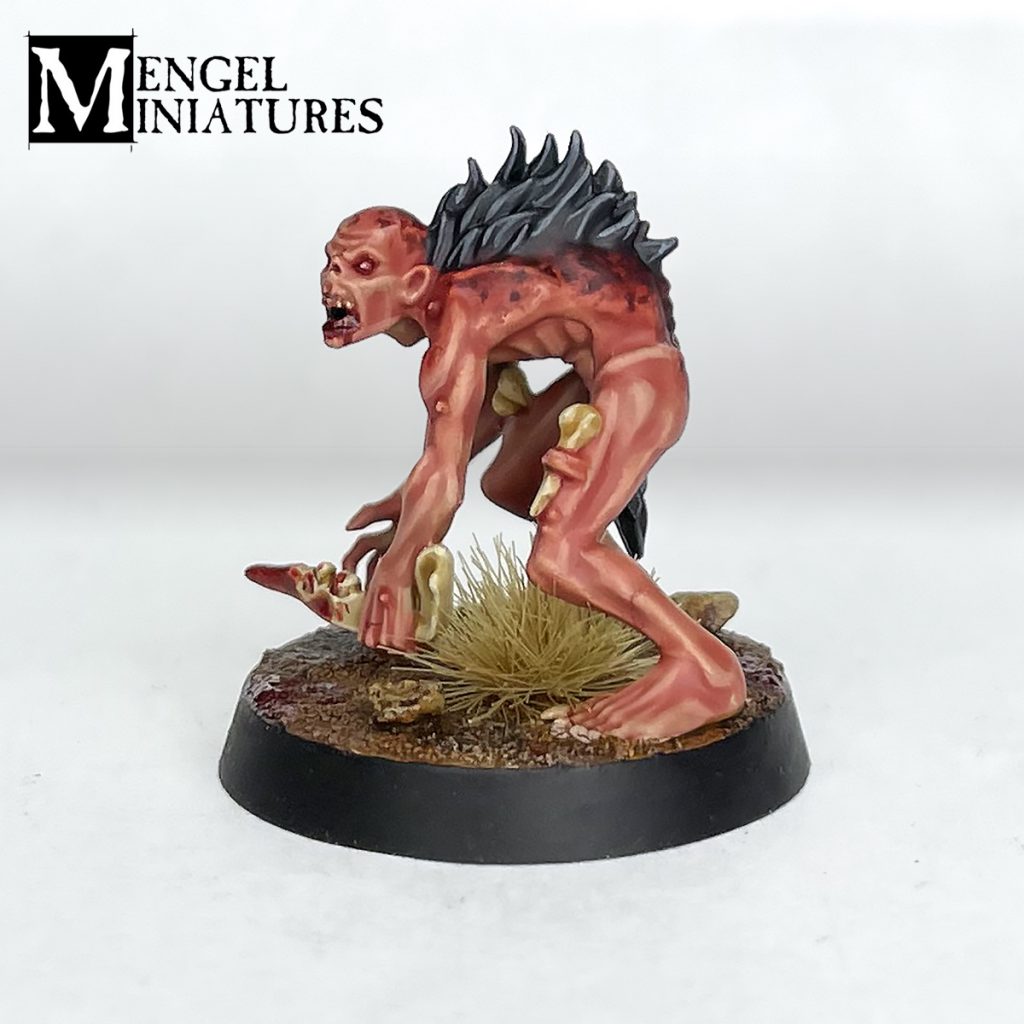
Once this was dry I edge highlighted the skin with Cadian Fleshtone.
 Credit: Tyler Mengel - Mengel Miniatures
Step 4.
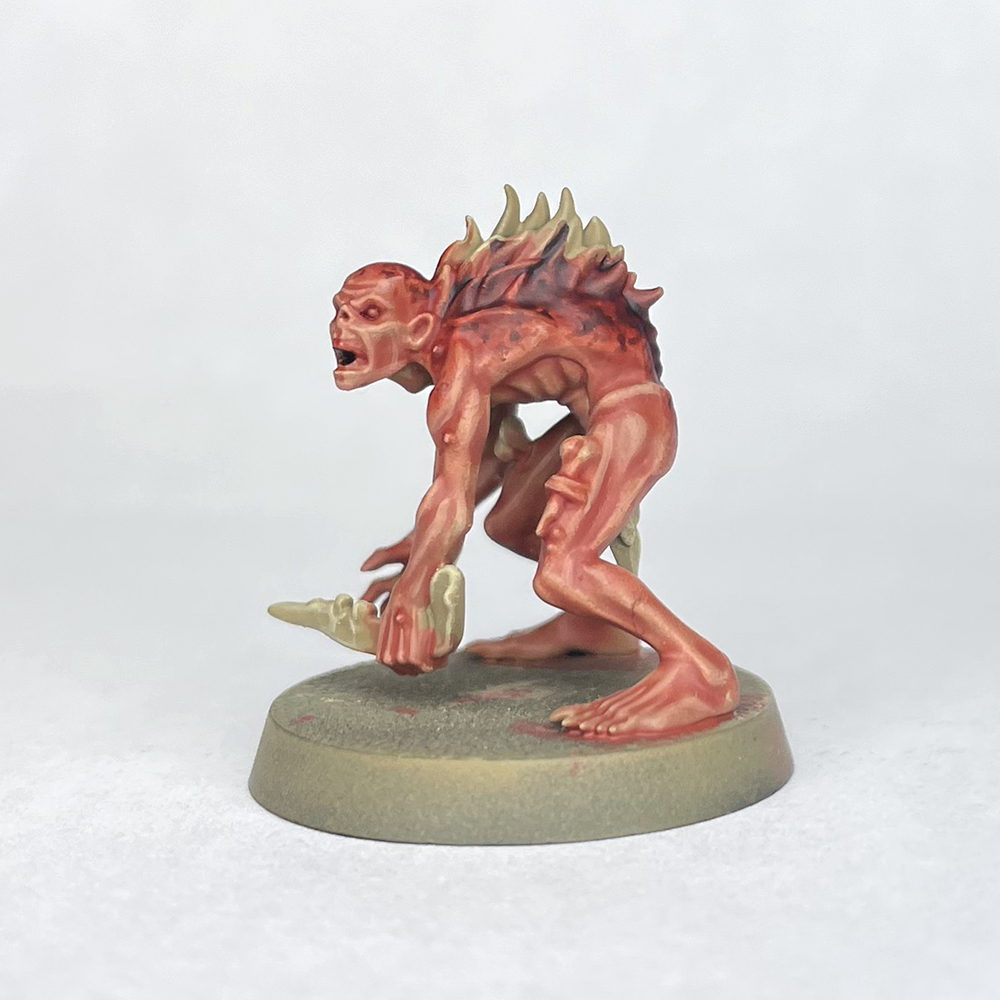
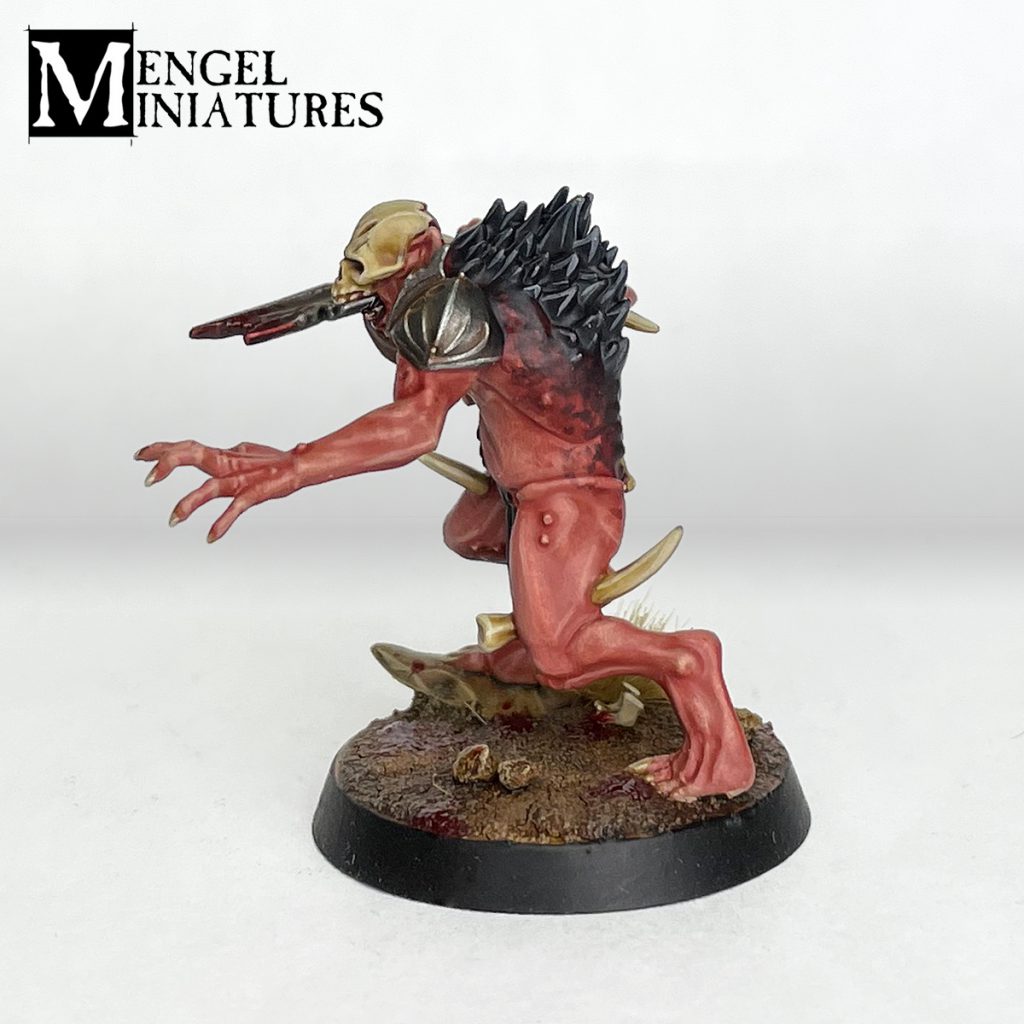
Now we start on the burnt skin of the back. I thinned down some Flesh Tearers Red and started building this up in thin layers on the areas that would be burnt such as the back, shoulders, top of the head, etc. Do this in a few thin layers to build up a gradient. I also did some random blobs of it to look a bit more organic and like patches of particularly burnt skin. I also picked out the boils and scars with this color to make them a bit more raw looking, as well as around the eyes, and in the nose and mouth.
 Credit: Tyler Mengel - Mengel Miniatures
Step 5.
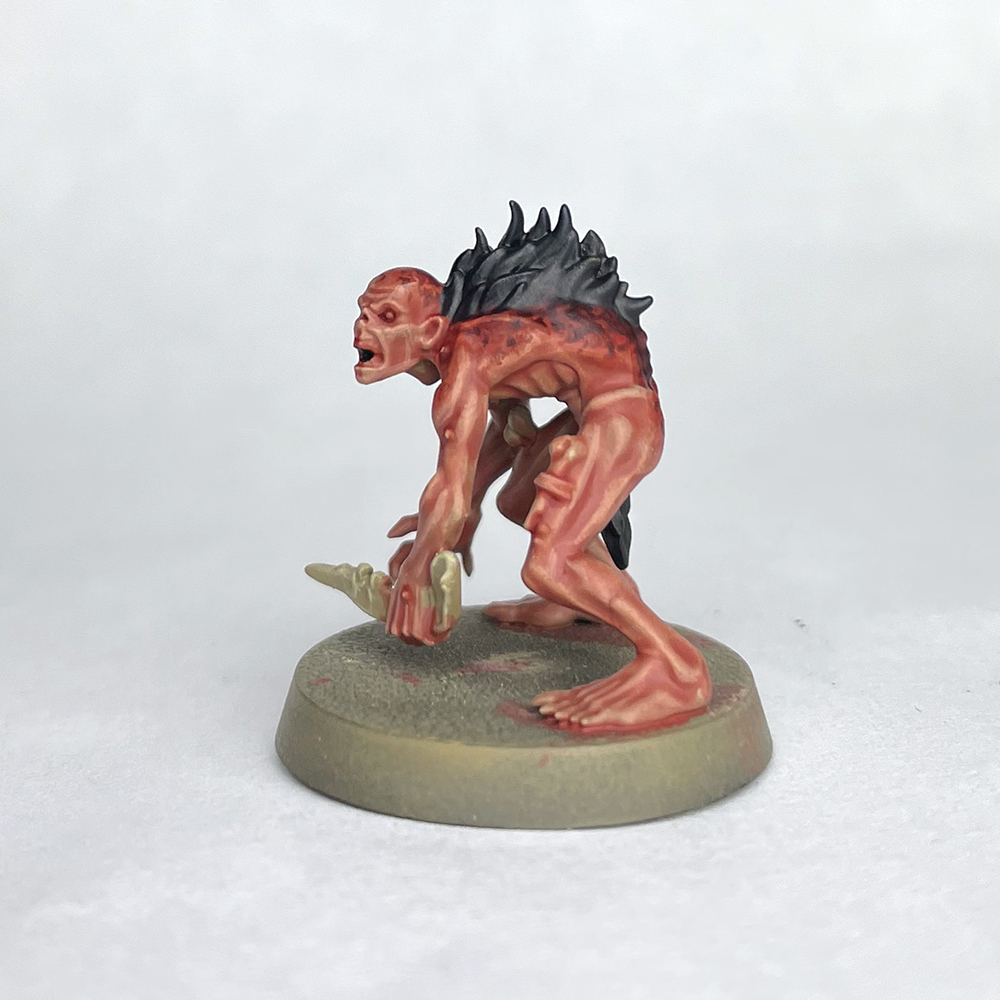
Next I mixed in some Black Templar and continued this gradient and also started doing even more splotches of it. This is finished with almost pure Black Templar for the really charred spots. Go as dark with this as you want. You're preference really.
The Hair and Eyes
 Credit: Tyler Mengel - Mengel Miniatures
Step 1.
All of the hair was base coated with Black Templar. I did two coats. You could also use Black Legion here, or any solid black really for that matter.
 Credit: Tyler Mengel - Mengel Miniatures
Step 2.
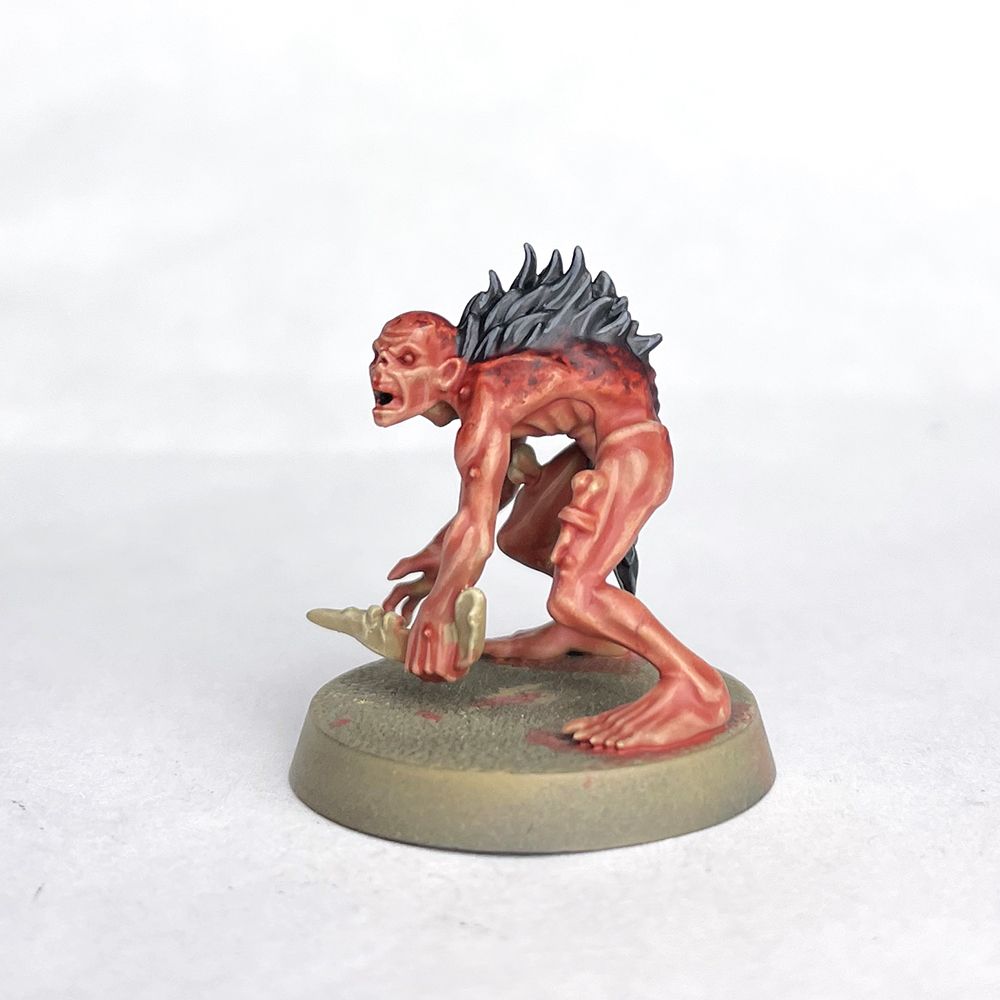
I then highlighted it with Dawnstone.
 Credit: Tyler Mengel - Mengel Miniatures
Step 3.
The eyes were picked out with Pallid Wych Flesh and then given a quick glaze of thinned Flesh Tearer's Red to make them look bloodshot.
The Bone
 Credit: Tyler Mengel - Mengel Miniatures
Step 1.
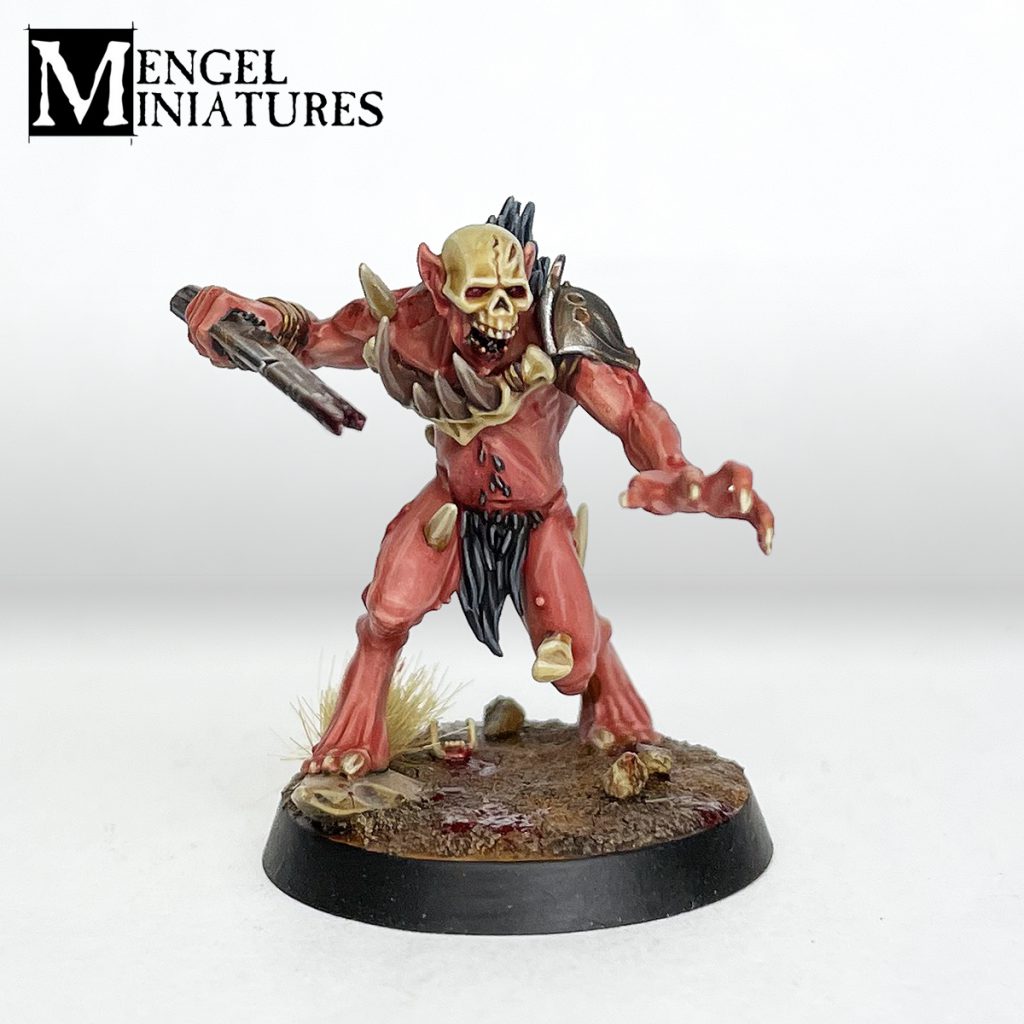
All of the bone was base coated with Morghast Bone, this includes the teeth and claws.
 Credit: Tyler Mengel - Mengel Miniatures
Step 2.
This was then given a coat of Aggaros Dunes thinned with Contrast Medium.
 Credit: Tyler Mengel - Mengel Miniatures
Step 3.
I then tidied it up with Morghast Bone.
 Credit: Tyler Mengel - Mengel Miniatures
Step 4.
Lastly, it was highlighted with Screaming Skull.
The Metallics
 Credit: Tyler Mengel - Mengel Miniatures
Step 1.
The metal areas were base coated with Leadbelcher.
 Credit: Tyler Mengel - Mengel Miniatures
Step 2.
This was then shaded with Ratling Grime thinned with Contrast Medium.
 Credit: Tyler Mengel - Mengel Miniatures
Step 3.
Lastly, I highlighted it with Two Thin Coats Mythril Blade (GW Stormhost Silver).
 Credit: Tyler Mengel - Mengel Miniatures
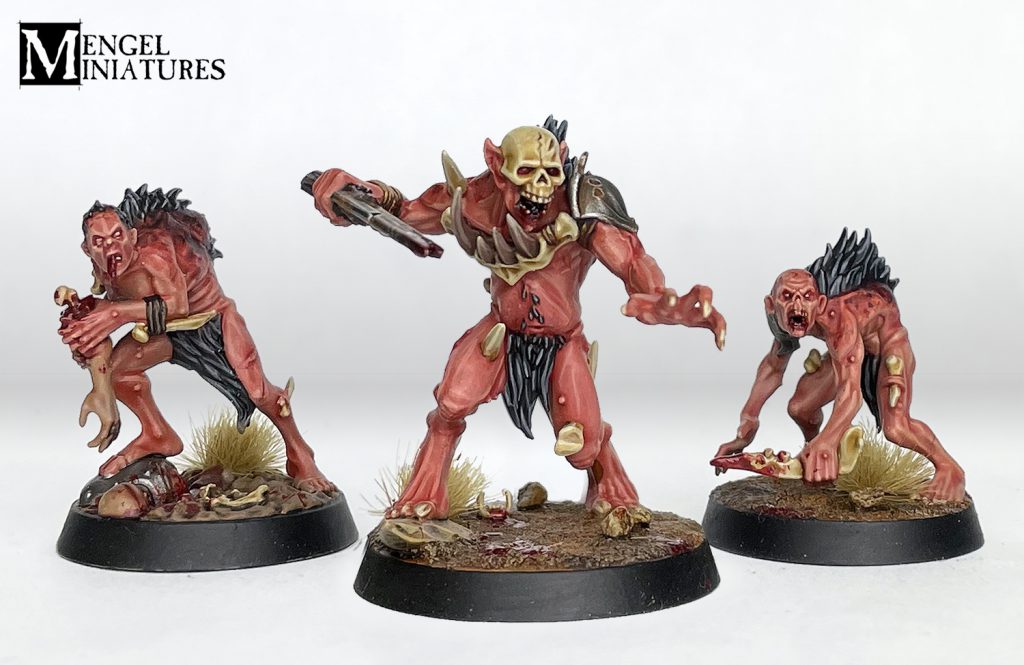
That's it, you're done! I added some gore to mine using Flesh Tearer's Red and Blood for the Blood God and based them in a suitably arid looking environment. I also added a bit of rust to the metals with thinned Skragg Brown once they were all done.
 Credit: Tyler Mengel - Mengel Miniatures
Though the main mix for the skin is a bit weird, the actual process of painting them is super fast.
 Credit: Tyler Mengel - Mengel Miniatures
I really like this scheme and think it's one of the more unique of the color schemes for the Flesh-eater Courts. As always, after painting a few test models I tempted to do even more. I don't know if I would do a whole army, but I do kind of want to finish the Warcry warband.
 Credit: Tyler Mengel - Mengel Miniatures
You may have noticed the third model in the group shot is actually from the Warhammer Underworlds warband. That model was my test for the scheme to make sure my idea worked before committing to the new models.
 Credit: Tyler Mengel - Mengel Miniatures
What do you think, should I finish the warband? Are you going to paint some of the Blisterskin up yourself to ravage the lands of Hysh?
[table id=86 /]

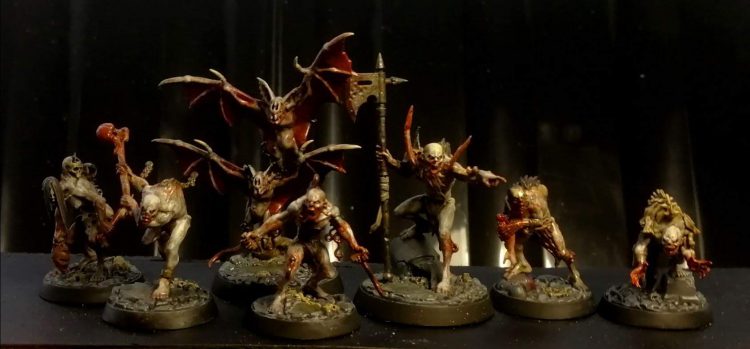
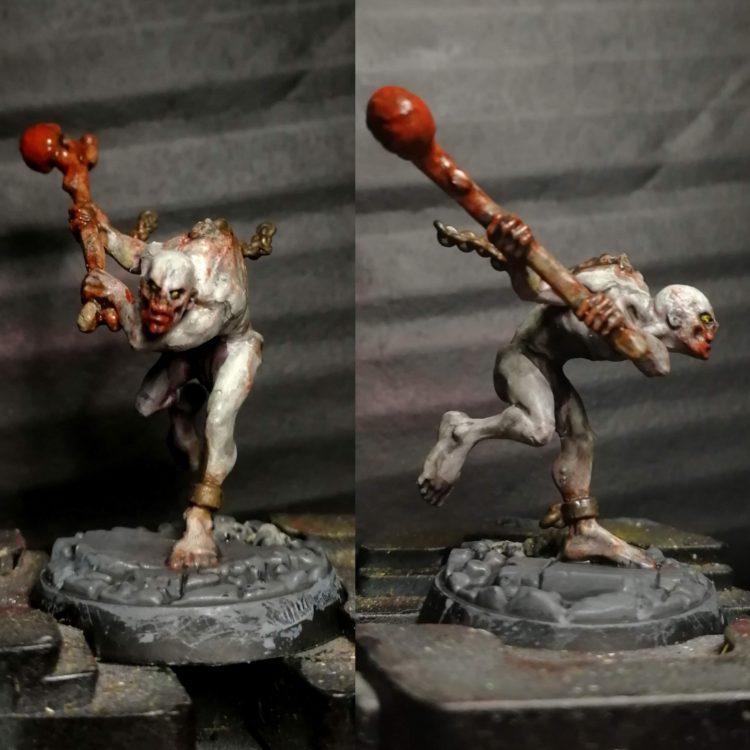
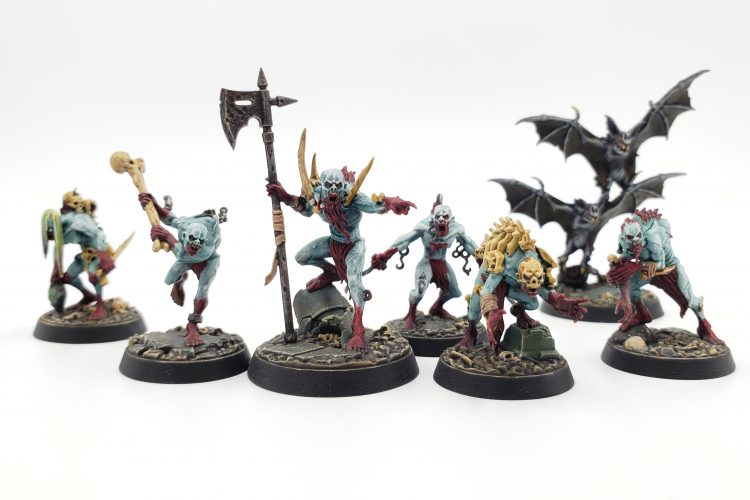
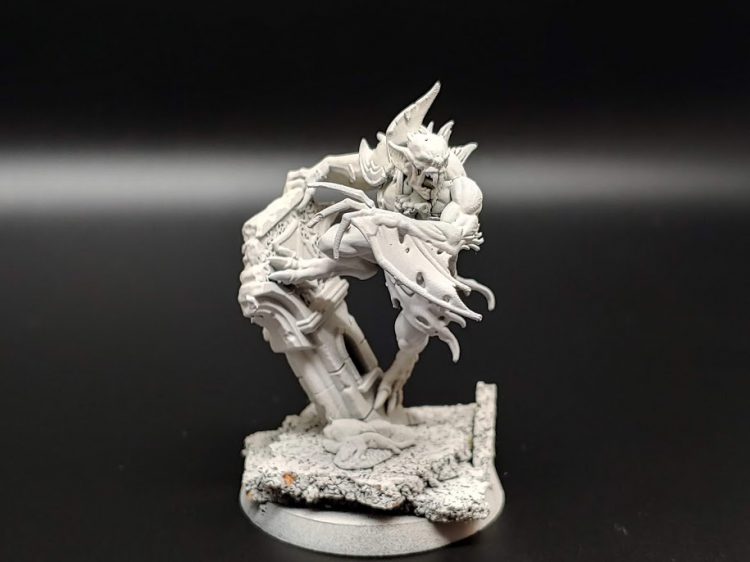
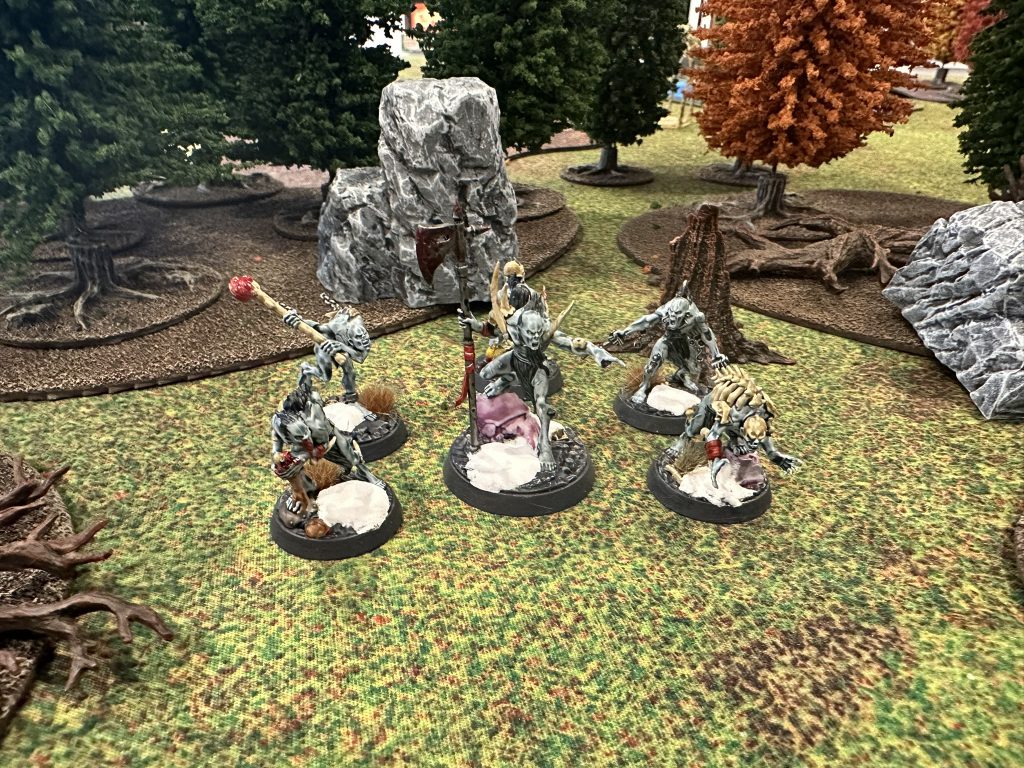
I knew going in I had a very very specific aesthetic in mind for my ghouls. I wanted to make them almost ethereal, dirty pale creatures that looked like they had not seen sun for years. The flesh would be the focus for me, but I also wanted to offset it with some sense of the kind of materials and equipment these filthy creatures would have access to, so corrosion and dirt would be the name of the game. I also wanted to play around with some technical effects, and so these have a really grizzly, bloodstained look to them.
- Make a ghoul flesh mix of 2:2:1 Rakarth Flesh : Ironrach Skin : White Scar and basecoat the skin
- Make a wash of 1:1:1 Reikland Fleshhade : Carroburg Crimson : Water and apply it over the skin
- Begin to highlight up, using your base mix at first, then slowly adding more white to the mix until your topmost highlight is almost pure white
- Make a wash of 1:2 Agrax Earthshade : Water and apply it over the skin
- Make a wash of 1:1 Druchii Purple : Water and apply it in the soft folds and crevices
- Make a was of 1:1 Carroburg Crimson : Water and apply it around the mouth, eyes, ears and other soft delicate tissues
Once the basic tones are in place, and after the rest of the model was finished (see below for the steps for that) it was time to add dirt, gore and grime. I used a 1:1 mix of Nuln Oil and water and added streaking and dirtt, especially around where cloth sits and also the feet, hands and forearms. Then using Vallejo Effects Fresh Blood and Old Blood I worked on the gore applying them thinly. The old blood I streaked wider around wounds, the mouth and the hands, making sure to wipe it into folds and crevices, and then used the fresh blood as highlight and to pick out the newest stains and scrapes. Finally using Vallejo Effects Vomit I applied some slickness and sickliness, particularly across the head, around any hair or fur, and across the shoulders and down the back of the arms.

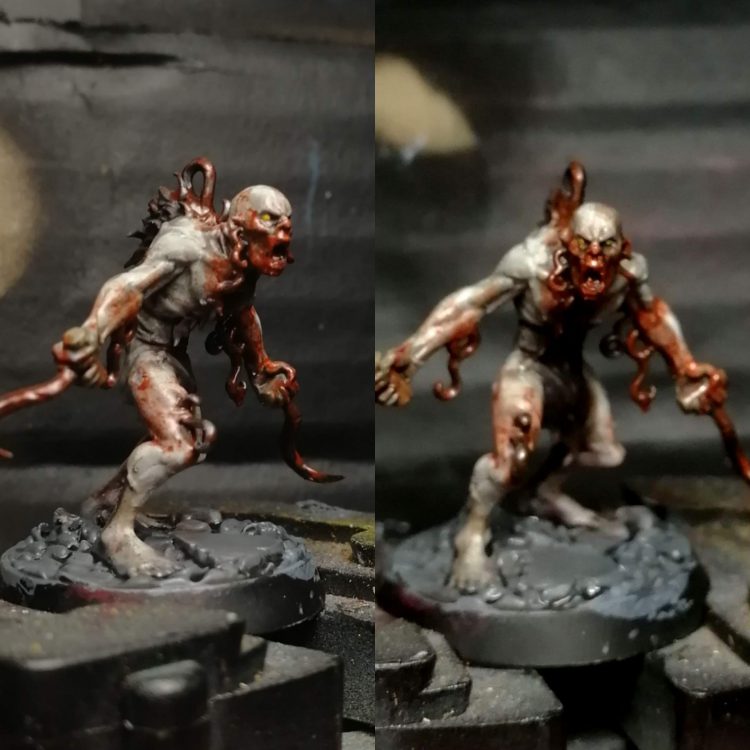
Metals I wanted to make dull and dirt, so I started with Scale 75 Black Metal, then washed with Nuln Oil. And that’s basically where I left it. For the larger areas with lots of rust, I used Skrag Brown and some Ryza Rust to bring those colours up, but I mostly wanted the dull glinting metal as a contrast to the skin.
One of the models is eating an arm, and I wanted to really push the distinction between the skin tone on that and the tone on the ghoul. To this end I painted a really warm ruddy tone on the army, using Cadian Fleshtone, Reikland and then highlighting up with mixed in Ushbati Bone.
For the fur, I used a dark grey (Vallejo Black Grey) and then washed with Agrax Earthshade and highlighted up. I applied a coat of the Vallejo Effects Vomit to make it slick and shiny, but I don’t know how effective this was, and I might do this area differently if I were to paint more in the same scheme in the future.
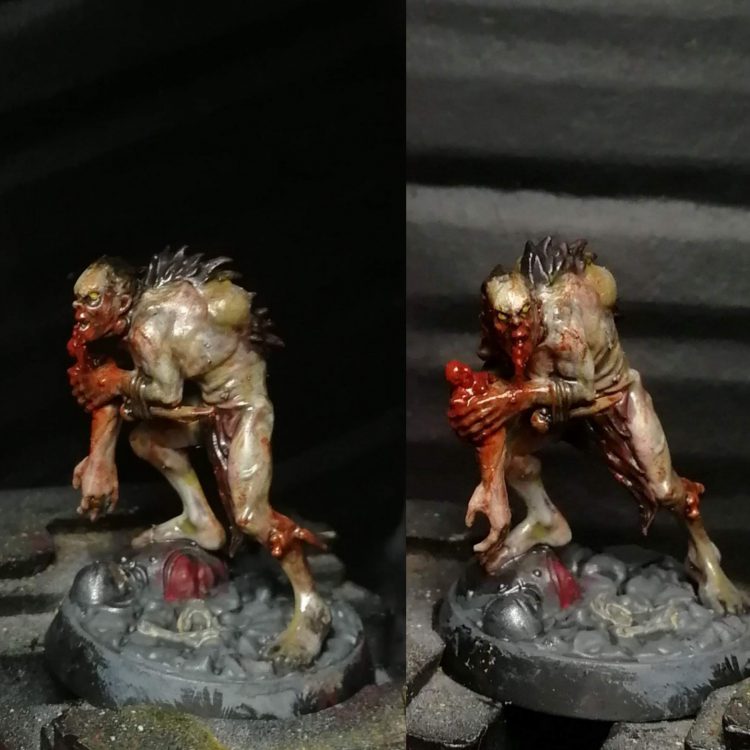
This model in particular is supposed to be very rotten and deformed, so I went heavy with the vomit all over, giving her a glistening slick look.
For the eyes I used Averland Sunset and then a little dot of Flash Gtiz. I made sure to heavily shade the eye socket with black to make them really stand out. bases I painted a neutral grey, washed and highlighted up simply before giving a little weathering too. I kept them simple and unobtrusive, as I didn’t want to distract from the pale ghouls.


Flesh Eater Courts are my favorite AoS faction, as I love the idea behind their lore, but their models leave a little to be desired in terms of variety and interest. My goal in painting my army was to give them an interesting scheme that would also be quick, allowing me to put lavish detail and time into characters like the Arch-Regent, while making Ghouls and even Crypt Horrors a fairly simple process. Aside from the issue of variety, I also suffer a bit from limited hobby time and hobby fatigue, so when I have to paint the same thing over and over, I knew I had to make something workable. Also, to compensate for the models themselves, I placed a lot of thought into their bases, again wanting something easy but eye-catching, spending more time on characters and maintaining coherency throughout the army.
I do not own an airbrush, so all of these models are painted with spray on primers and then with a brush. Also, all of the paints I use here are GW paints (as those are the only ones sold in my area), and contrast paints play a pretty big role in this scheme. Finally, basing is something I wanted to spend time on with these models, as I feel it is a great way to add some extra color and character to each of these, while also keeping things uniform.

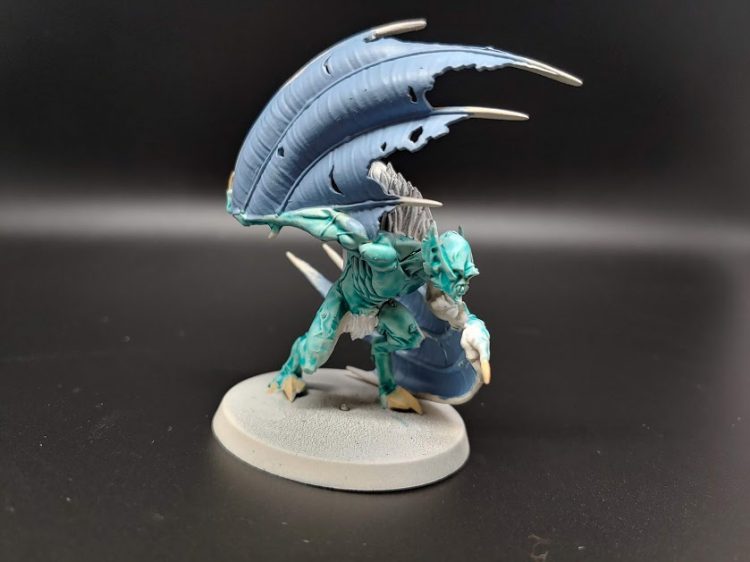
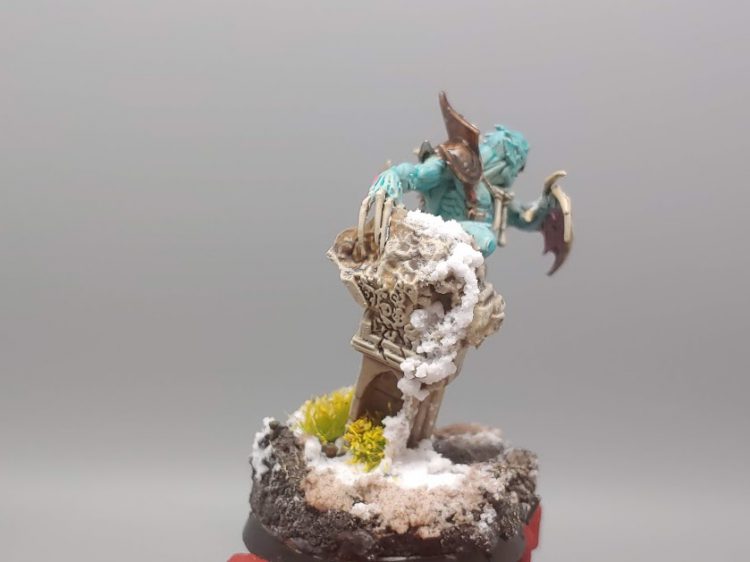

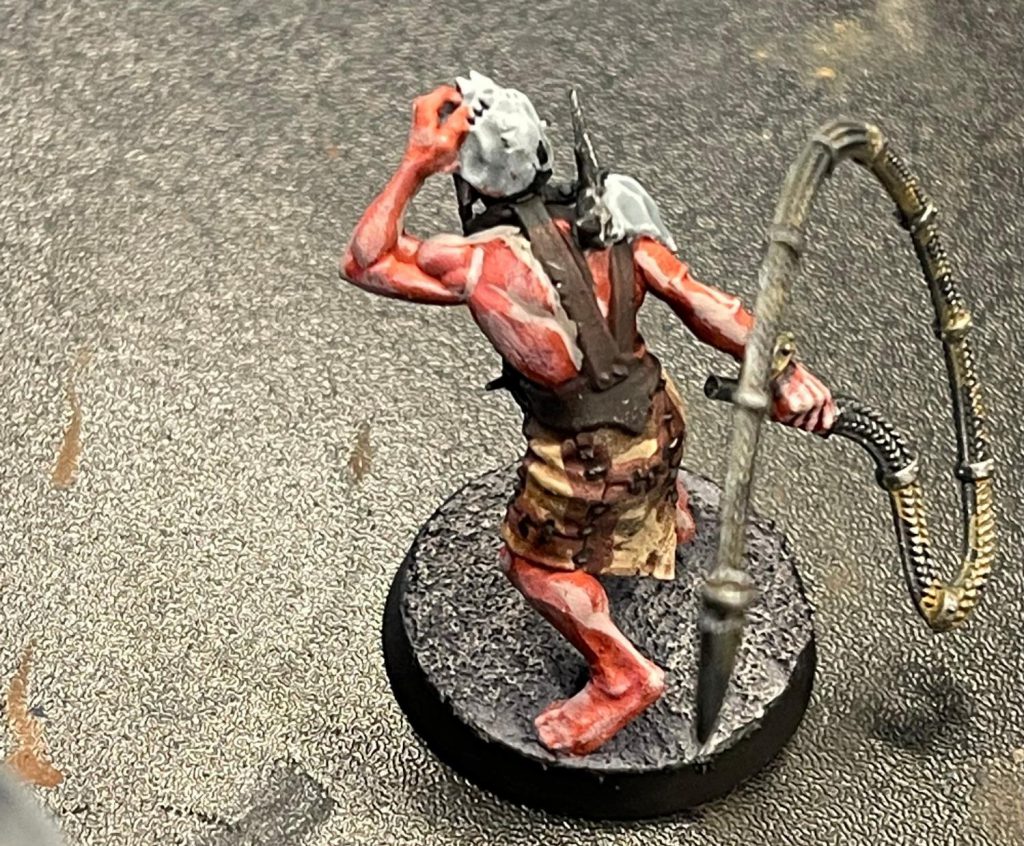
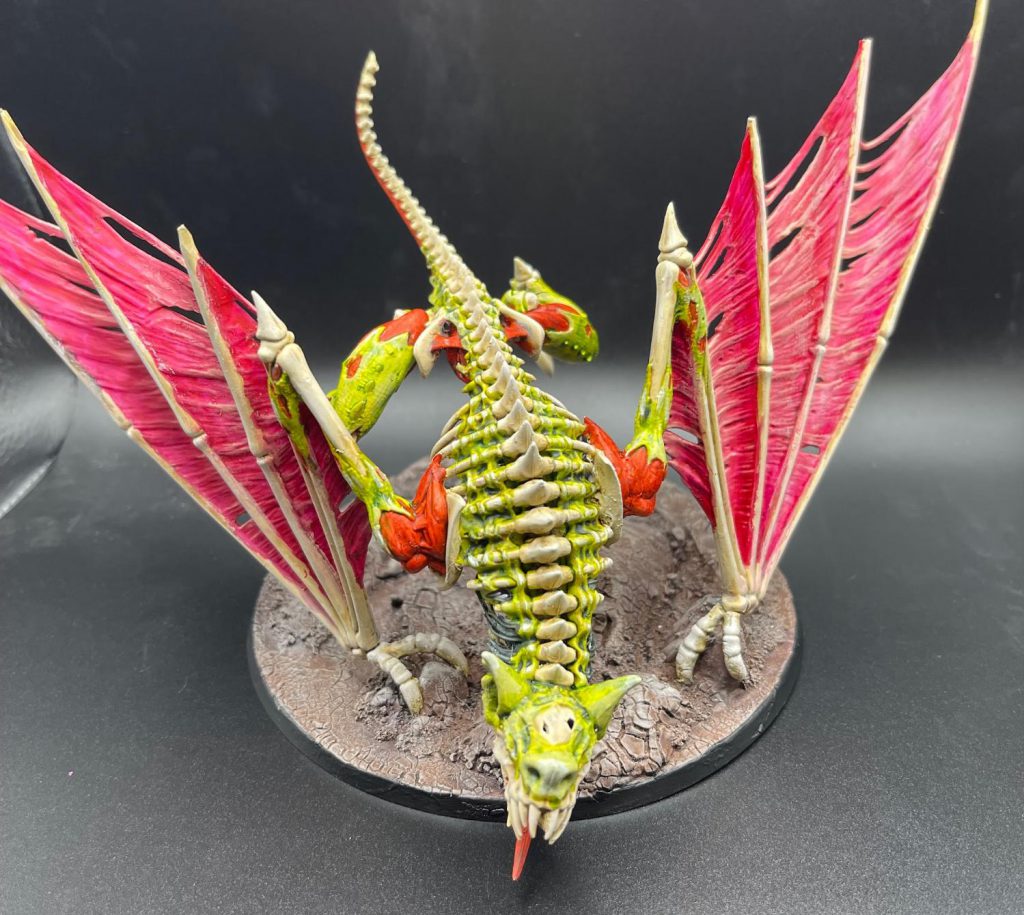
I love painting undead, for someone like me who’s ADHD doesn’t like painting the same thing (read: Space Marines) for more than an hour, I have so many options when it comes to this super faction. This is part of my Flesh Eater Courts, which are Spring themed. I saw a bumper sticker for some punk band with a toxic green and magenta color way and I got inspired to paint this rescue bat. In total this took about six hours of work.
The Terrorgheist
Prep work:On large undead models, subassembly is important. Being able to reach all the nooks and crannies with pigment is a hell of a job when it’s all built. This model was a rescue, badly damaged and already glued together. It’s Doable, but if I had started this model from spurs I would have left the wings off. What I was able to do was cut the joints at the claws so I could remove the model from the base, this really helped.
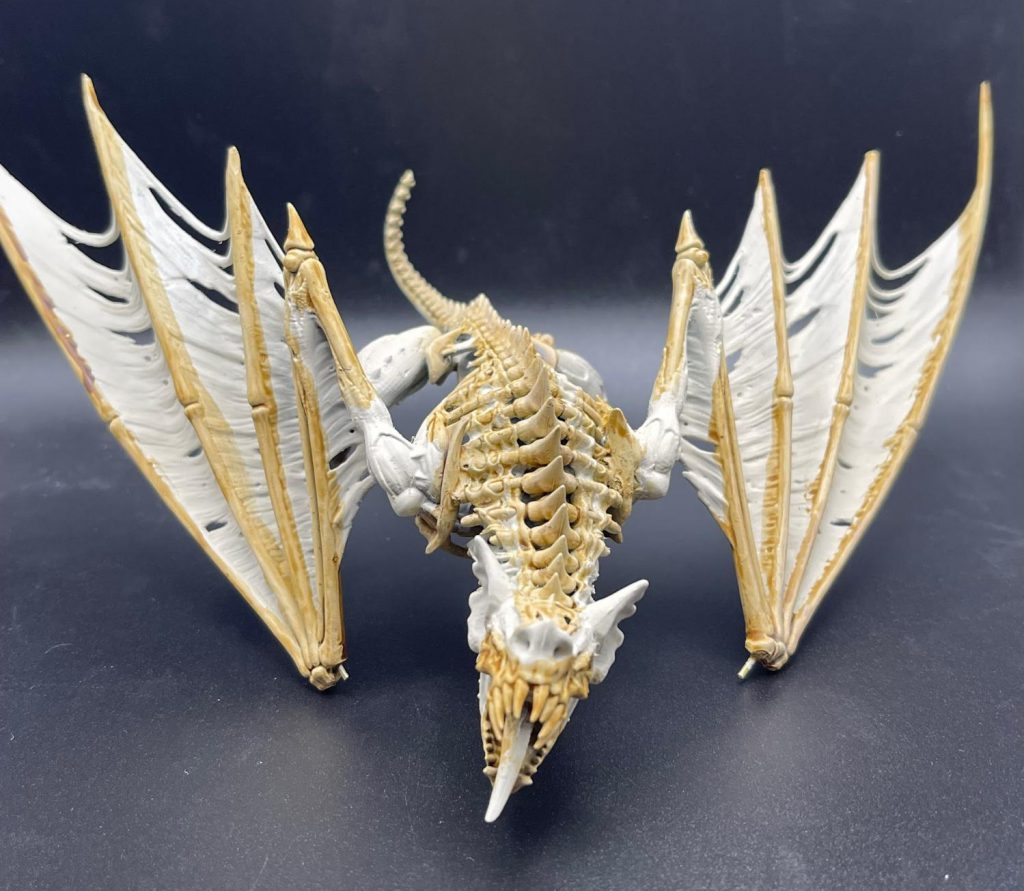
Priming and Bones:
Starting from Wraithbone, we start by hitting all the bone parts with Skeleton Horde. Don’t worry about hitting other parts with this too much, keep it neat but don’t stress.
After this, we do a drybrush of Tyrant Skull (you can use Morghast Bone instead, I just had this on hand and in front of me while painting) and then a layer of Pallid Wych Flesh. The drybrush evens out the bone tones and get rid of any tea staining.
Muscles and Exposed Flesh:
Next I applied Blood Angels Red to all the musculature and rents in the skin, if you are going to apply lots of blood effects like me you can stop here, otherwise you would want to highlight it with flesh tones and then paint lines with something bright like Rakarth Flesh to show the tendons, like this:
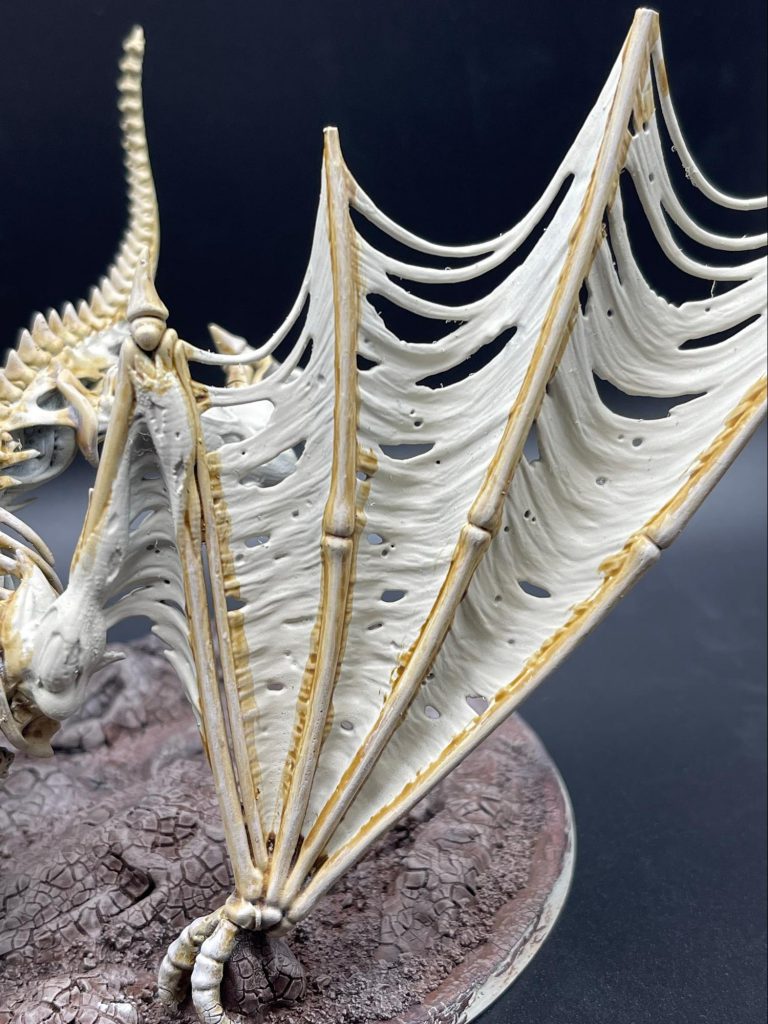
Skin and Wings:
Start by blocking in all the skin with Mantis Warriors Green, if you get any on the bones don’t freak out as we’re going to put a little Blood for the Blood God on it after varnishing, or you can just touch it up with the bone color again.
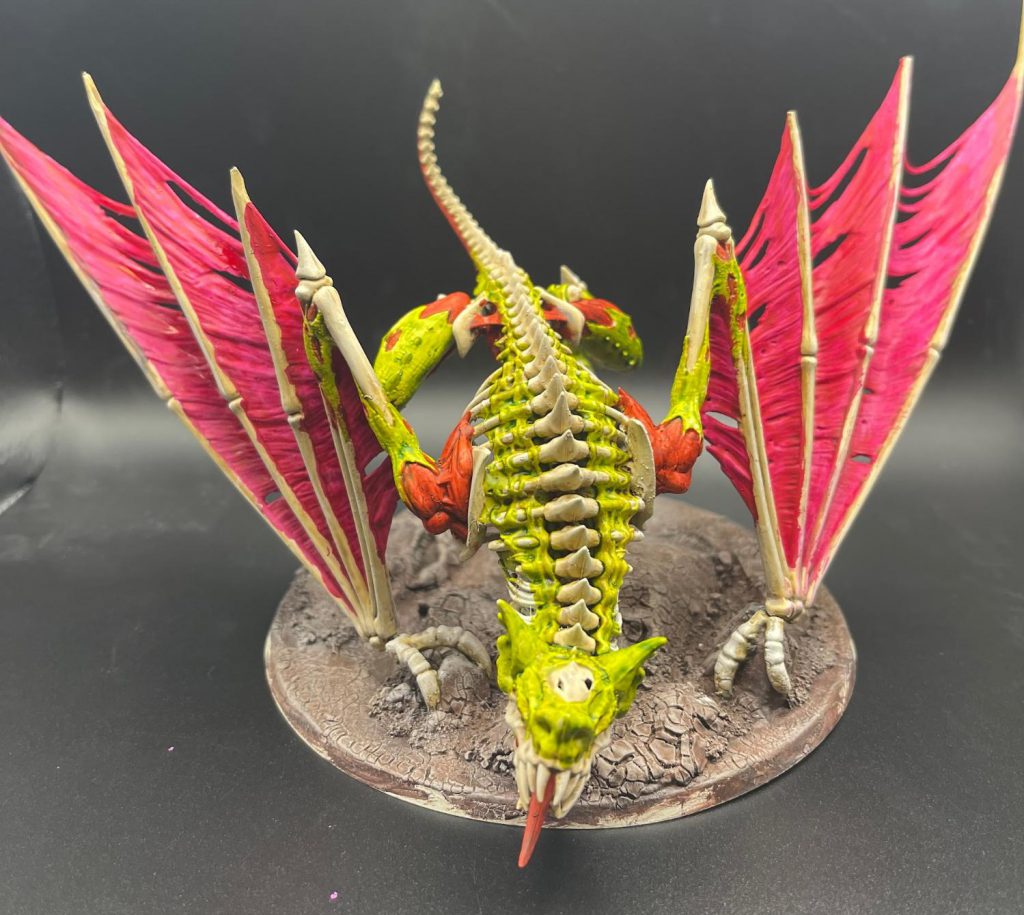
Now to the wings, we start with Doomfire Magenta, which is a color that can be seen from space it’s so bright. After this, apply Volupus Pink into the shadows.
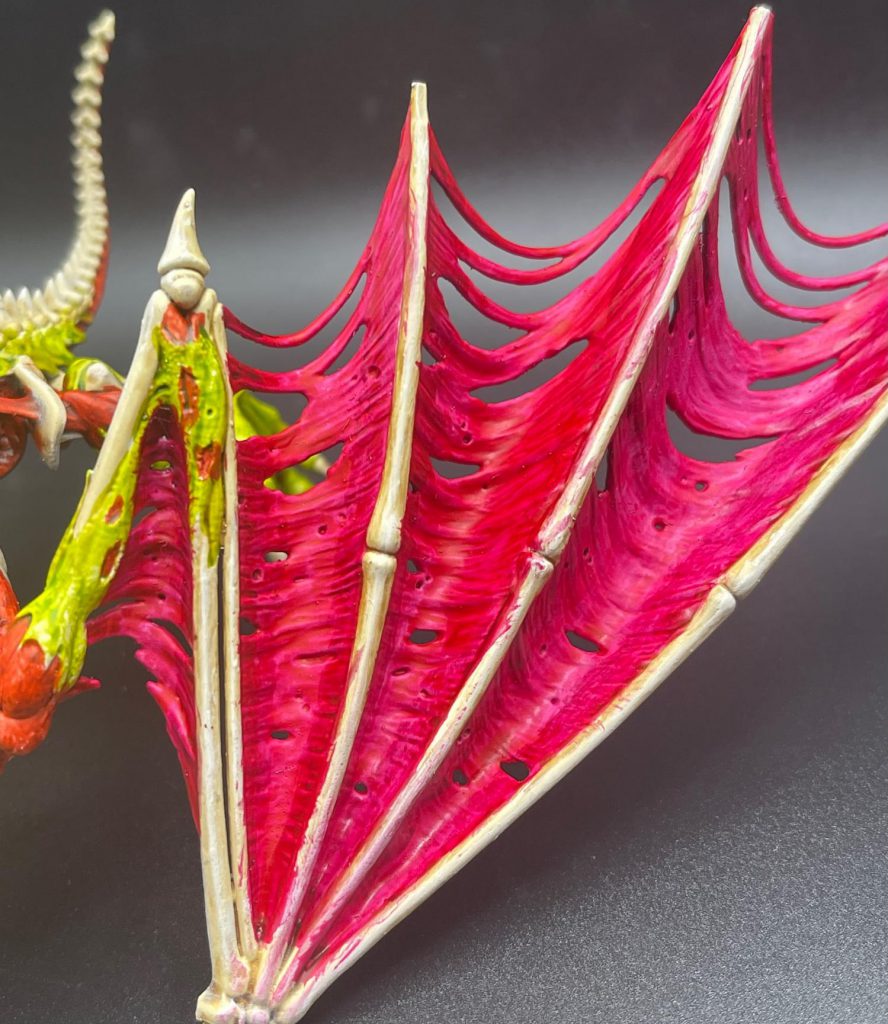
Then drybrush with Pink Horror, and then again with Eldar Flesh (you could use any light skin tone for this, Kislev Flesh would be great)
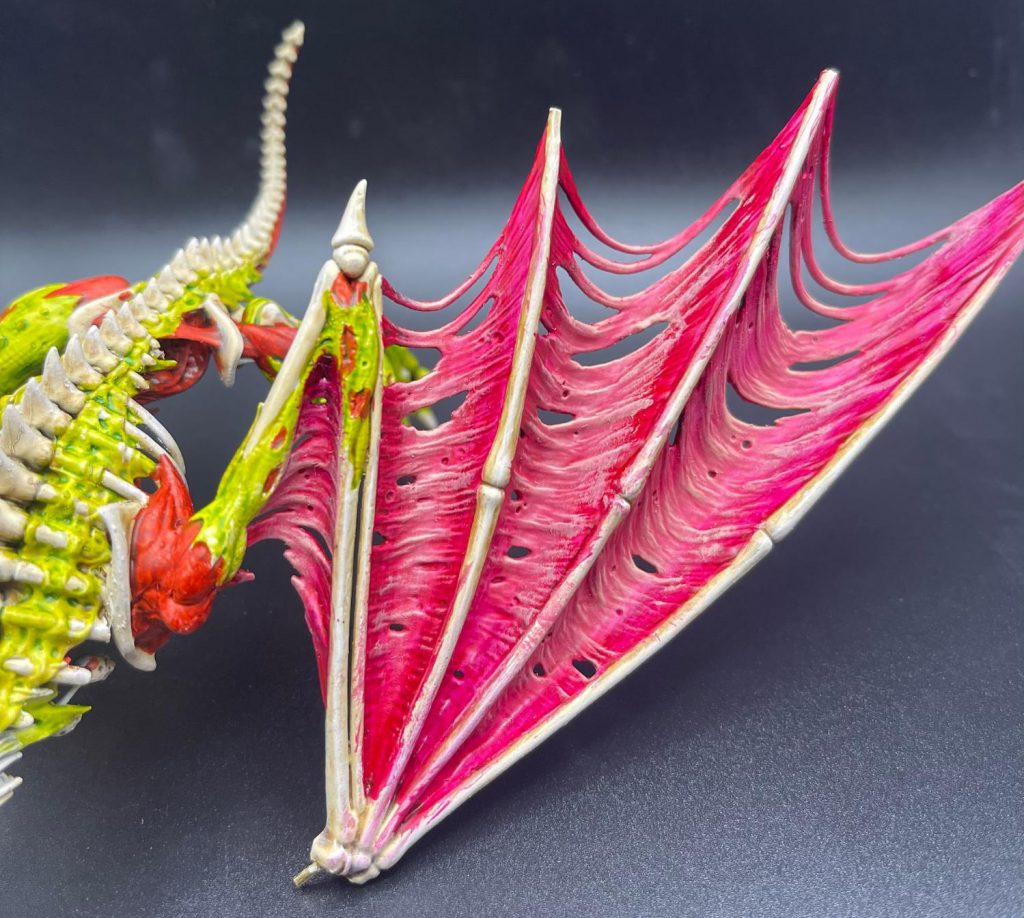
Now back to the green skin, push the shadows with Militarum Green contrast, then later with Ogryn Camo. After this pick out the highlights further with Deepkin Flesh. I focused this on the face, the skin down the back, the hips, and the skin on the wings.

After this, hit the hair/fur with Black Templar.
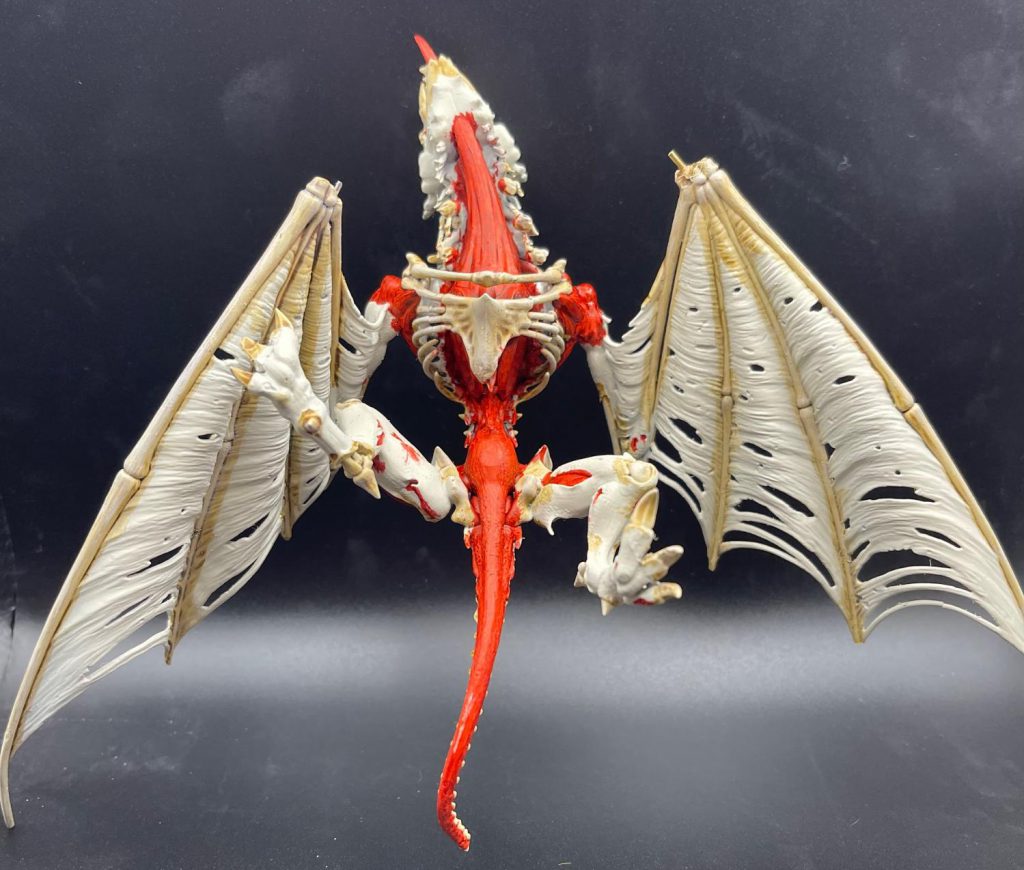
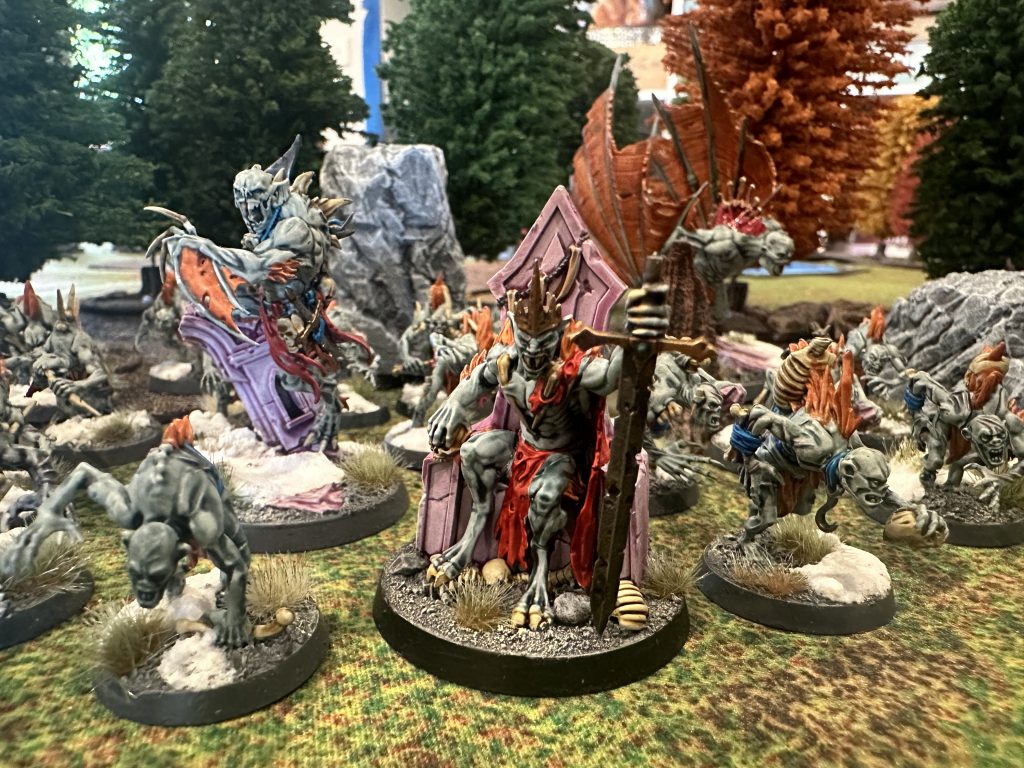
 The Ghoul King
To offset all these bright vibrant tones, I decided to paint up the Ghoul King with a light purple skin tone. Starting from Gray Seer, give the model a coat of Dreadful Visage. 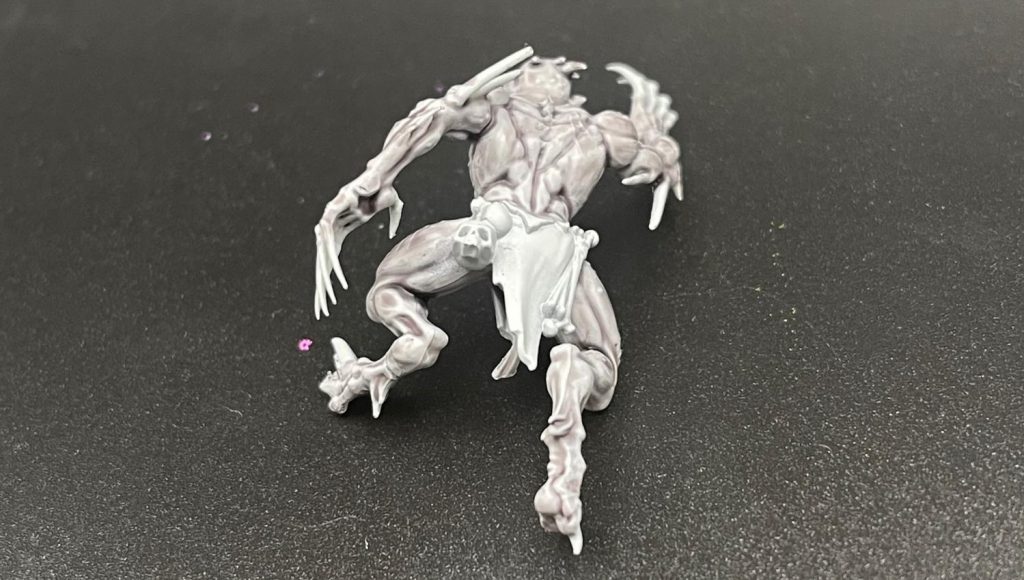
After that’s dry, go into all the recesses with Druchii Violet, and then pick out the wounds, mouth, and eyes with Carroburg Crimson.
Bonus: quick and easy stone for basing
The model was missing the rocks it usually stands on, so I added some ruins I had on hand. It’s a two step process, from a Wraith Bone spray hit the whole thing with Gryph Charger Gray and once that’s dry a heavy wash of Agrax Earthshade.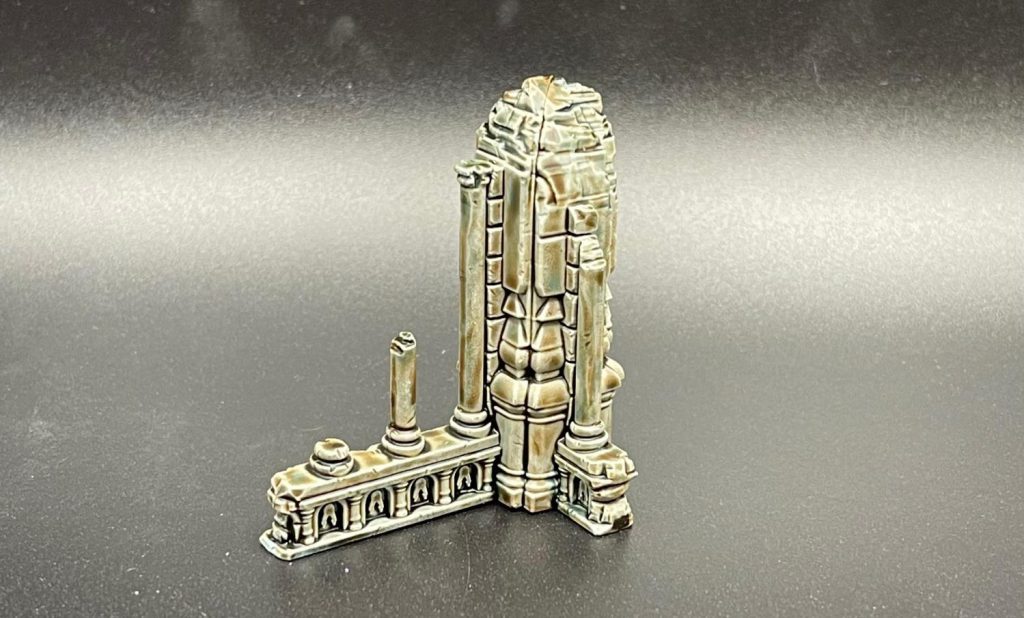
The base was just a quick basecoat of Rhinox Hide drybrushed with Rakarth Flesh, and once it was all glued together and varnished I hit all the red exposed skin and the maw/claws of the bat and rider with BftBG and called it a day.
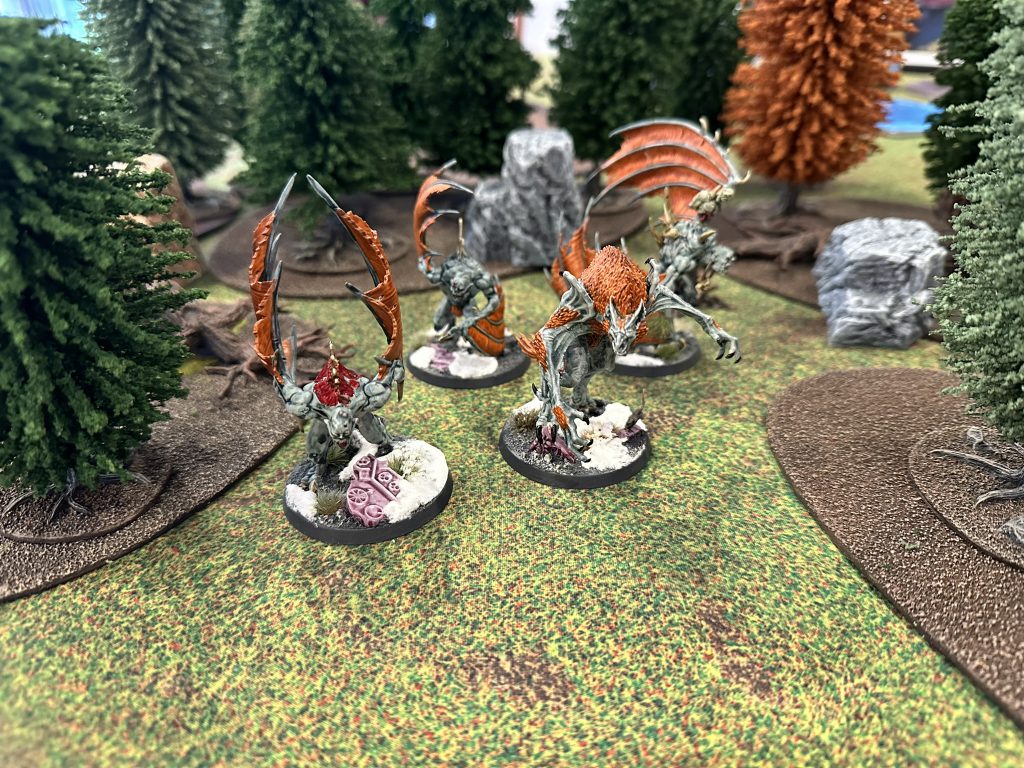
Finished pictures:
 Credit: Maxi_the_Pigasus
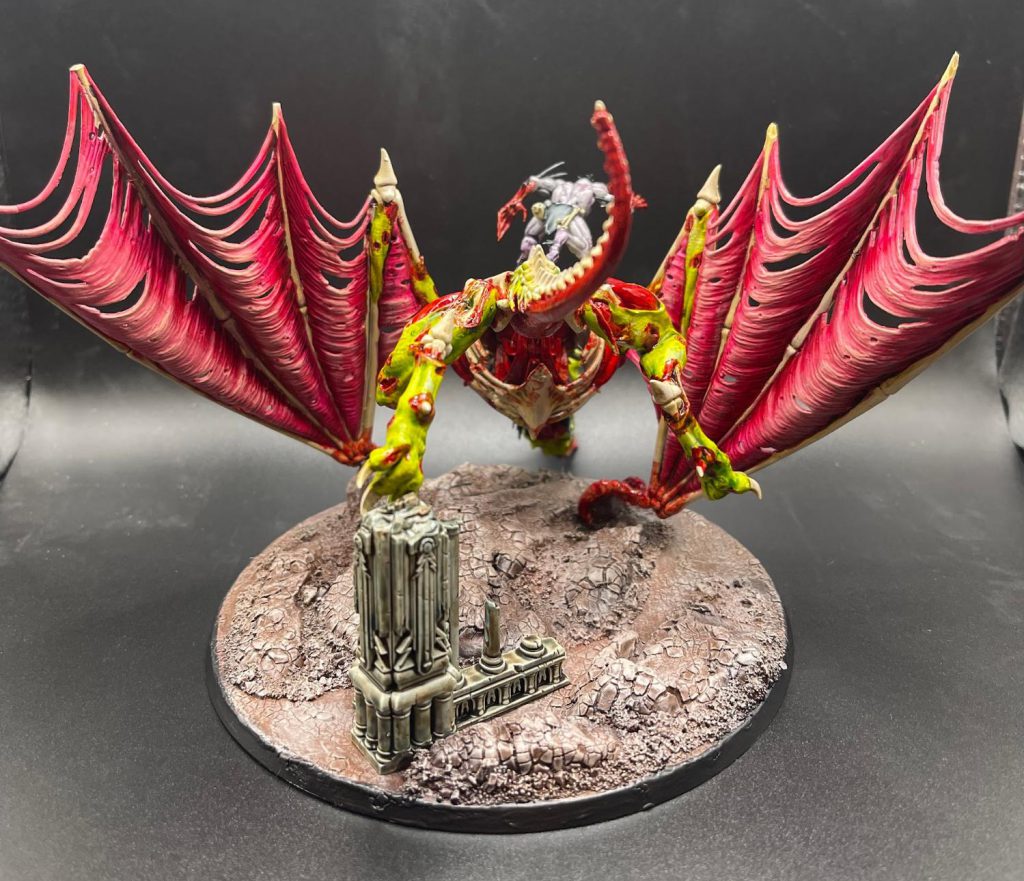 Credit: Maxi_the_Pigasus
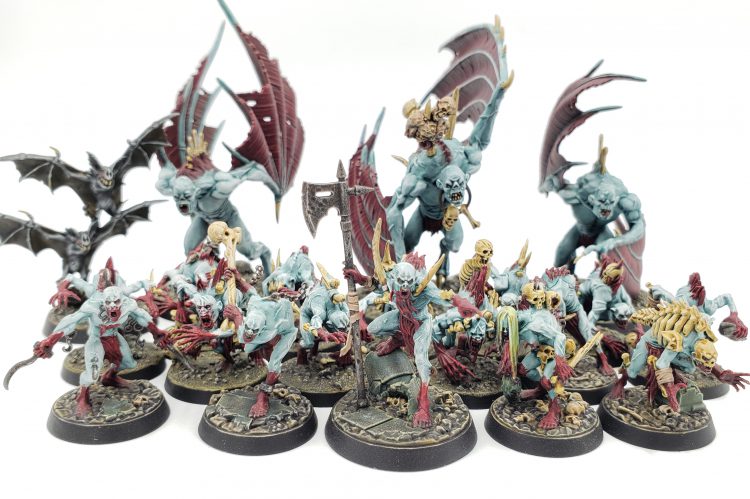
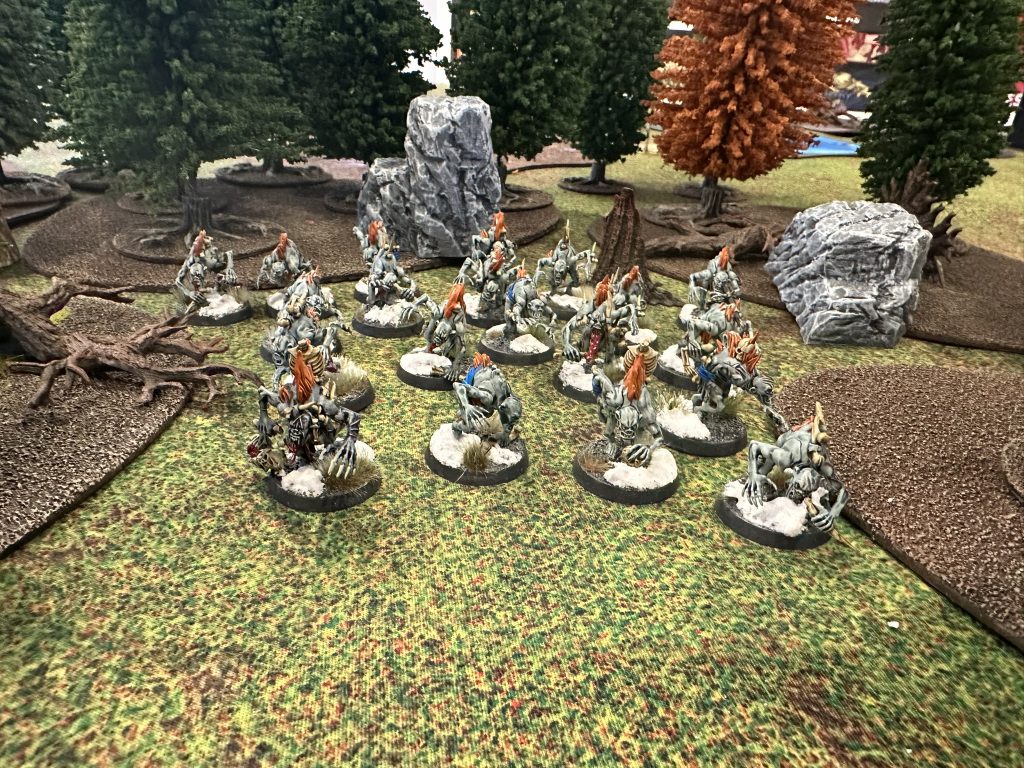
One of the joys of Age of Sigmar models, from a speed painting perspective, is that they’re quite… wrinkly, taking Contrast paints better than many of the smooth armour surfaces of Warhammer 40,000. For my Flesh Eater Courts, the goal was speed above all, and the only non-Contrast paints used here were on the base.
 A throne for a Ghoul King. Credit: Magos Sockbert
Starting with a prime of Grey Seer or Wraithbone, the primary skin tone was Space Wolf Grey Contrast paint, which is a very blue-grey, which comes out very nicely with such wrinkly models; test schemes found that more grey-greys like Bassilicanum Grey can be quite flat. Gryph-Hound Orange was used for fur, hair, and wing membranes, being quite generous with what might be captured in this category. It’s a great splash of colour that lets the force draw attention from far across the battlefield with minimal effort. Black Templar was used for the fabrics and fur on the Warhammer Underworlds Grymwatch war band, just so they looked fractionally different from the uncounted hordes of otherwise almost identical ghouls around them.
Teeth and bones were simple Skeleton Horde, with splashes of Blood for the Blood God technical paint as the bloody splatter of their dinner victims or the ghoul's own torn flesh, and straps and fabric were Talassar Blue or Blood Angel's Red, giving another splash of colour. I tried browns for a bit more realism, before working out that a) this is Age of Sigmar, and our-world realism isn’t always realistic, and b) it’s just too flat and low energy compared to the rest of the model.
The few steel metals were Vallejo Metal Colour Dark Aluminium with a wash of Nuln Oil Gloss, the same way I painted my Iron Warriors. The gold was Retributor Gold washed with a mix of Agrax Earthshade and Nuln Oil (shout out to SRM for this tip), and drybrushed with Runefang Steel.
 Flesh Eater Courts beasties. Credit: Magos Sockbert
This is my fun default Death basing scheme, and has now also made its way into my City States for Conquest: Last Argument of Kings (a great game, come play with us). A sand base was painted Eshin Grey, extending the blue-grey scheme a bit and tying in to the body of the ghouls. A drybrush of Tyrant Skull was followed by Terminatus Stone to bring out some of the sandy definition, before a variety of tufts were added.
The terrain parts of the base were Magos Purple (obviously a regal colour named after a splendid class of folk) then lightly drybrushed with Praxeti White, though not consistently across all models, due to painter laziness and distractions.
 Flesh Eater Courts Grymwatch from Warhammer Underworlds. Credit: Magos Sockbert
Snow was a standard modelling mix of bicarb soda (baking soda), PVA glue and water, with a few drops of Liquitex Titanium White Acrylic Ink to get that crisp white. The glue goes on after everything else is done (a mistake I’ve made a few times with tufts), as obviously snow falls from the sky after plants grow up from the ground!
I need to emphasise the sheer speed of this scheme. I painted roughly the Mortvell’s Hellcourt back from Broken Realms in less than a day, and thanks to the joy of a production line. The longest breaks were waiting for the basing paints to dry!
 Never enough ghoulies. Credit: Magos Sockbert
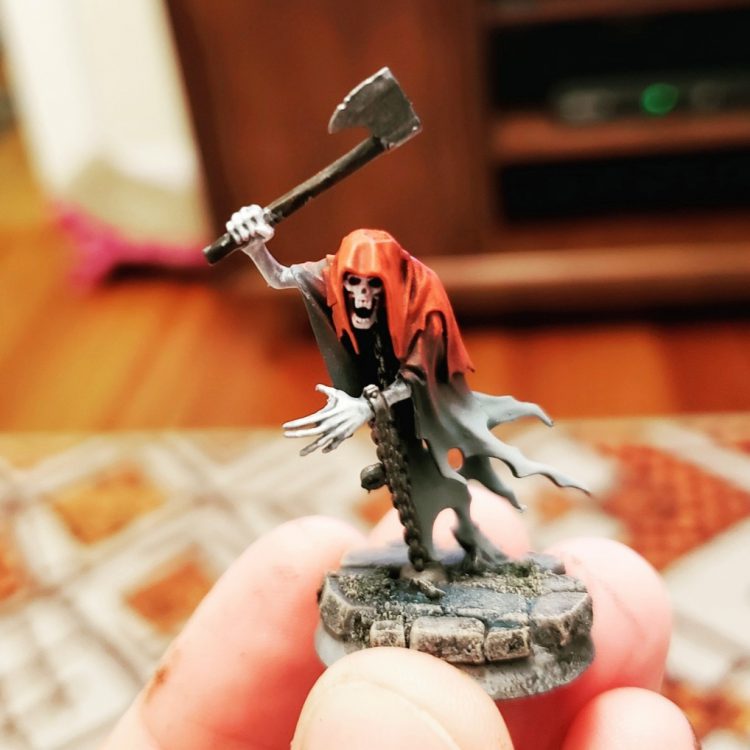
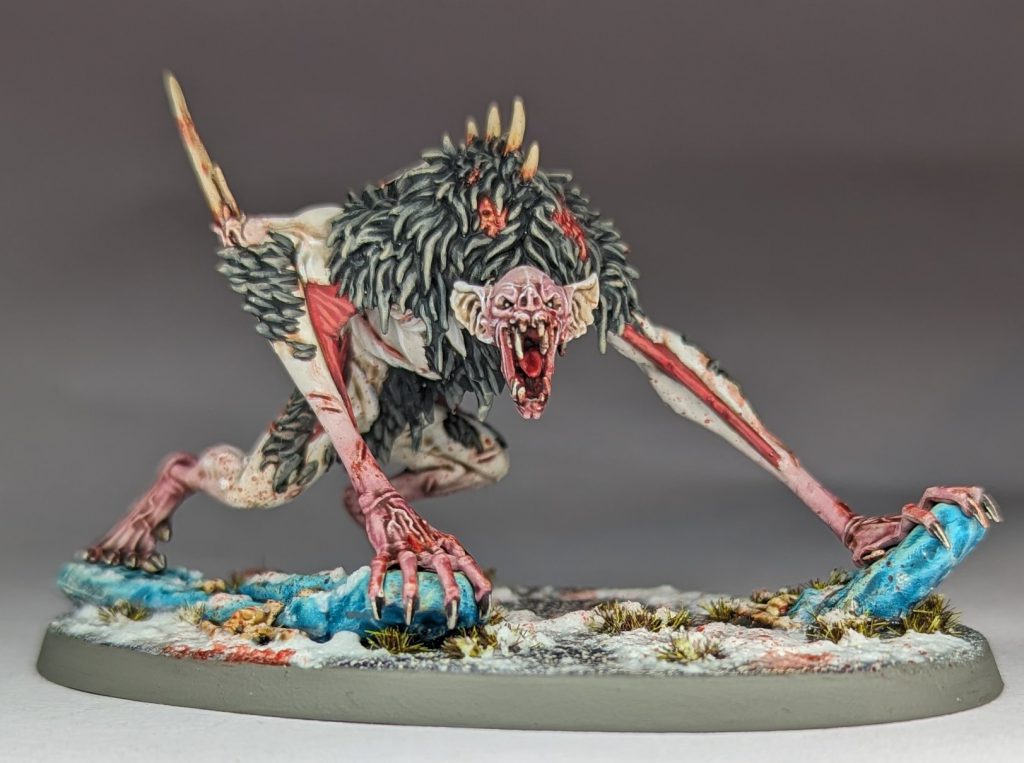
I was immediately taken by the pale white skin and contrasting extremities of the Morgaunt sub-faction when I started painting my Flesh-Eater Courts. I tend to shy away from pale colours and whites for army projects out of fear that it'll be a complete pain to achieve quickly, but I was determined to make this one work.
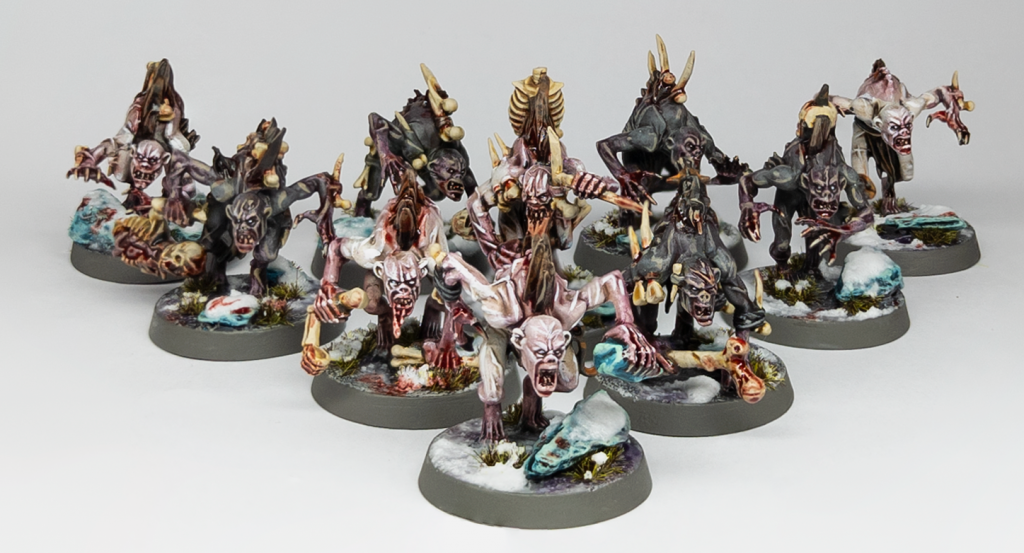 Crypt Ghouls. Credit: Rich "Cronch" Nutter
Skin Tones
The light skin is quite simple - from a white primer (overbrushed with some white paint if you want to make sure you've got full coverage), the whole skin area is washed with a 50:50 thinned mix of Agrax Earthshade. I use Lahmian Medium, but Contrast Medium or water would also work. Once that's dry the skin is layered with Pallid Wych Flesh, leaving the brown shade in the recesses.At this point I do the red details - a slightly thinned wash of Carroburg Crimson is applied to the hands, feet and lower face, and then feathered out with a clean damp brush to give a smoother blend into the skin tone. I recommend doing one area at a time to make sure you avoid tide marks where the wash dries before you can feather it.
Finally, I apply sharp edge highlights in a pure white, to really make the model pop. My current favourite is Pro-Acryl Bold Titanium White. On some larger models I have chosen to do edge highlights on the red areas with a lighter pink before going straight to white, to ease the transition - in this case I would normally mix a bit of the red wash into my white to get a pink tone.
Given that I might be painting upwards of 100 ghouls I wanted to have a little variety in the army, so I chose to do some in a darker grey tone too. This is pretty similar to the light skin really. I based Mechanicus Standard Grey before washing with the agrax mix, then did some layering/thick highlights with Dawnstone. At this point I experimented with the red wash - on some models I've applied it as above, on others I have first picked out the areas with some Pallid Wych Flesh on a small drybrush to make the red pop a little more. Both worked OK so the extra step isn't needed, but variation is nice. These models got highlighted with Karak Stone.
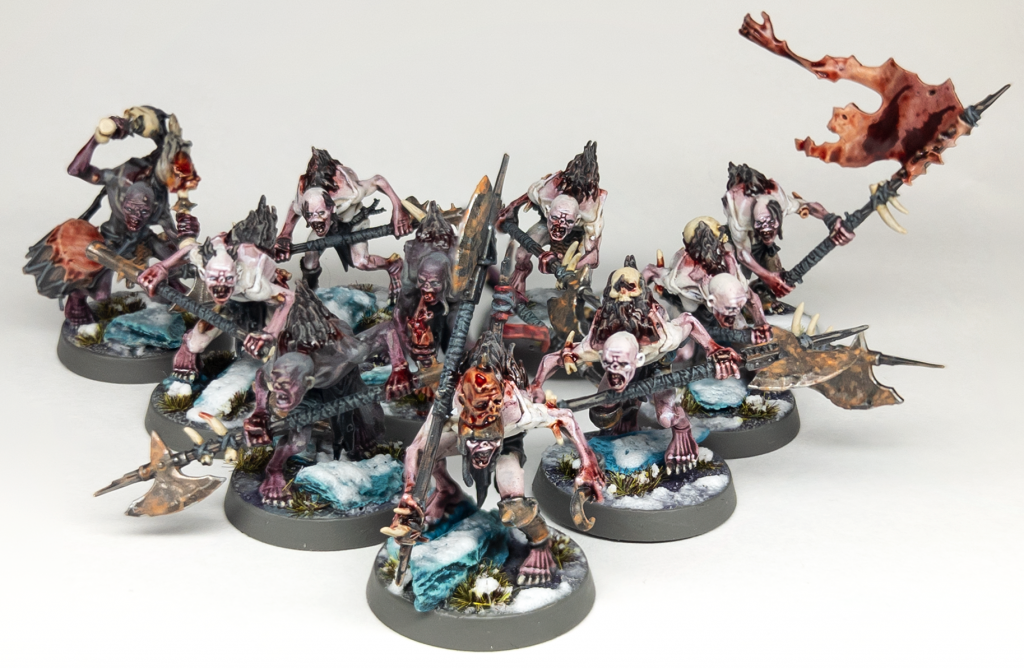 Cryptguard. Credit: Rich "Cronch" Nutter
The Metals
I tried to keep life simple for the metallics on these models, but clearly they're going to need to be dirty and worn to fit in amongst the Mortal Realms' very own abominable chittering hordes. I do this for all of the weapons, and any trinkets or armour panels that you want to be metallic.I start with a basecoat of Iron Warriors, although sometimes I use Leadbelcher if I forget. It doesn't matter though, a bit of tonal variation can be good. This gets washed down with Agrax Earthshade, and highlighted Stormhost Silver, or Ironbreaker if you want to keep the highlights duller. A good tip for highlighting worn metal is to get a small amount of thinned paint on the end of your brush and tap it along the length of the edge rather than drawing a neat straight line, this can help to sell a chipped, weathered effect.
Speaking of weathering, it's time to make those weapons look dirty! I take Skrag Brown and thin it a lot with water, probably something in the region of 3:1 water:paint. Experiment with this yourself, see how thinner and thicker mixes behave. I wash this quite aggressively onto the silver metals, sometimes tapping with an old brush rather than painting it on. if you're not happy with how the paint sits, you can push at it with a piece of sponge (or your finger) to move it more naturally. It's fine if this dries with some tide marks - it's very thin, and also rust tends to be caused by wetness!
Once the brown has dried, I go back with a bright orange like Troll Slayer Orange, Fire Dragon Bright, or both, and do some very sharp dot highlights inside the brown area to sell the idea of the rust being more advanced in those areas and add some variation.
For gold details I basecoat in perennial favourite Retributor Armour, which gets washed with Agrax Earthshade. For bigger or more weathered pieces, I will mix in a bit of a blue-green like Kroxigor Scales with the wash for a more tarnished look. This gets small highlights of Liberator Armour, and some dots of a blue-green like Sotek Green followed by Gauss Blaster Green for some verdigris vibes.
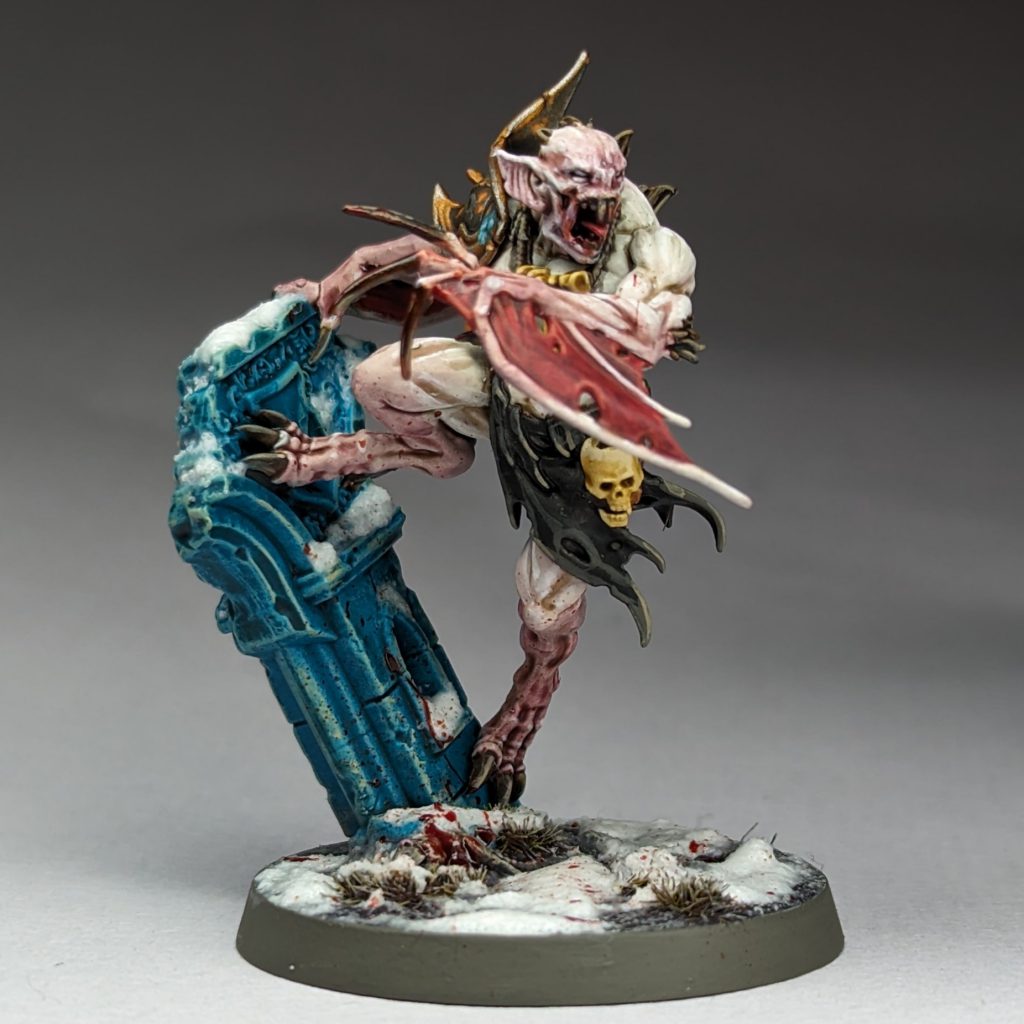
 Varghulf Courtier. Credit: Rich "Cronch" Nutter
The Details
I tend to use a lot of Contrast paints and washes for my painting, as I am a lazy basecoater. Whilst doing the skin recipes above I try to be neat and preserve the details that aren't skin in the white base tone, although normally I have to go back and tidy up neatly with a brush afterwards. For the darker skinned models I'll take the time to pick details out with white before this Contrast step.With a couple of exceptions the details are a case of a Contrast basecoat followed by a single sharp highlight, so it's time for a quickfire round:
- Red membranes - Flesh-Tearers Red, washed Carroburg Crimson, highlighted with a bright red like Evil Sunz Scarlet and then Squig Orange. I also used this for bits like the Varghulf's tongue, shown above.
- Claws and Teeth - Wyldwood, highlighted with Screaming Skull.
- Eyes - Wyldwood, dotted with pure white.
- Fur - Cygor Brown, highlighted with Skrag Brown and then a lighter tone like XV-88 or Karak Stone on larger models.
- Bone - based with Skeleton Horde, making sure not to let it pool much, then highlighted Screaming Skull. You can do Ushabti Bone before the final highlight on larger pieces.
- Cloth/leather - Black Legion or Black Templar, highlights of a mid grey like Mechanicus Standard Grey.
- Cords/rope - Ratling Grime, highlighted with Karak Stone.
- Flayed Flesh - Guilliman Flesh, highlighted with Cadian Fleshtone or Kislev Flesh. Wash with various tones to make it old and gross if you want, e.g. Reikland Fleshshade, Mortarion Grime, Targor Rageshade.
- Nightshrieker mounts - bodies based Gore-Grunta Fur, wet blended down into Black Legion. Highlighted with Mournfang Brown, Skrag Brown for the bodies, and Dawnstone for the wings.
 Morbheg Knights. Credit: Rich "Cronch" Nutter
Basing
I base my army in a fairly Eavy Metal style, but I include some green-blue rocks/ruins which are consistent across some different Death projects. These are based Sotek Green before being highlighted up with Temple Guard Blue, Baharroth Blue and Gauss Blaster Green, before a final wash of Coelia Greenshade. The ground itself (use any texture paste or sand) is based Mechanicus Standard Grey, before being washed with blobs of Nuln Oil and Druchii Violet for some variation. This is drybrushed Karak Stone, then Screaming Skull, and base rims are painted Stormvermin Fur.At this point I varnish my models, before adding tufts, snow or gore. I use Tamiya TS-80 Flat Clear in a spray can. It's the closest I can find in the UK to Testors Dullcote, and I find it reliable and repeatable. The downside is it's in a small can that costs £6. Still, I like the matt finish it gives, and it's hardly ever given me trouble compared to other options.
After varnishing I add tufts (Gamers' Grass 2mm moss tufts on these), then add some snow with Valhallan Blizzard. I go for a mid-coverage of snow rather than full, but arguably I still put a bit too much on. Try to have it settle on plants and surfaces, and be clear from the spaces under these, to set a more realistic scene.
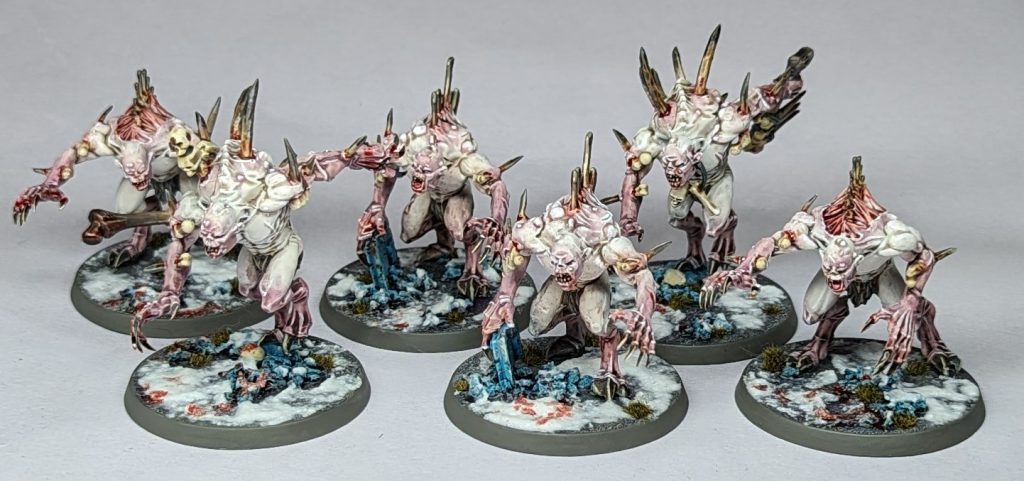 Crypt Horrors. Credit: Rich "Cronch" Nutter
Gore
Gore effects tend to be most effective when used sparingly, and I'm sure some people think I've overused it on these models. This is good old Blood For The Blood God, thinned just slightly with water. A thin coat of this goes over all of the flayed flesh on the models, as well as in the mouths and on the hands. Don't be afraid to stipple with your brush to get a more natural effect.On some models I've also gone for transferring the blood onto the basing - I think this works best where it's minimal, like the Morbheg Knight with the arm in his mouth, rather than with the Varghulf where I went a bit overboard and ended up splashing a lot back onto the model itself.
Tidy up any blood effect that gets onto your base rims or anywhere else you don't want it, and then your noble court of the Summerking are ready to hit the battlefield!
 Abhorrent Arch-Regent. Credit: Rich "Cronch" Nutter
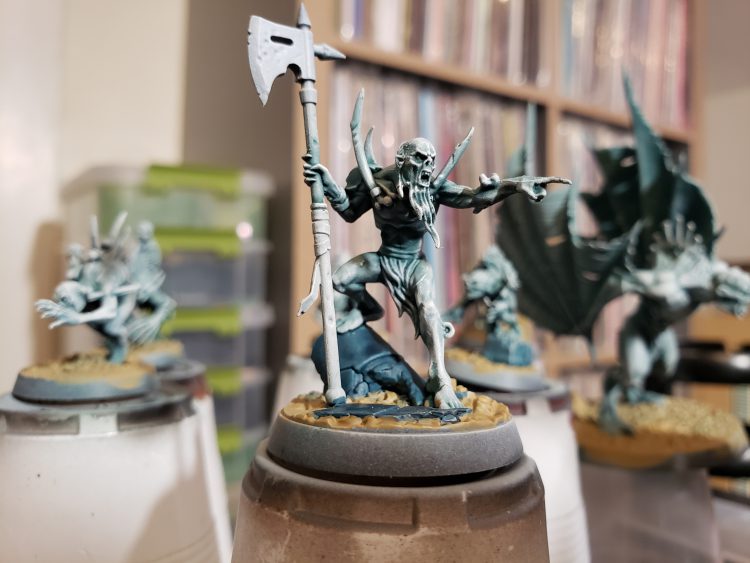
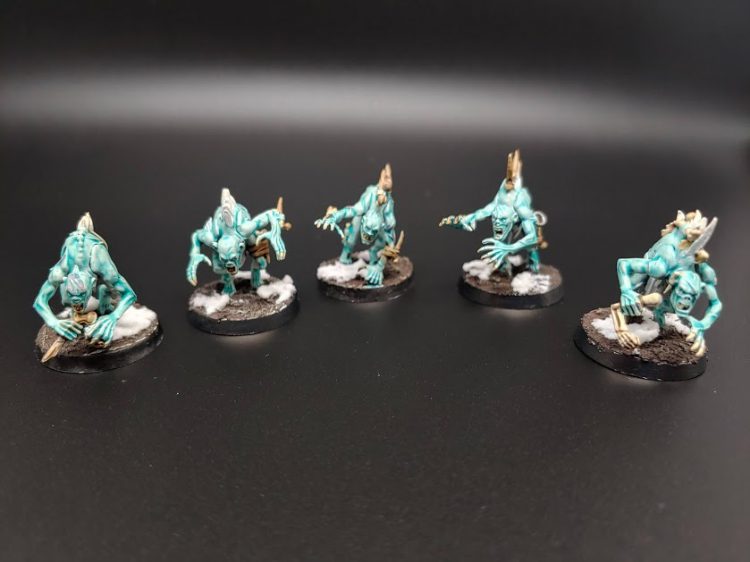
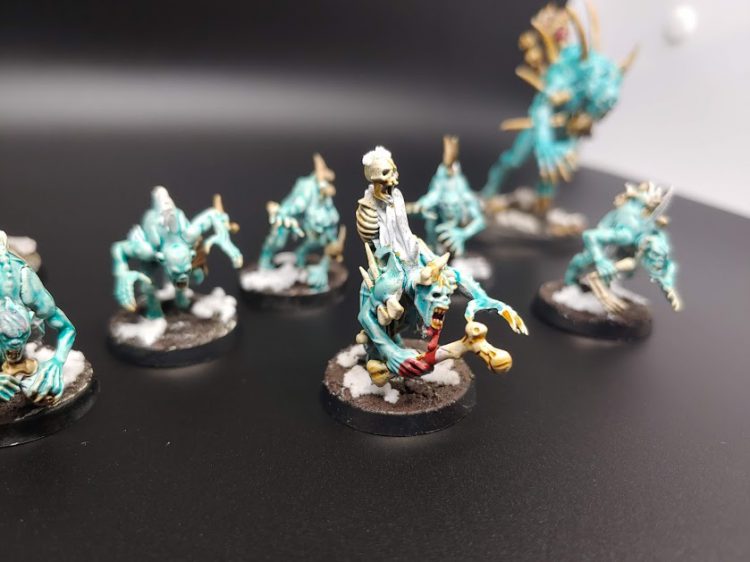
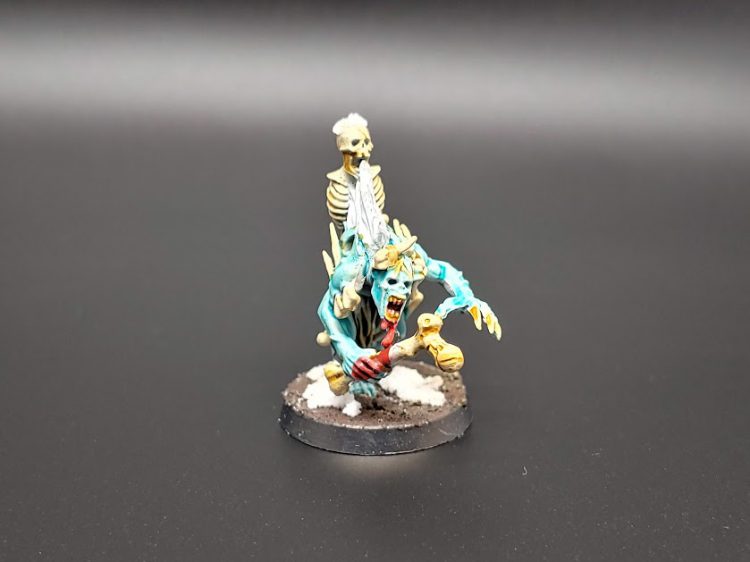
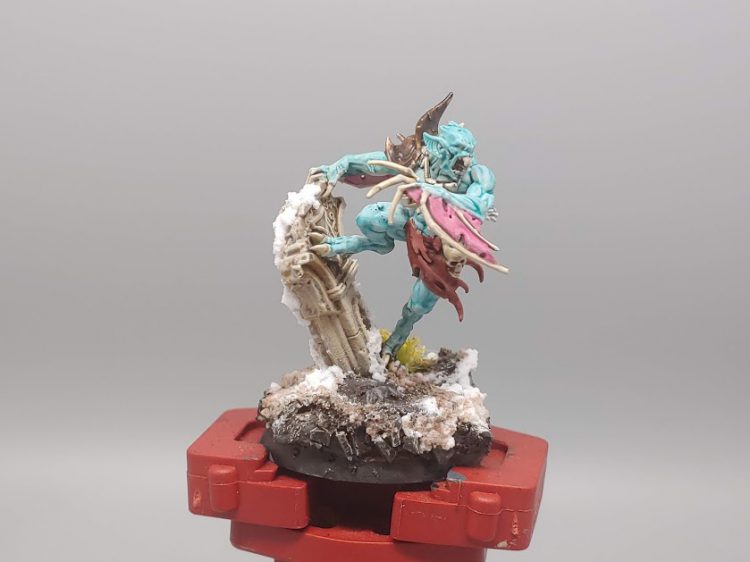
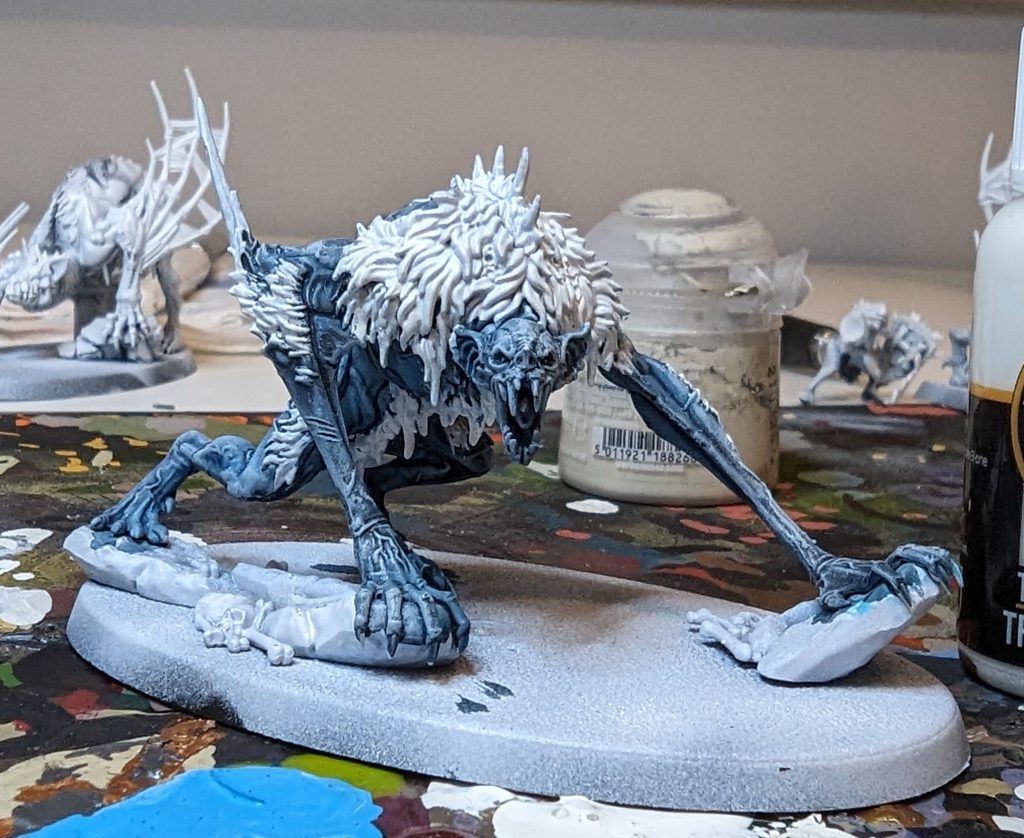
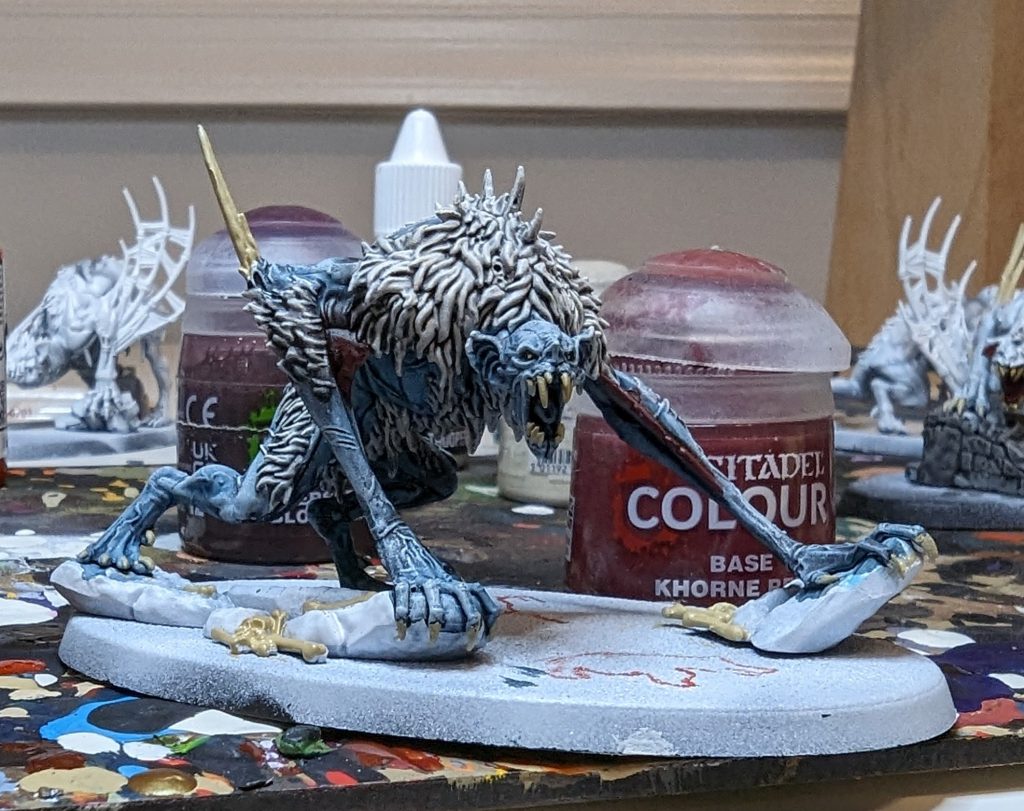
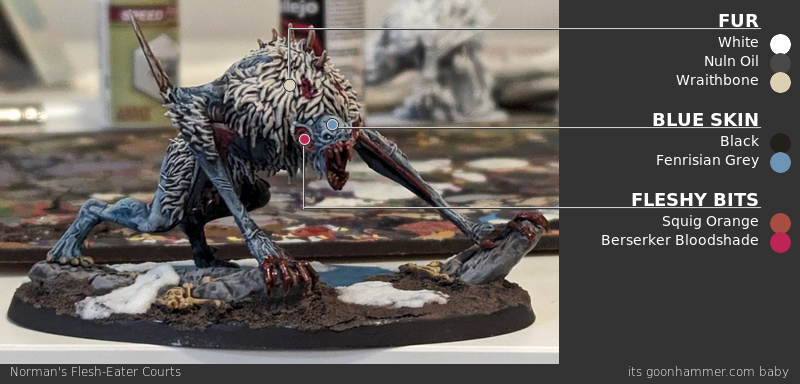
When I started my FEC I knew I wanted to paint Hollowmourne, the traditional blue dudes, but I wanted my own twist on it. Where I landed was a frostbitten, icy scheme that keeps the traditional look intact. I also wanted it to be nice and fast so its fairly speedpaint/contrast heavy.
Step 0: Priming
I start with a white primer, usually White Scar since I want the coldest look I can get.Step 1: Skin Base
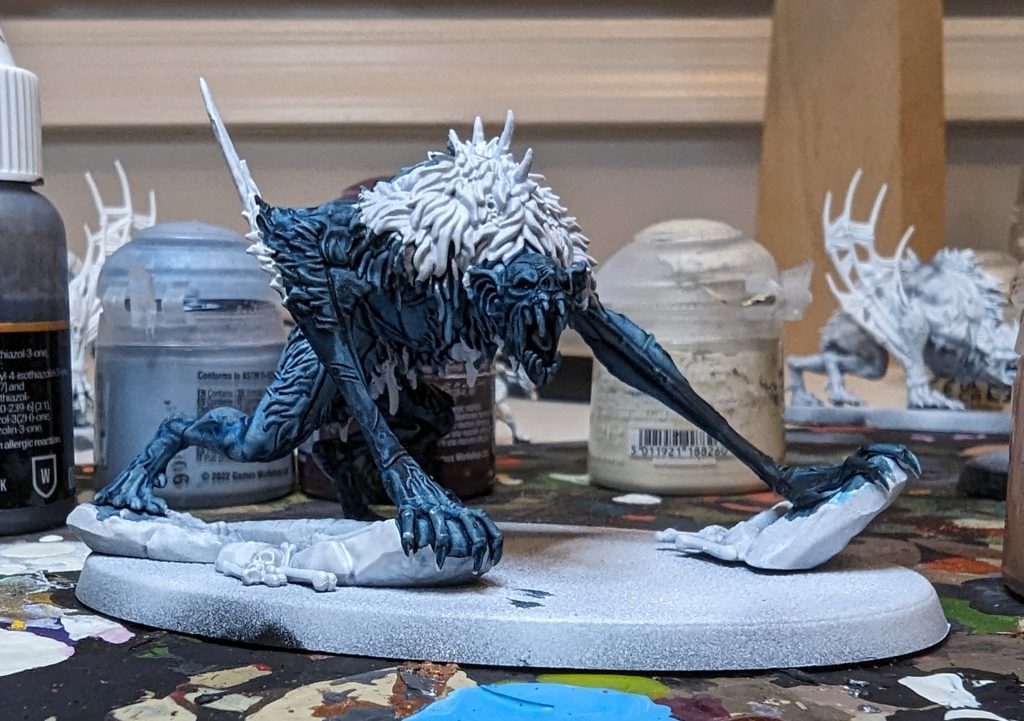
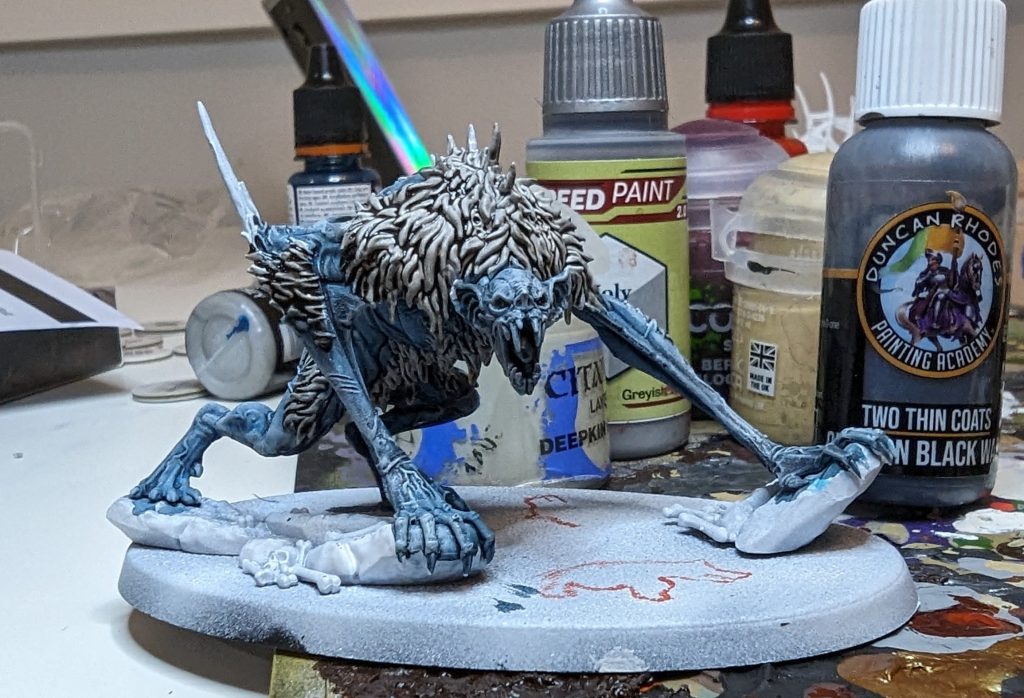
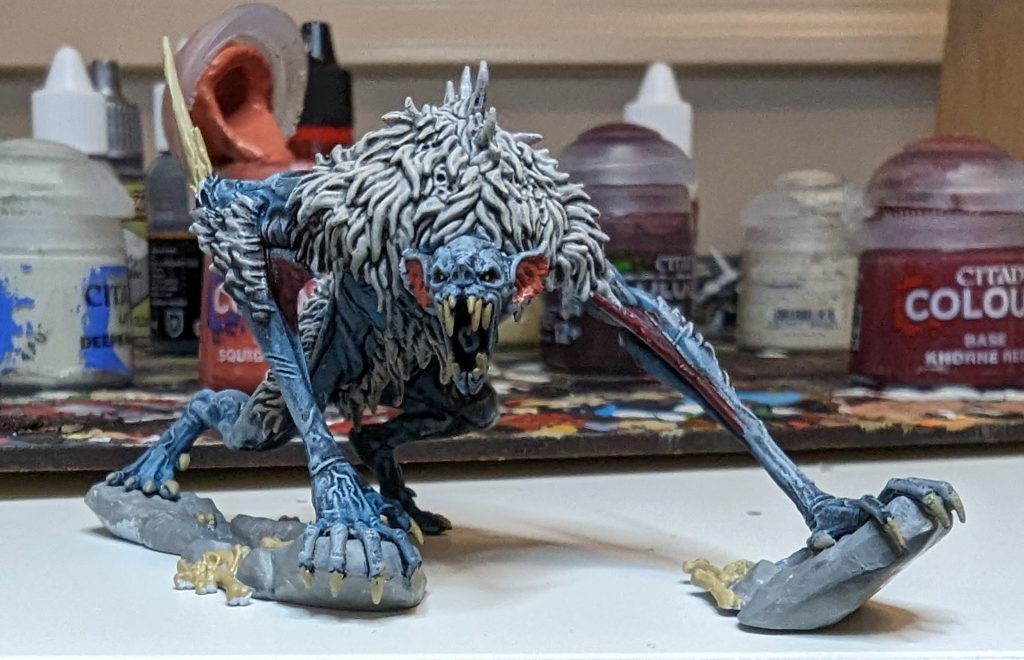
The first real step is hitting all the skin with Vallejo's Black Lotus speedpaint. This looks ugly as hell but don't worry we'll be getting far far brighter than this in our end product. Don't worry about being too precise here (at least I didn't) but the cleaner you are the easier the next step is gonna be.
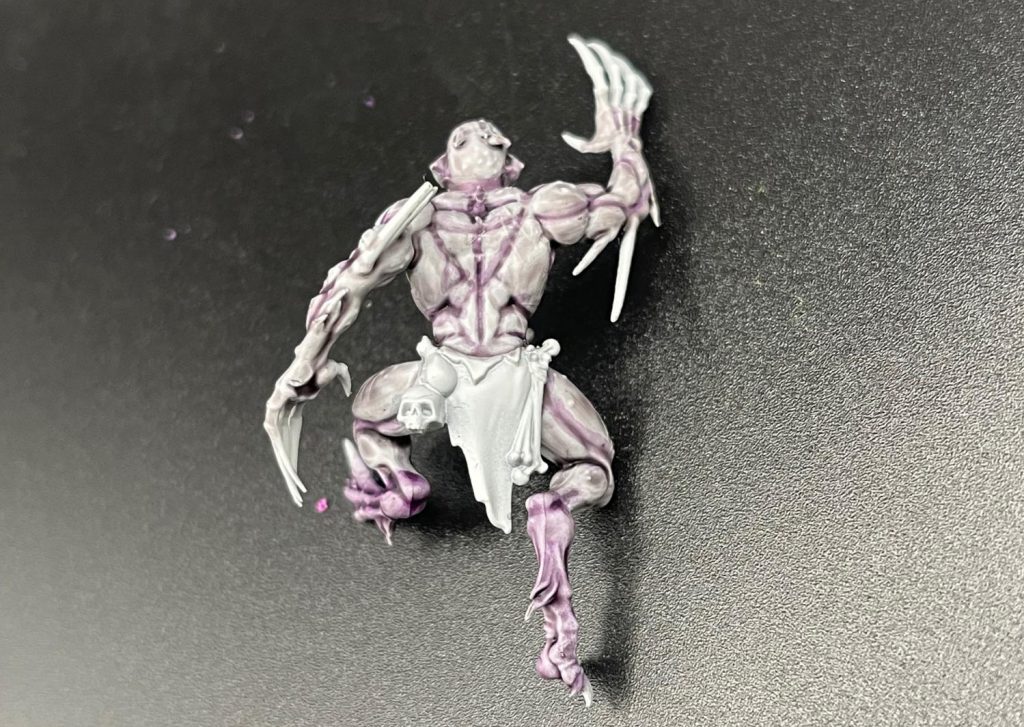
Step 2: Drybrush and Detail Cleanup
Step 3: Hair Wash
Step 4: Sores and Membranes
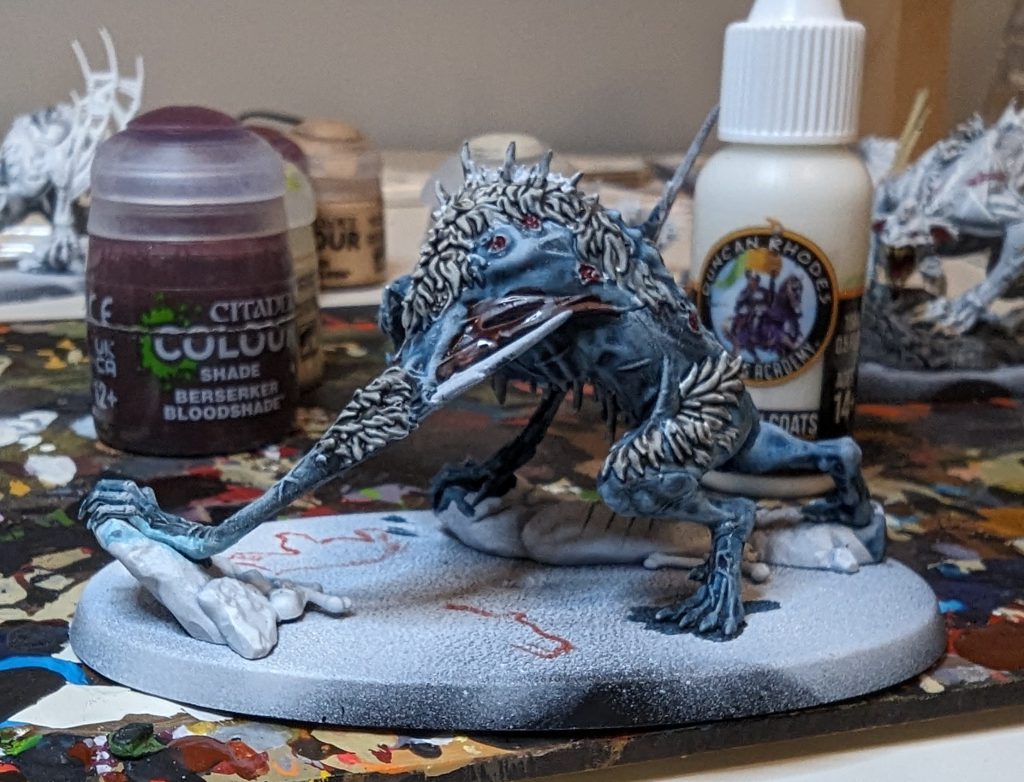
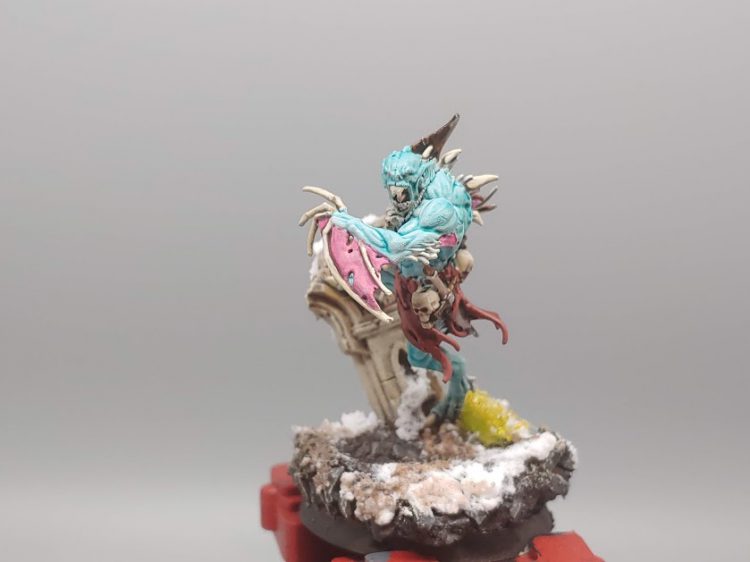
That black wash is gonna take a while to dry so lets do some more detail work. All the open wounds, and sores, and gross stuff gets hit with some Citadel Beserker Bloodshade. This was is very strong so you'll get some nice color off the bat but if its not quite deep enough hit it with another coat.
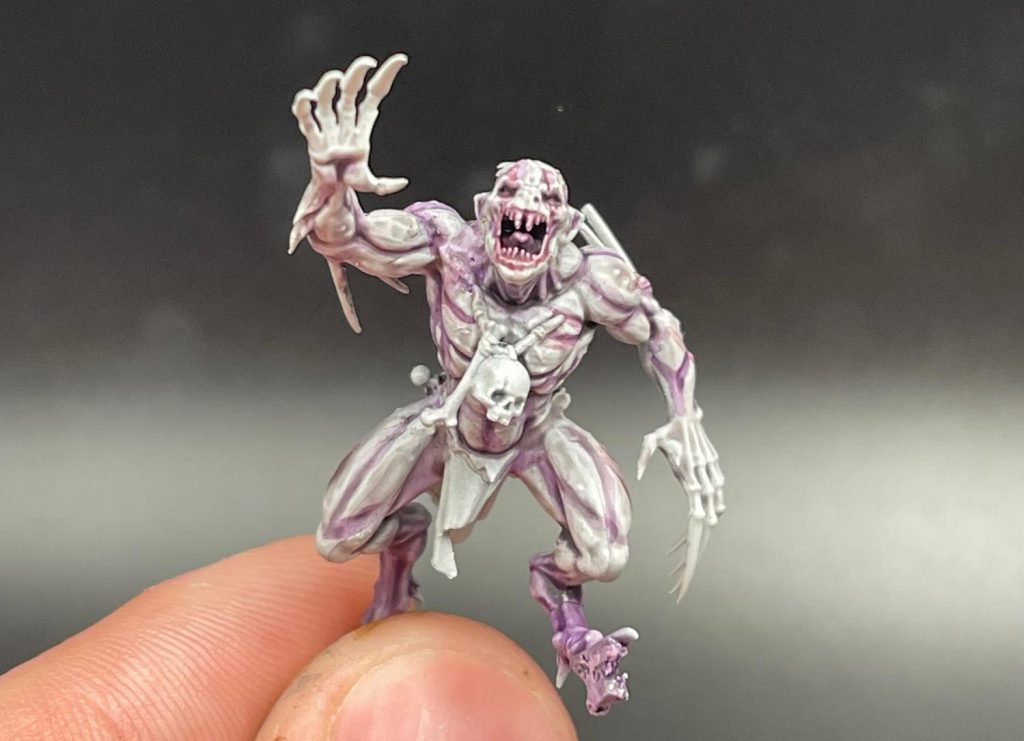
Step 5: Hair Highlights
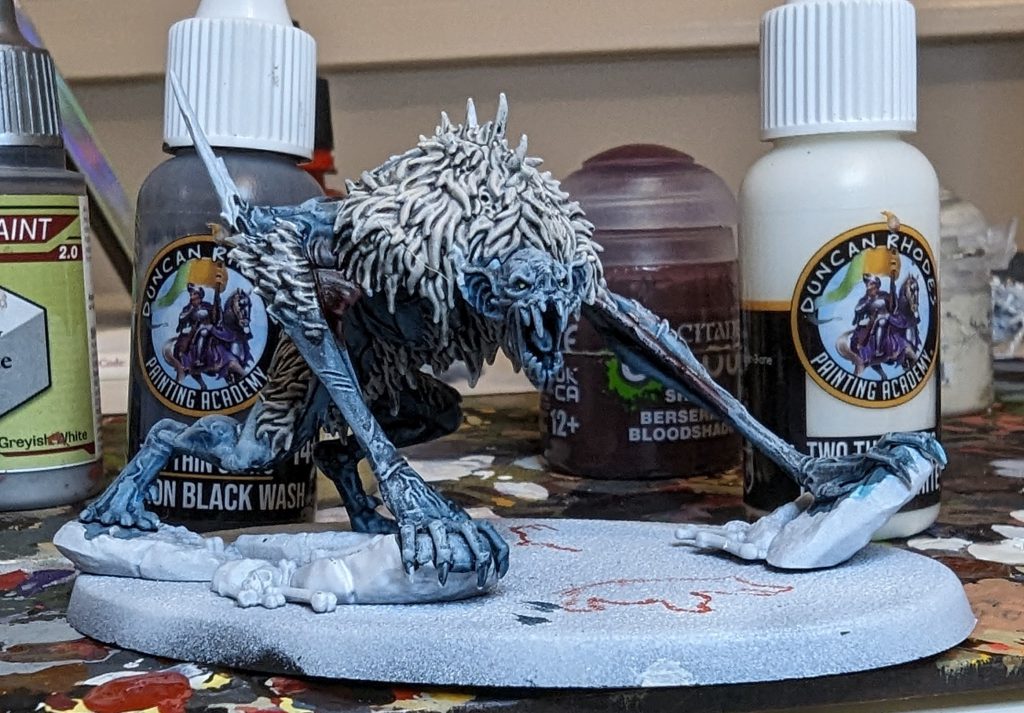
Now that our wash is dry, we can go through and highlight the fur. I use Two Thin Coats Trooper White for this, but Citadel's Wraithbone works just as well. you can do this step with a drybrush, but I find a manual highlight gives the best results.
Step 6: Bone Basecoats
Next step is to base coat all the bones, claws, and teeth with Citadel's Morghast Bone. I also do the eyes around this step which is done with Citadel's Dorn Yellow.
Step 6: Ears and Other Fleshy Stuff
Next up I hit all the stuff that is fleshy but isn't the main skin tone with Squig Orange and wash it with Berserker Bloodshade. This includes the inside of the ears, lips, and sometimes I use this for wing membranes.
Step 7: Bones
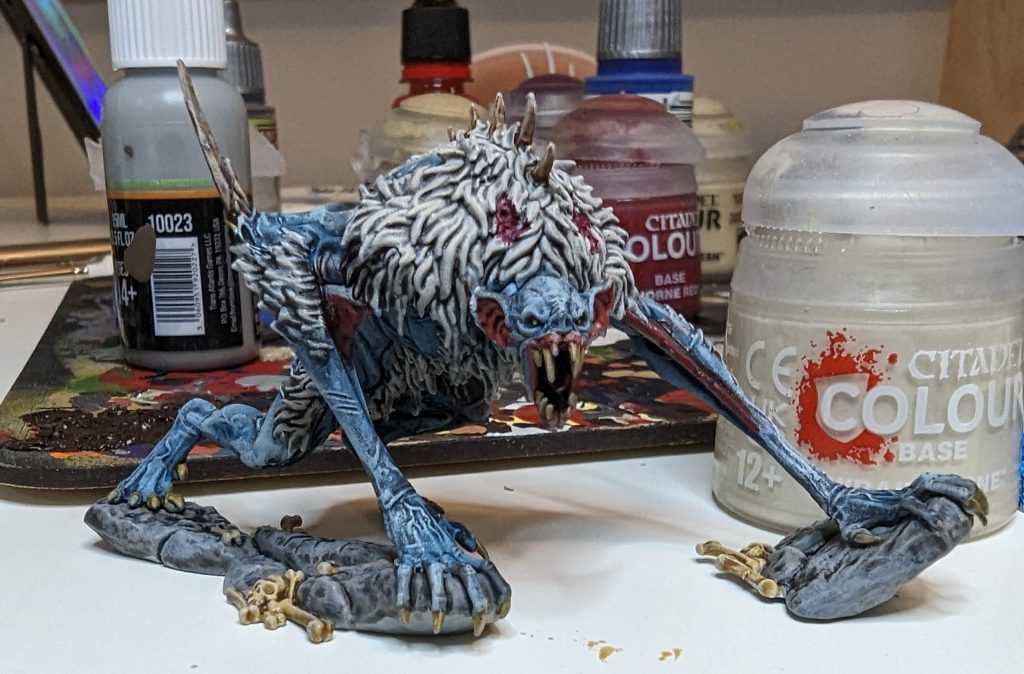
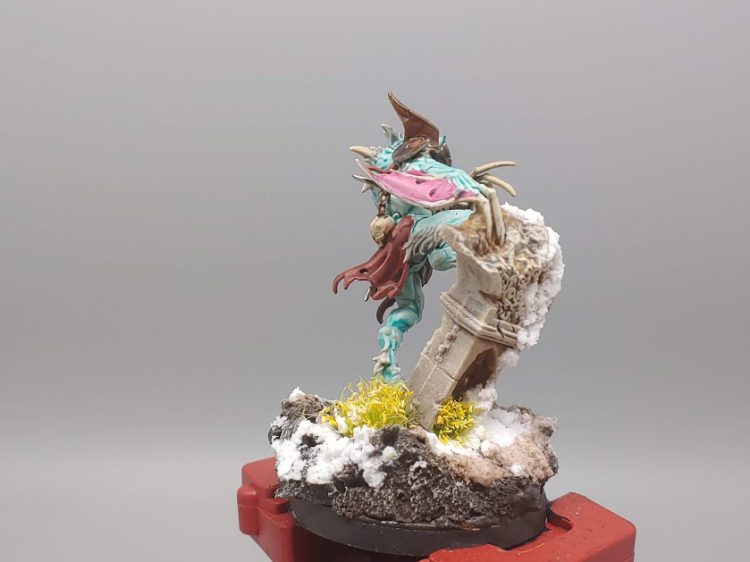
Next I hit all the bones with Army Painter Boney Matter Speedpaint and Drybrush it with Wraithbone to give it a bit of an icy effect.
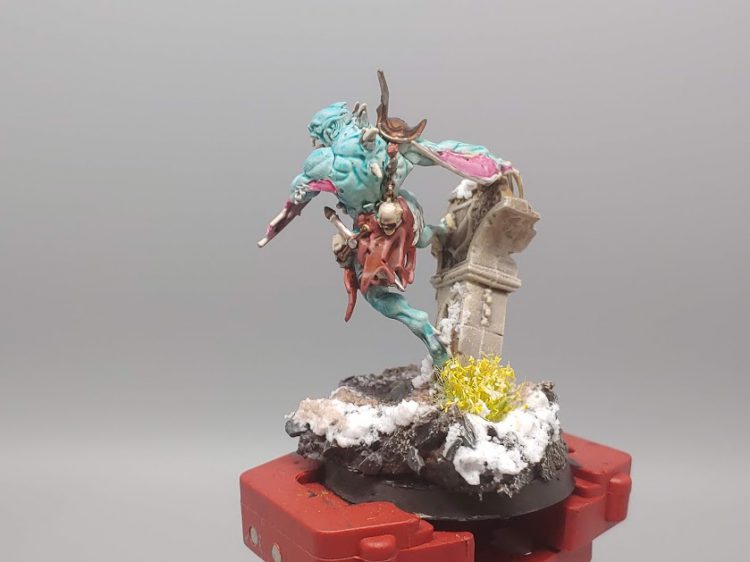
Step 8: Basing and Blood
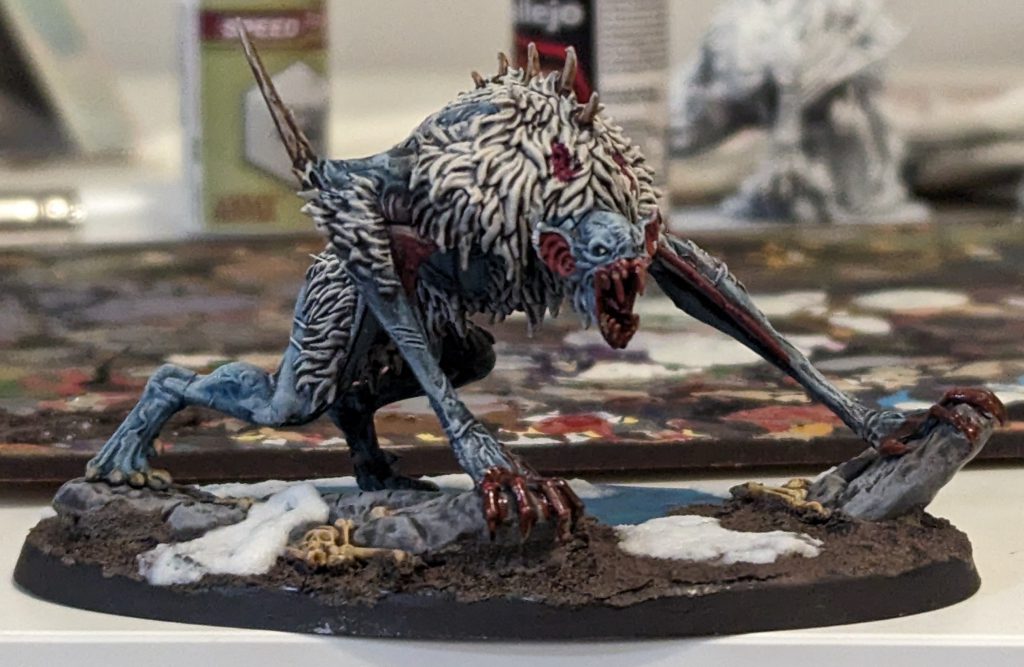
I hit the front hands and mouth with some old reliable Blood for the Blood God (a tasteful amount, you don't wanna cover up all the hard work you did) and do the base here. the dirt is just Vallejo Mud drybrushed with Vallejo Tan and for the ice I put down a mix of Terradon Turquoise and Aethermatic Blue, mixing them randomly on the base, then cover that with UV resin. Note if you want to do this, put the resin down before the basing paste.

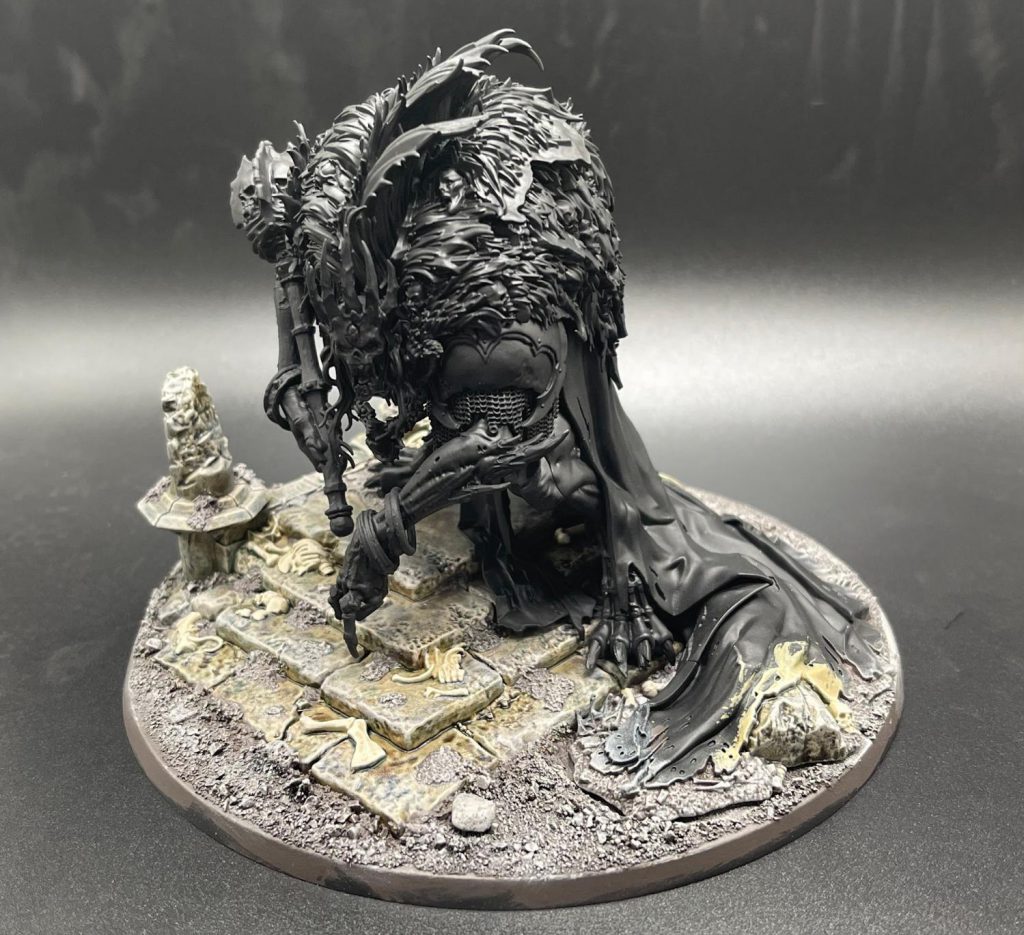
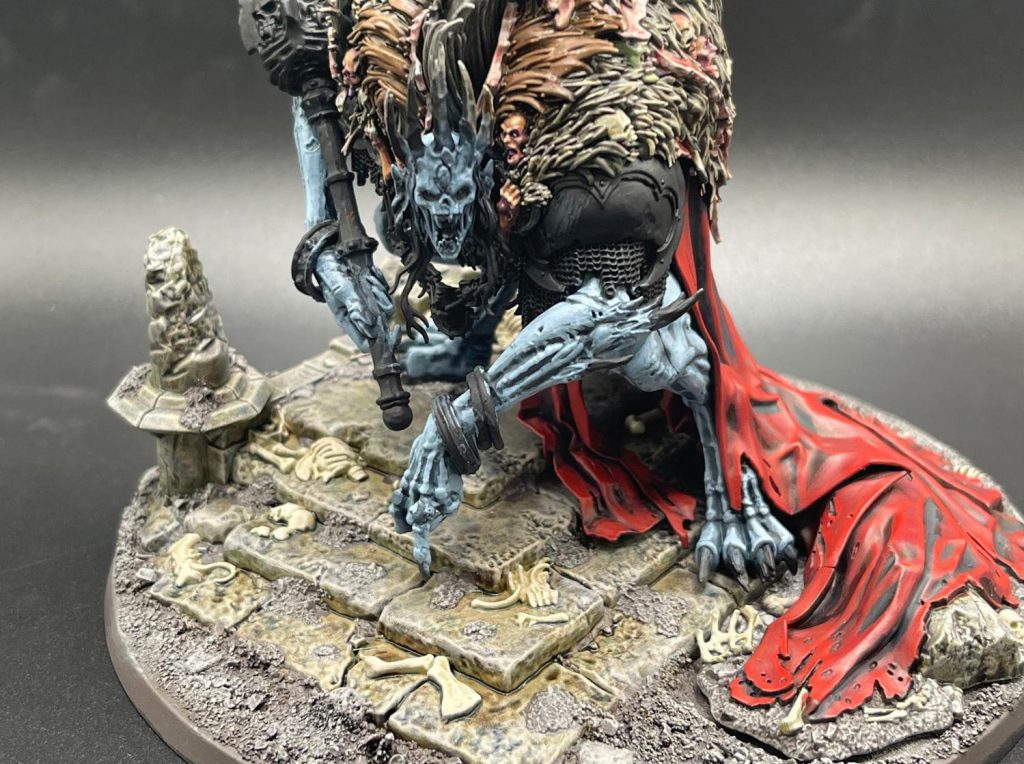
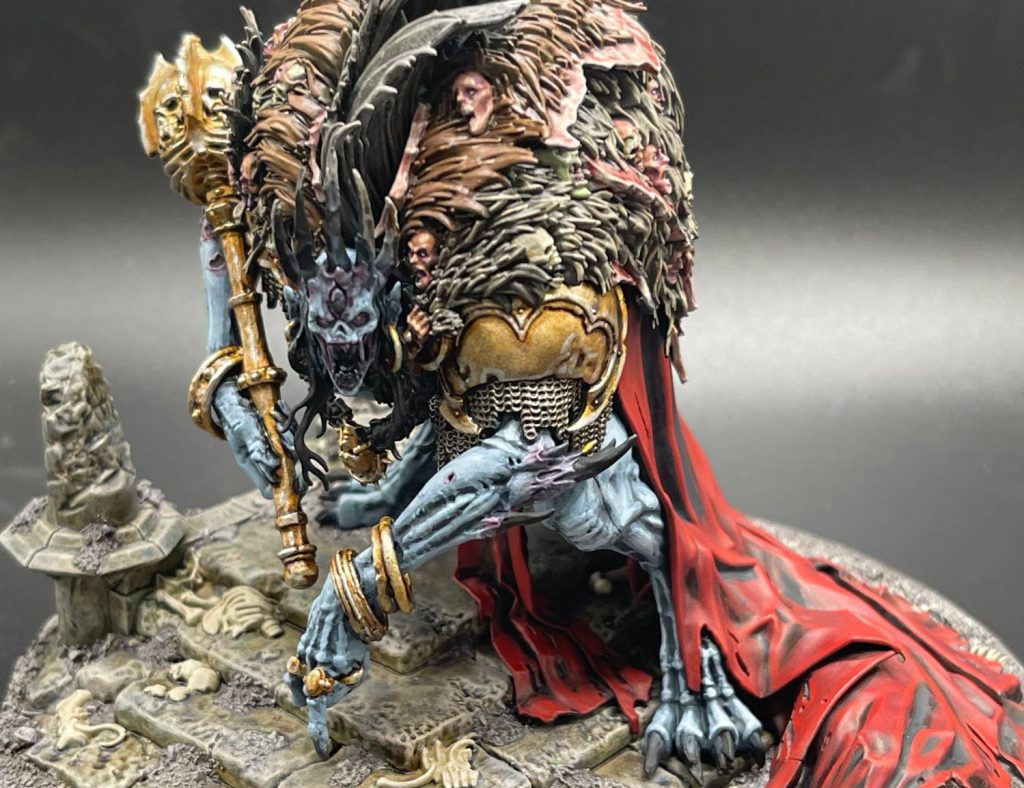
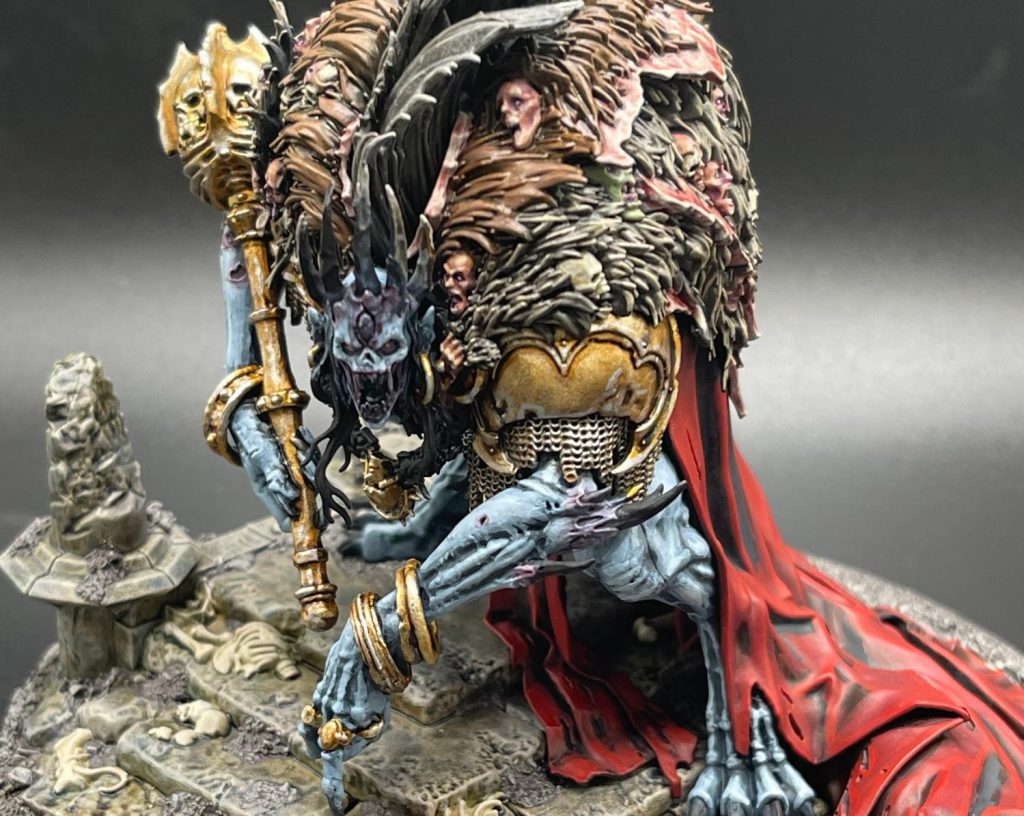
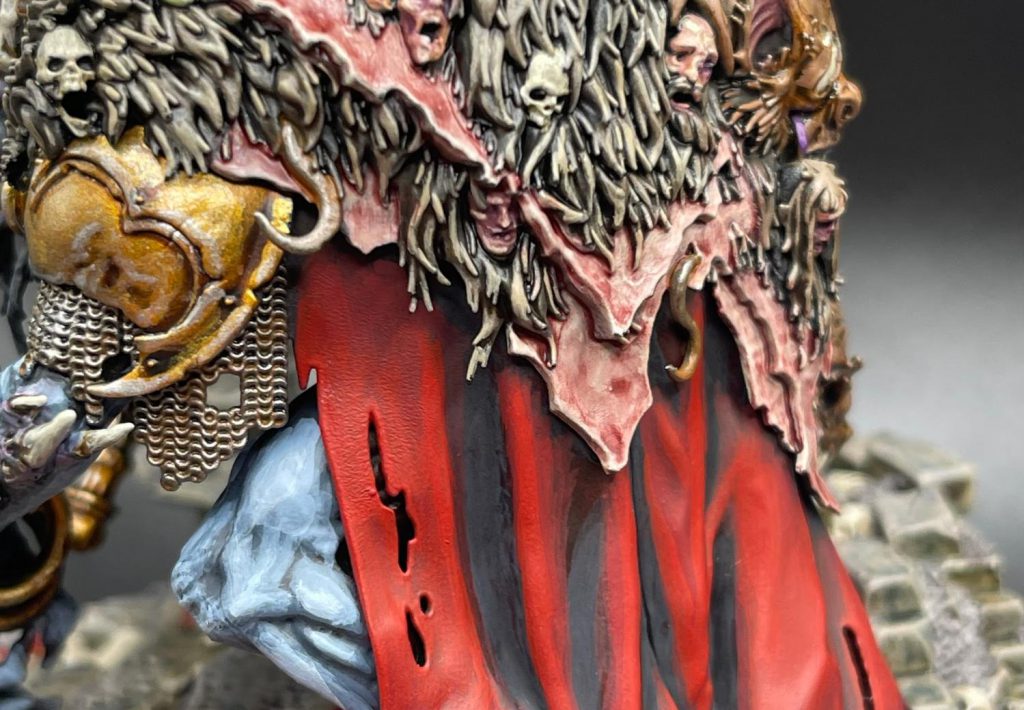
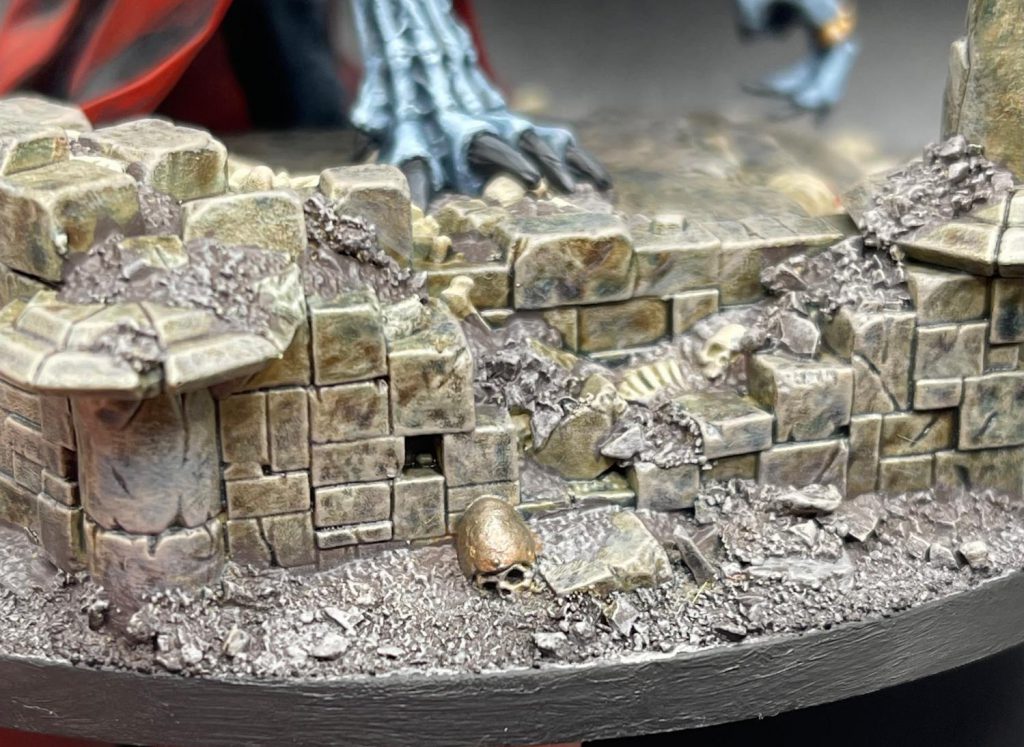
I built this model and left it in two pieces, the base and the main model. This was so I could do the stonework without having to fuss with getting the brush around Ushoran.
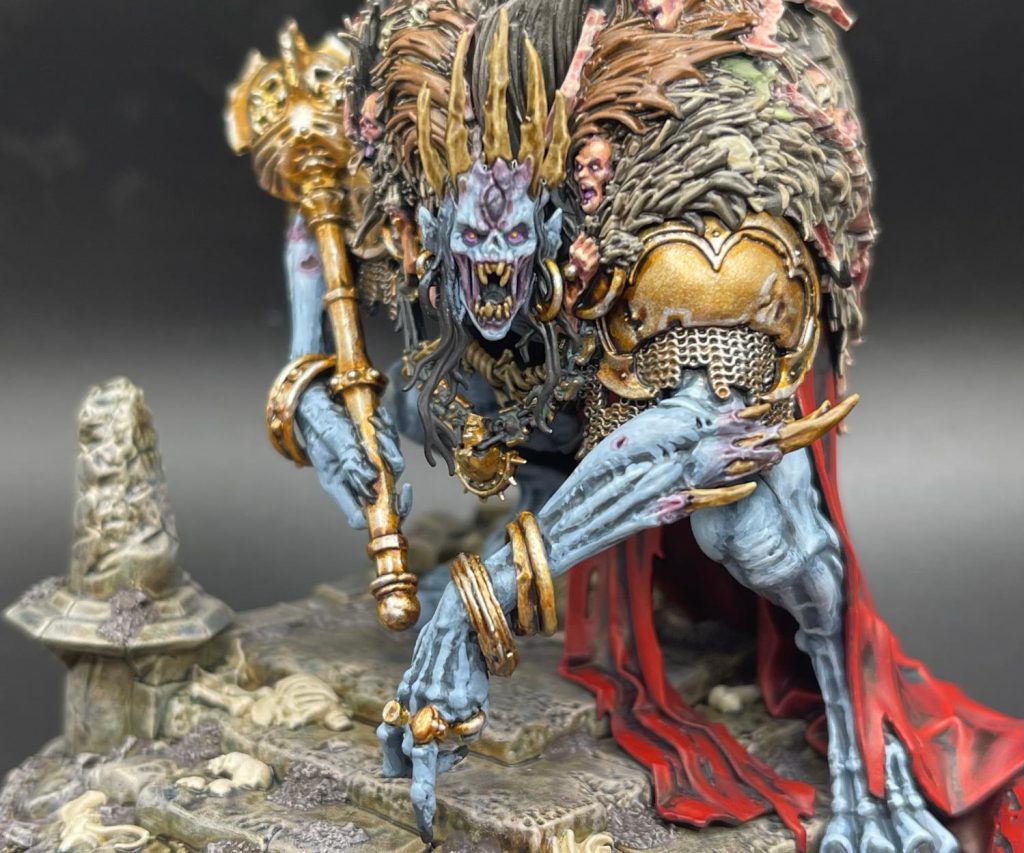
Basing
The stones were base coated Zandri Dust, making sure to get a good coverage with a few thin coats. After that I drybrushed it with Screaming Skull followed by Wraithbone.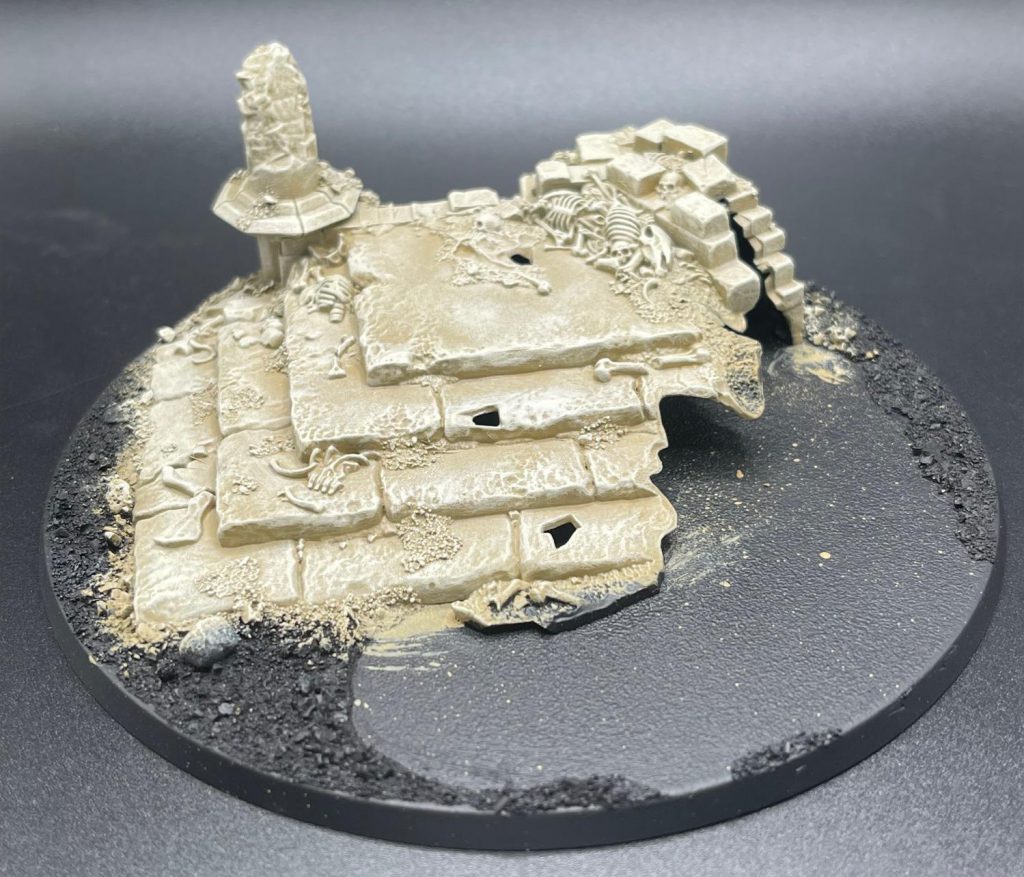
After this dried, I threw a coat of Gryph-Charger Grey contrast over the stone, doing my best to keep it off the bones.
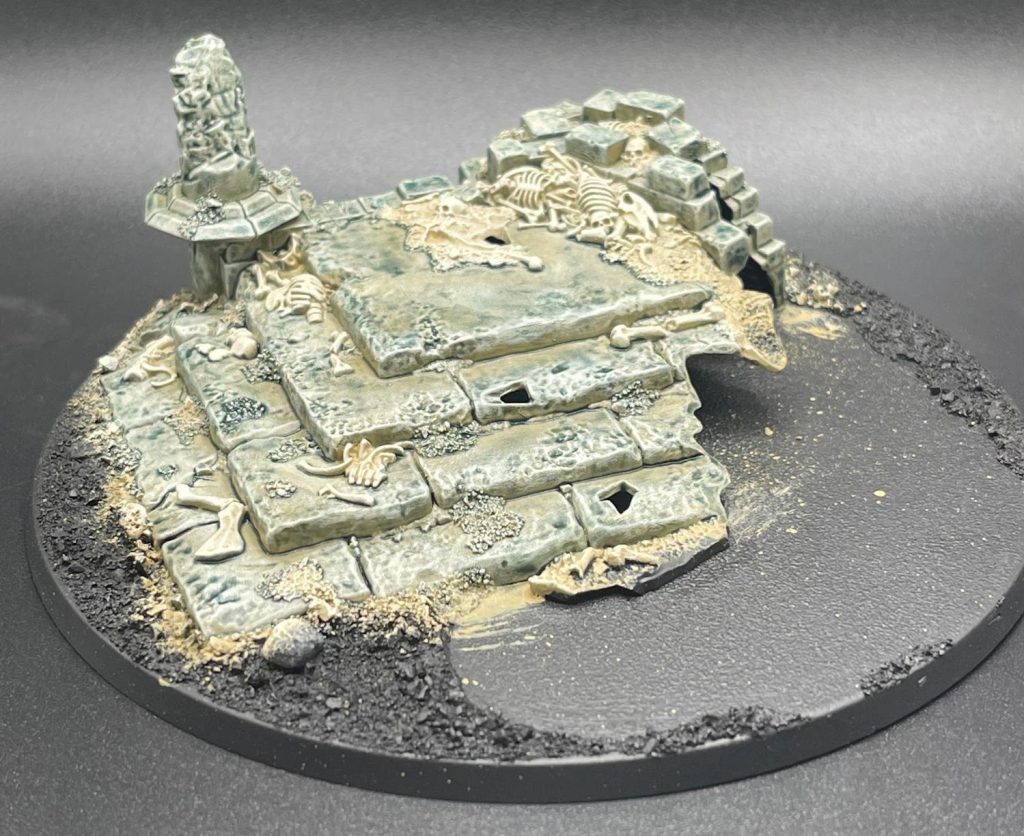
After this I put a heavy coat of Agrax Earthshade over the stone, this is my go-to recipe for quick stones and it’ll help tie him to the rest of the army.
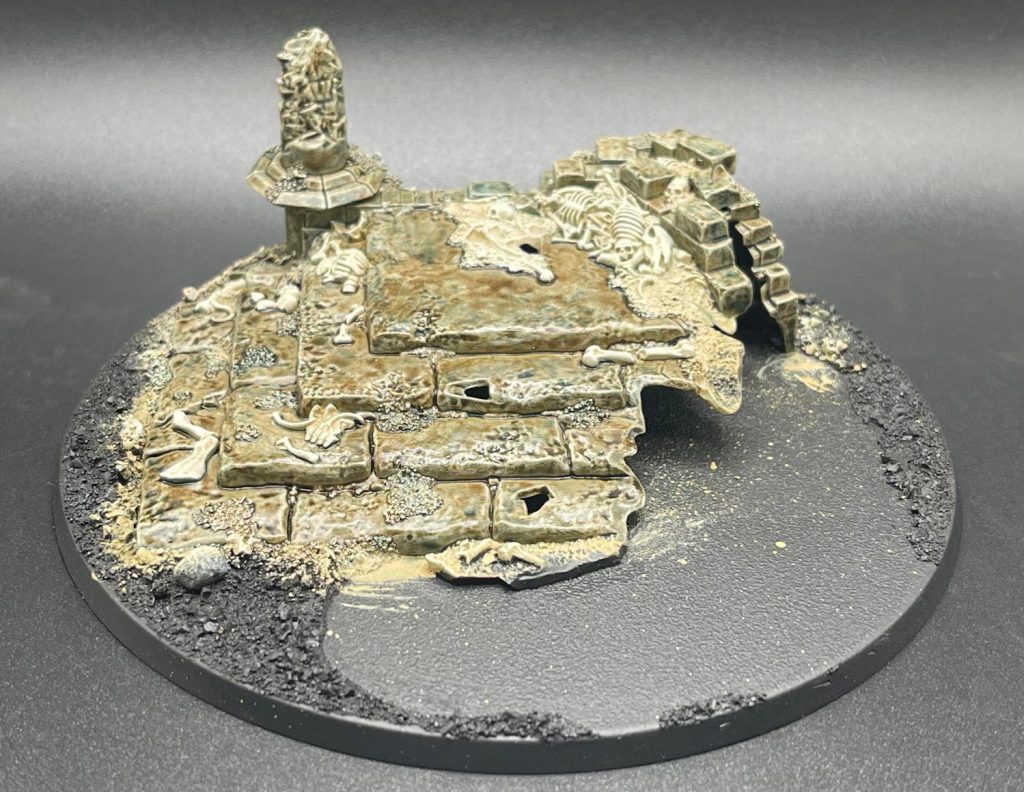
Once this is nice and dry, I painted in the dirt and rubble in Dryad Bark, followed up with an all over drybrush of Rakarth Flesh to tie it all together.
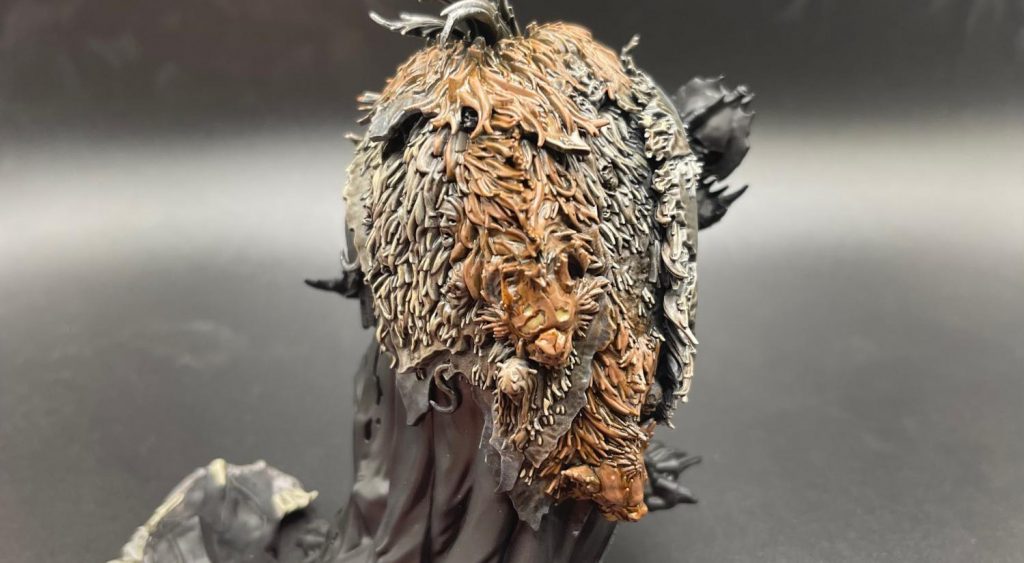
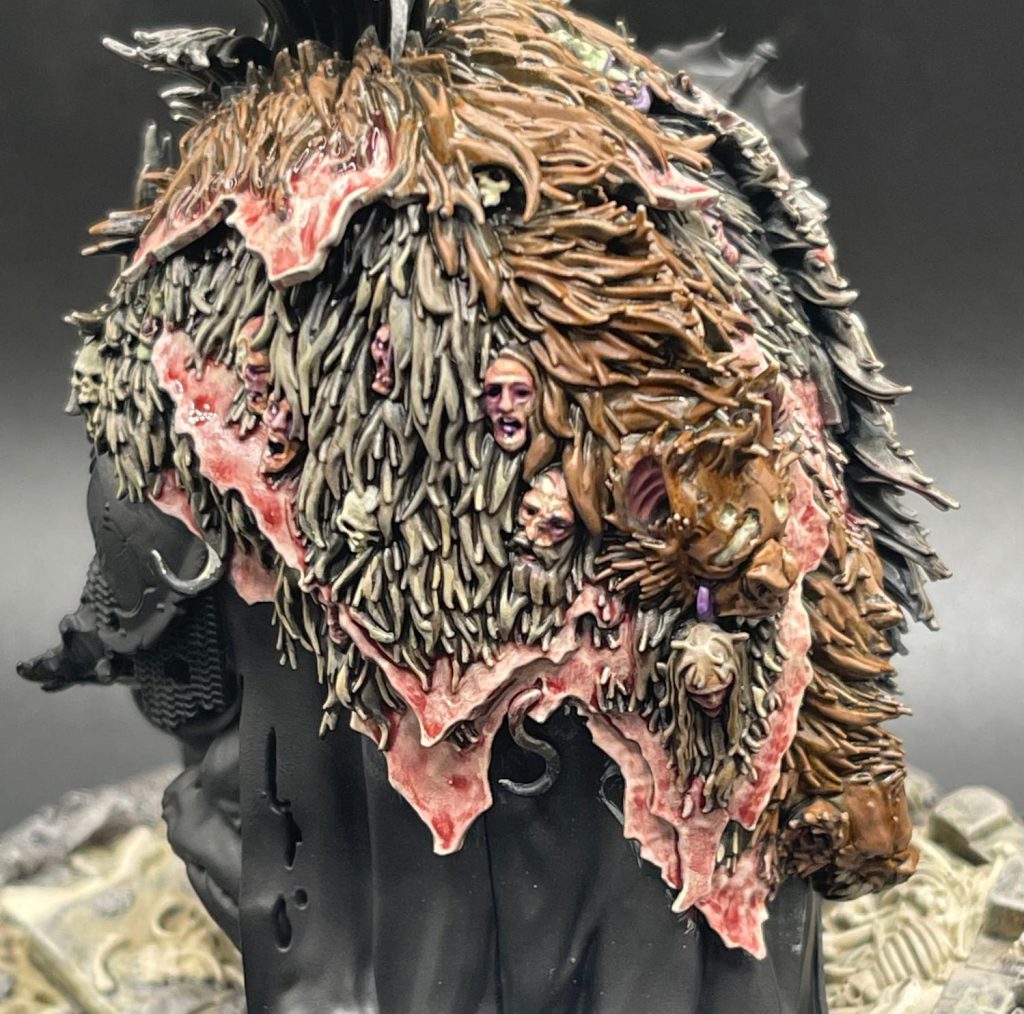
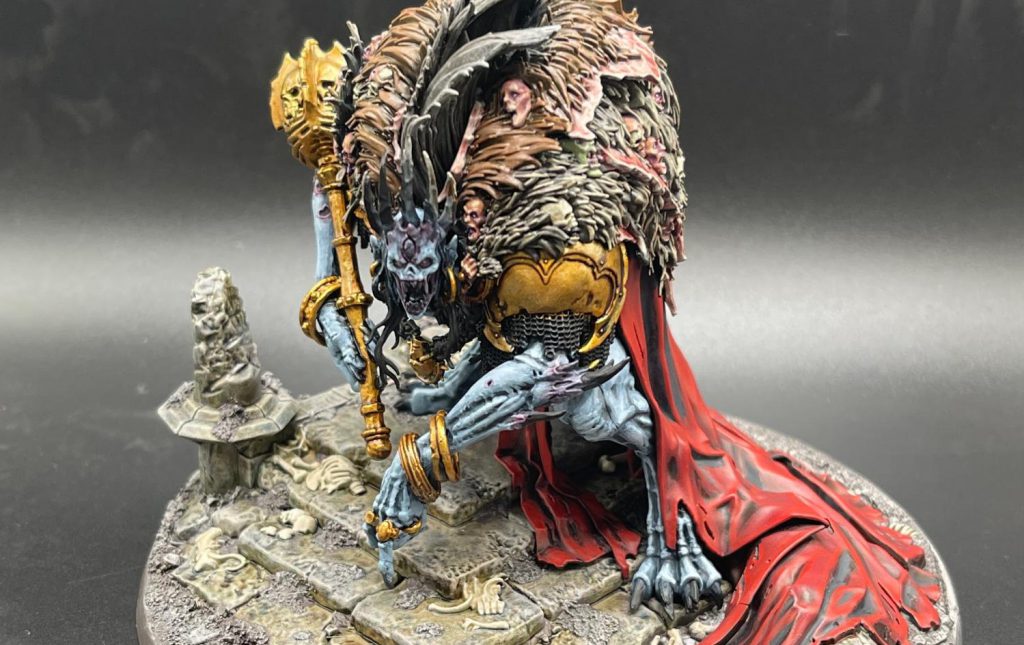
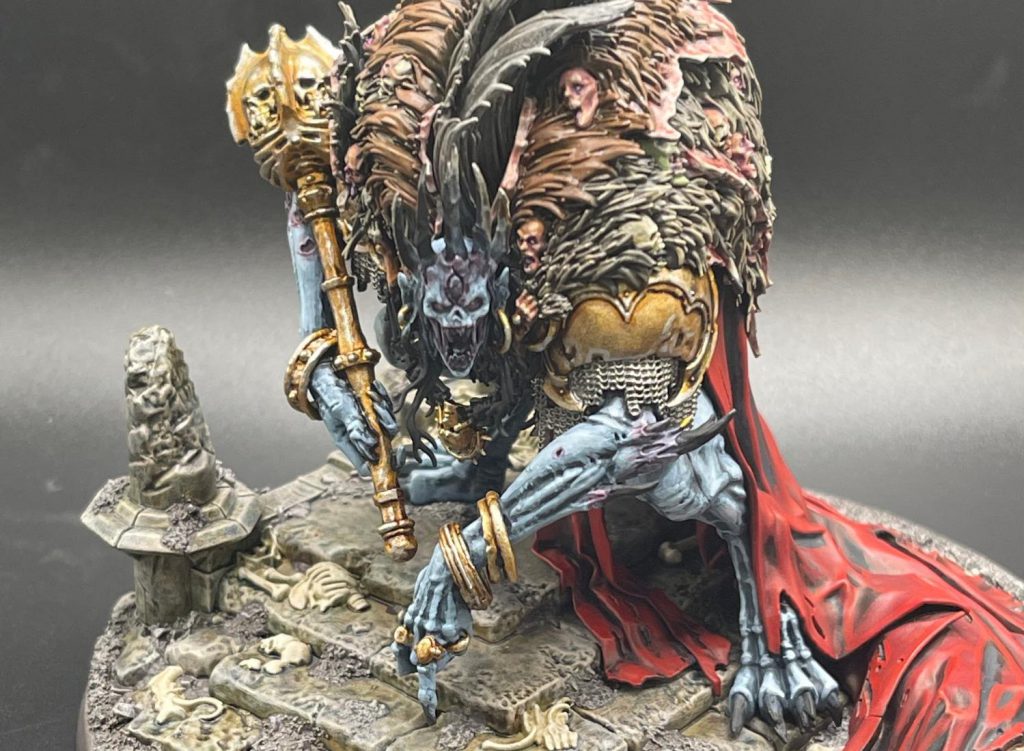
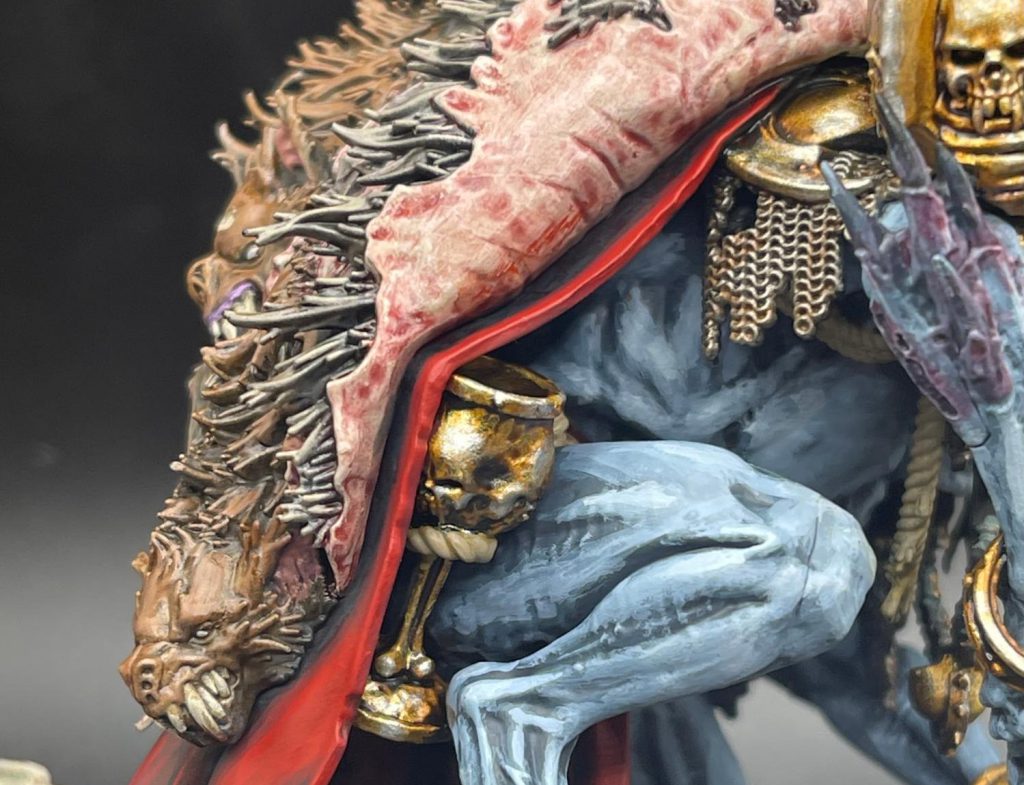
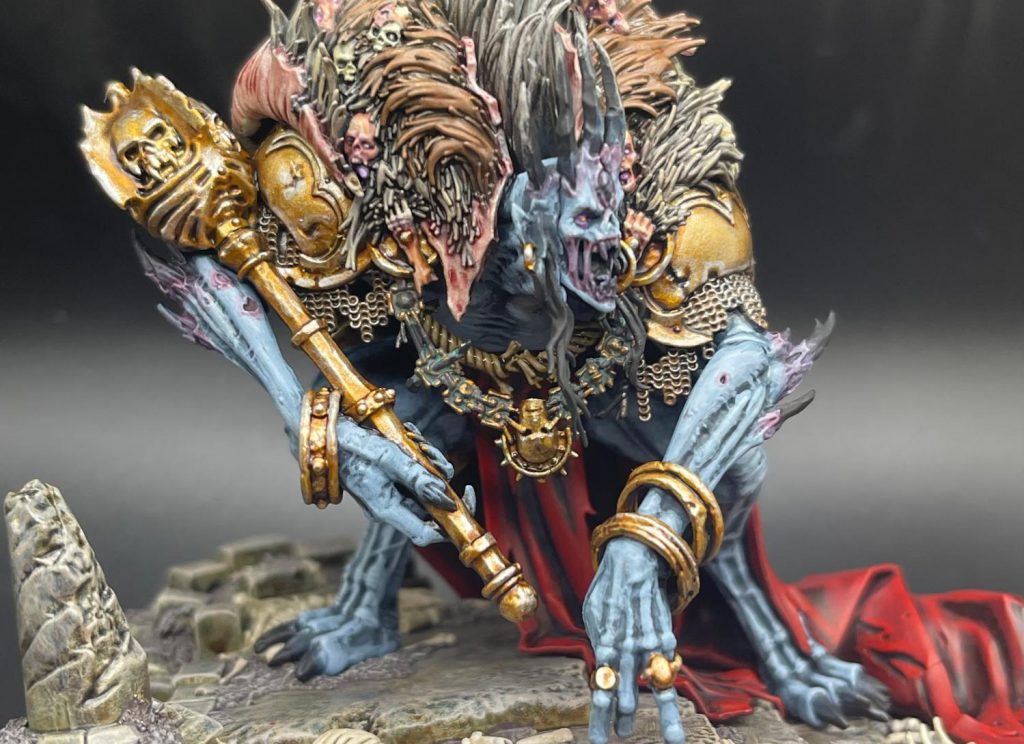
Fur and Skin Cloak
Starting by blacking out the cloak with Black Legion, then I applied a basecoat of Skavenblight Dinge to all the fur areas. Don’t worry about hitting the skin underneath the fur, we will come back to that once the surrounding fur is done. Skavenblight is a nice dirty grey color which we will bring up with some dry rushing and thinned washes to give us some tonal variation in the fur.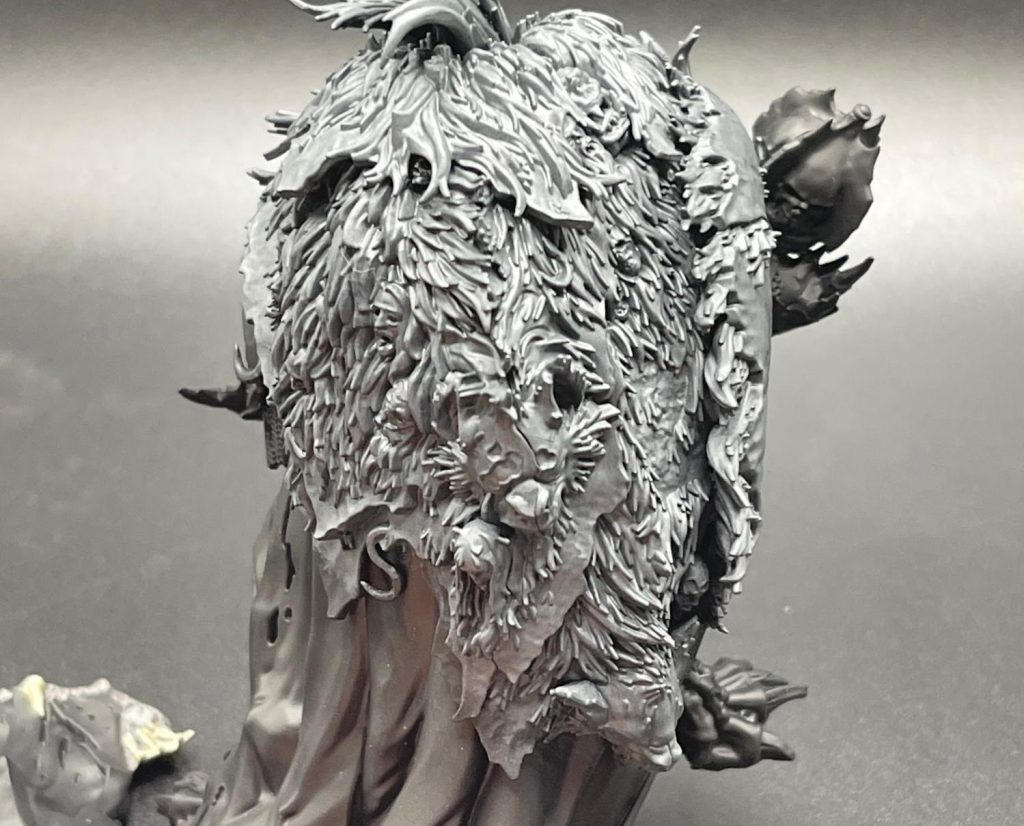
After this has dried we will continue to bring it up with a drybrush of Stormvermin Fur, followed by Rakarth Flesh. I went a little harder with the Rakarth on the monster faces so that when we use contrasts and glazes they pop.
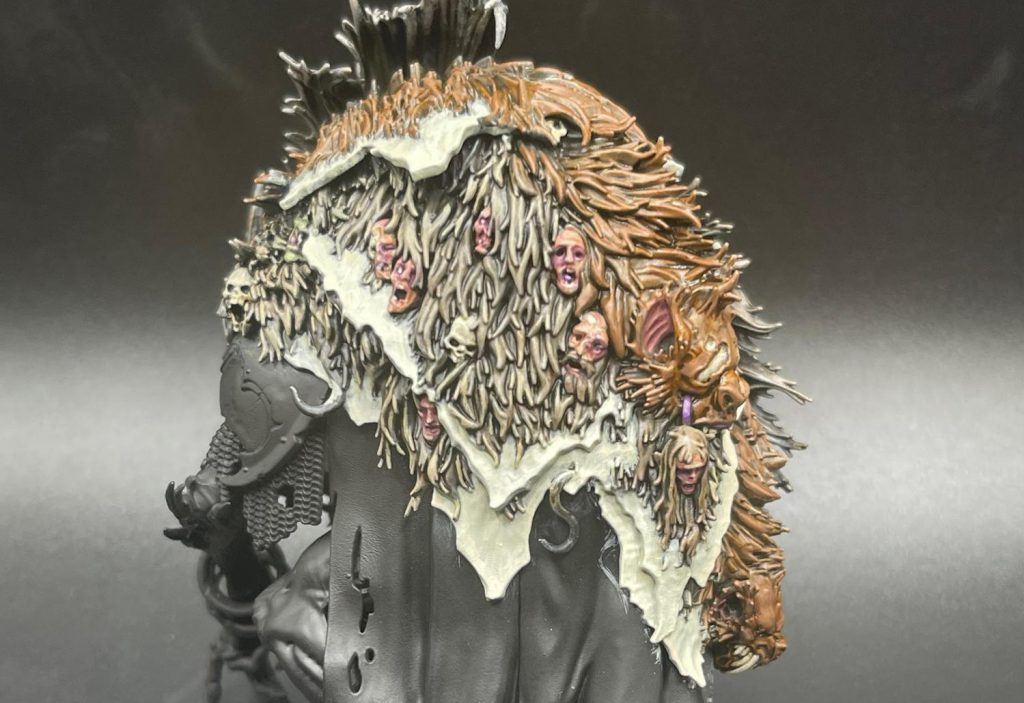
Next we apply a thinned down coat of Targor Rageshade across the fur, this is a muted red/purple tone and will bring a little hint of color back into this area. Once this dries we apply a thinned out Gore-Grunta Fur to the center of the fur, and a few patches around to break it up. This is also applied to the bat/monster heads. While this is wet, I blend it out with thinned Wyldwood, and apply Wyldwood straight from the pot to the central crest (Mohawk? Is he that radical?) of the model.
Next I do a coat of Agrax Earthshade to bring it all back down again, the back and forth of this gives more depth than just a single drybrush into contrast. From here we start highlighting. This takes a while, and while you could drybrush it I decided to do it all by hand as this is the centerpiece to the army. Starting with the warm brown, layer it up with Mournfang Brown. Then for the lighter hair, I highlighted it with Karak Stone. This color was mixed 1/1 with Mournfang Brown to highlight the previous step.
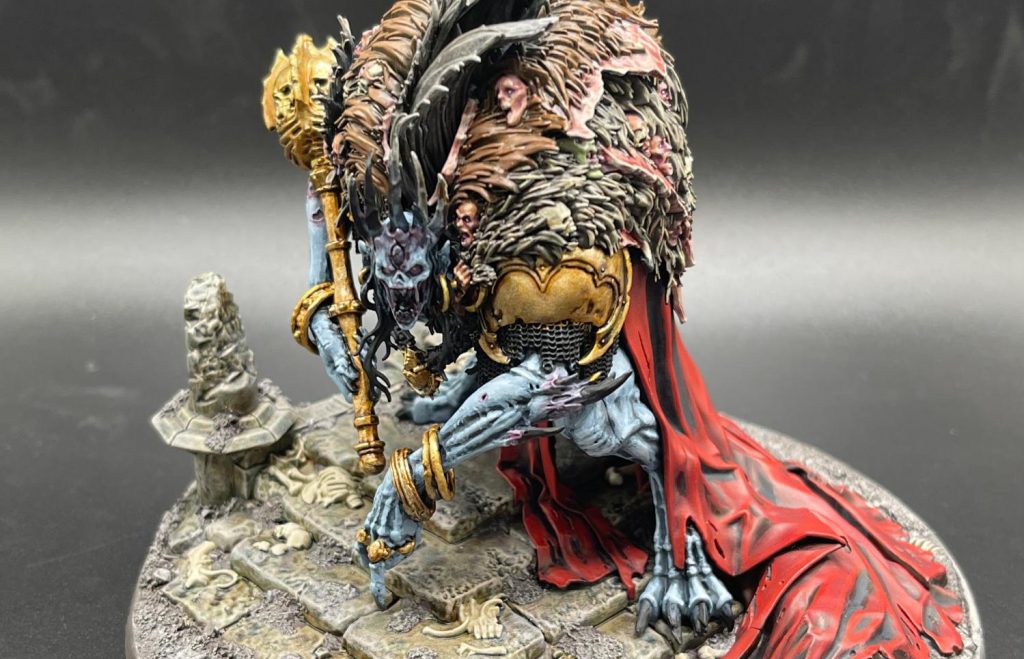
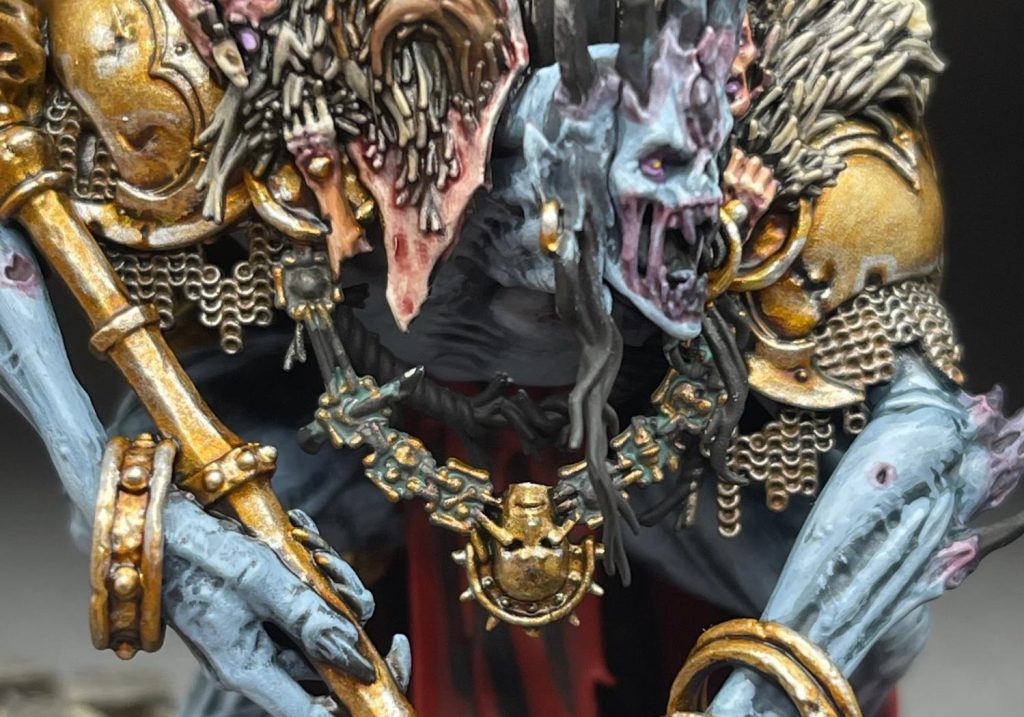
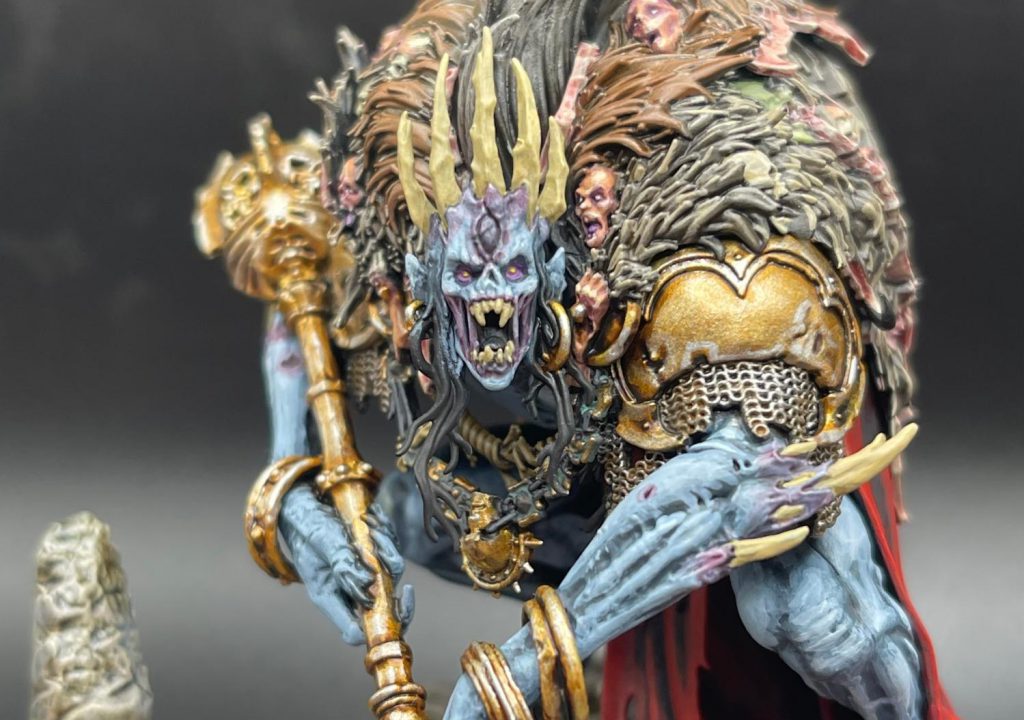
Now we need to tackle the heads throughout, start by base coating any bones sticking out with Zandri Dust, then high light with Screaming Skull and Wraithbone. After that base coat all of the human heads and skin bits with Bugman’s Glow. Layer the skin with Cadian Fleshtone and highlight with Flayed One Flesh. The Orruk heads were base coated Straken Green and highlighted with Nurgling Green.
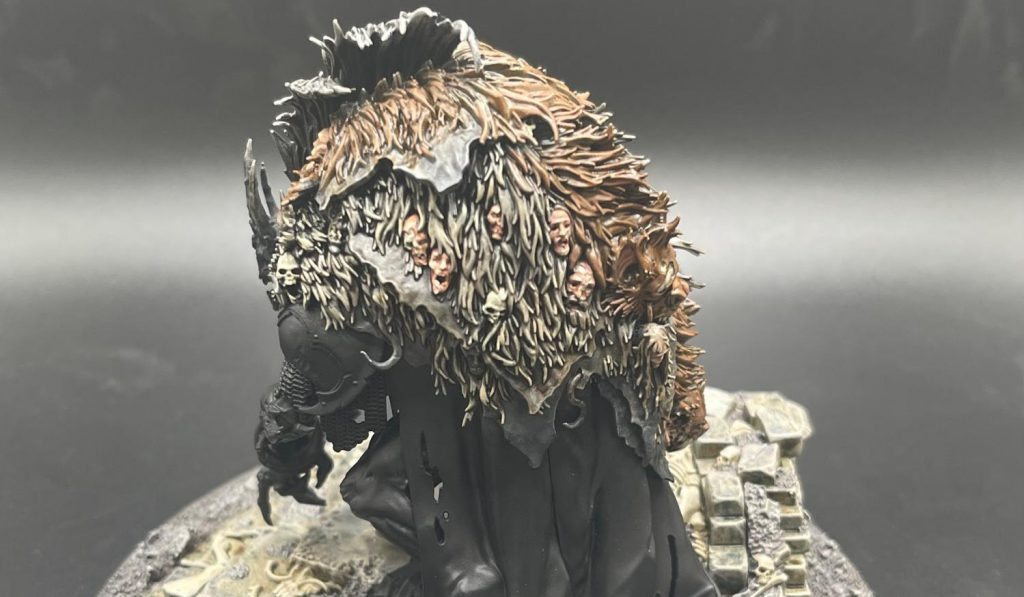
From here apply Druchii Violet into all the eye sockets, mouths, and under the cheek bones of the heads as well as inside the ears of the bat heads. Once that dried, I hit the eyeballs with Grey Seer. All the gums on the bat/monster/thing heads, the more classic Orruk head, and all the tongues sticking out were base coated with Xereus Purple and highlighted with Kakophoni Purple.
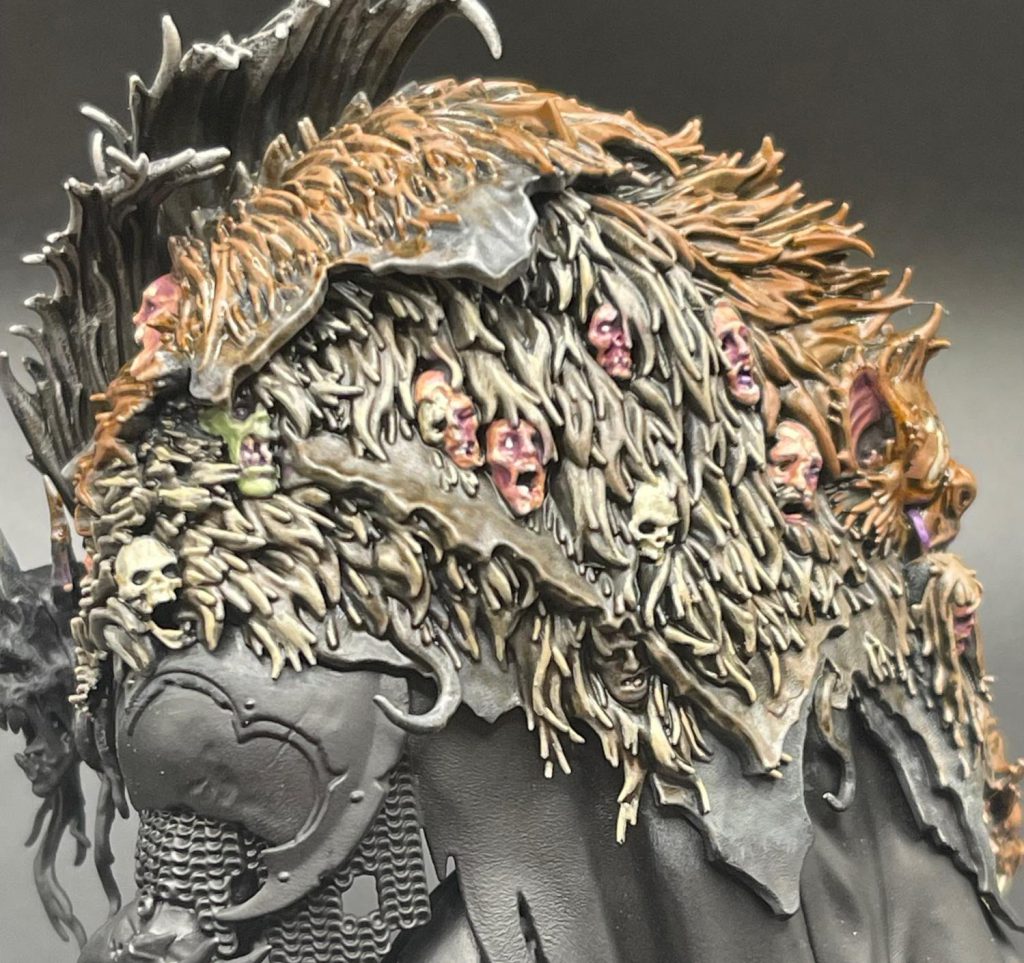 (Do you see it? The unpainted head? The fifth one I’ve missed in the process of painting this thing?)
For the skin underneath all that, start with a base coat of Ionrach Skin, followed by a layer of Deepkin Flesh and a highlight of Wraithbone.
Next I applied a thinned wash of Berserker Bloodshade across the skin, focusing the pools into the recesses all over the skin.
 The emperor's new clothes are just his skin suit!
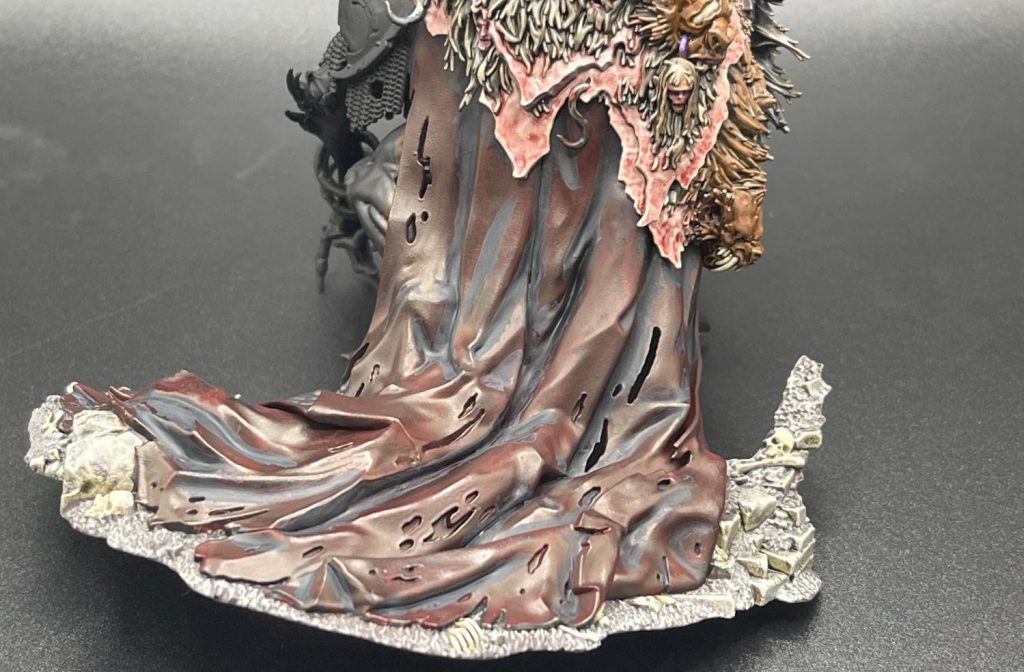
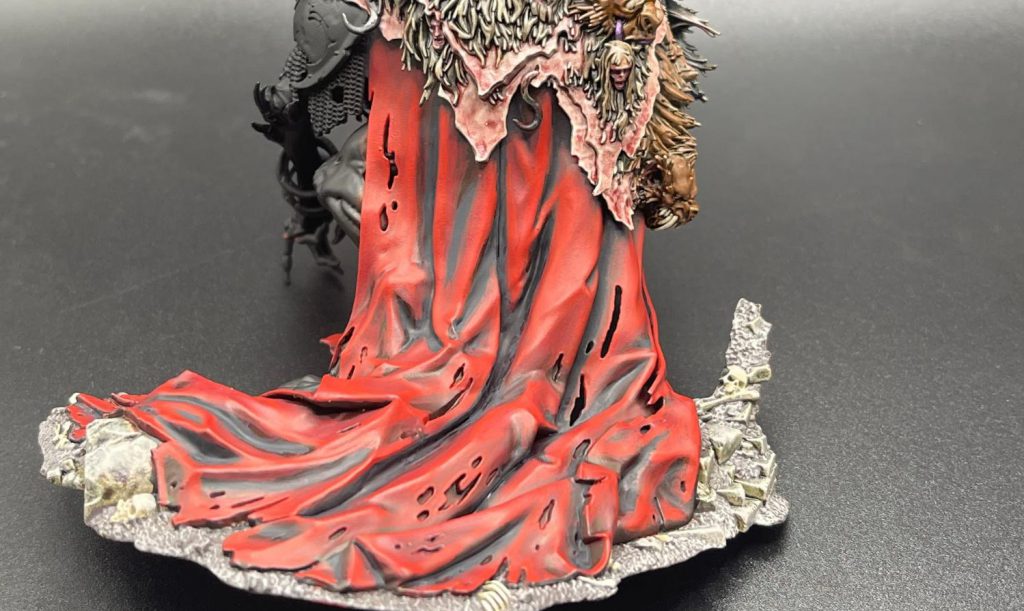
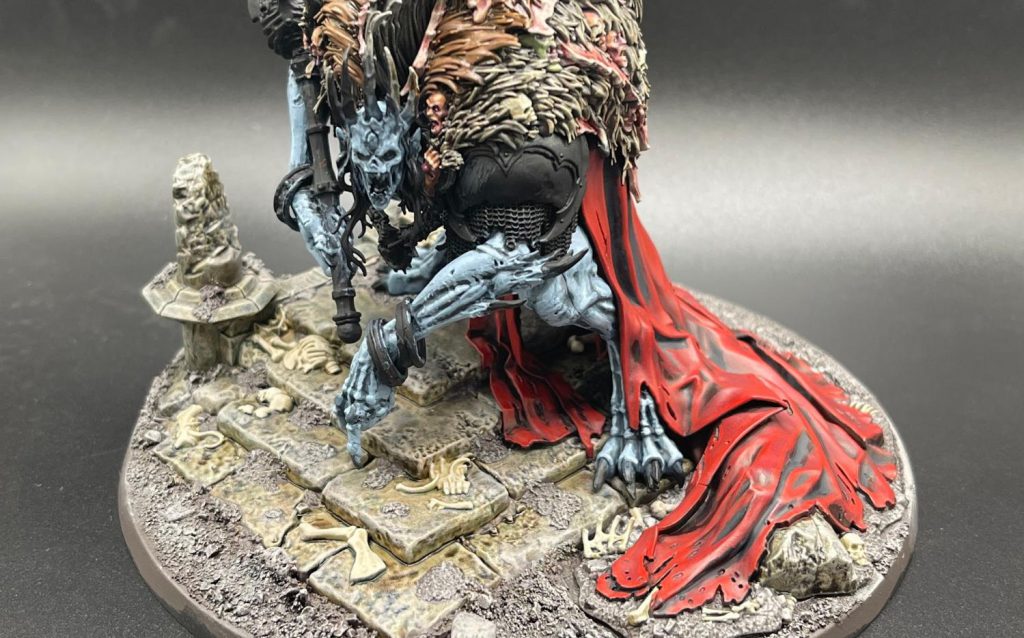
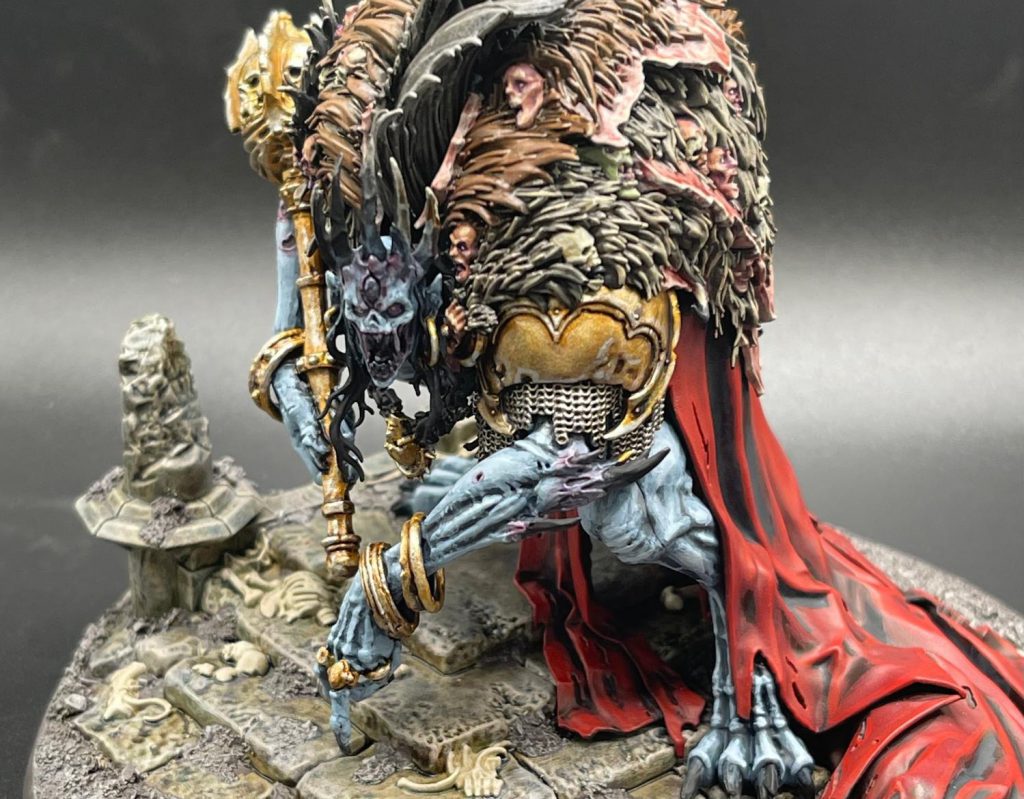
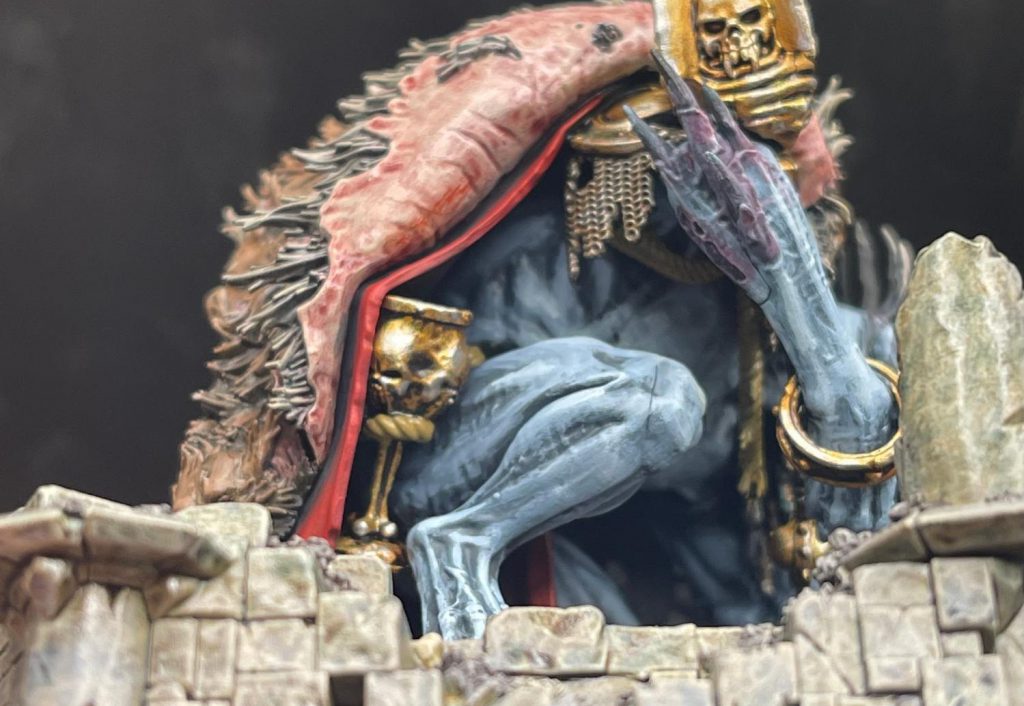
Cape and Loin Cloth
The next area to tackle is the cloth. Starting from a black undercoat I applied Flesh Tearers Red to all the cloth, this gives us a really nice deep red to start from. I find that using what feels like too much contrast is the key to getting a good even coat, pushing pools of contrast allows for it to dry a bit more slowly rather than using a very small amount on your brush. Small amounts of contrast will dry too quickly, leading to tearing and giving a finish we are not looking for. Make sure this is applied evenly, some small pooling in the cracks isn’t the end of the world though as we will be shading the recesses next.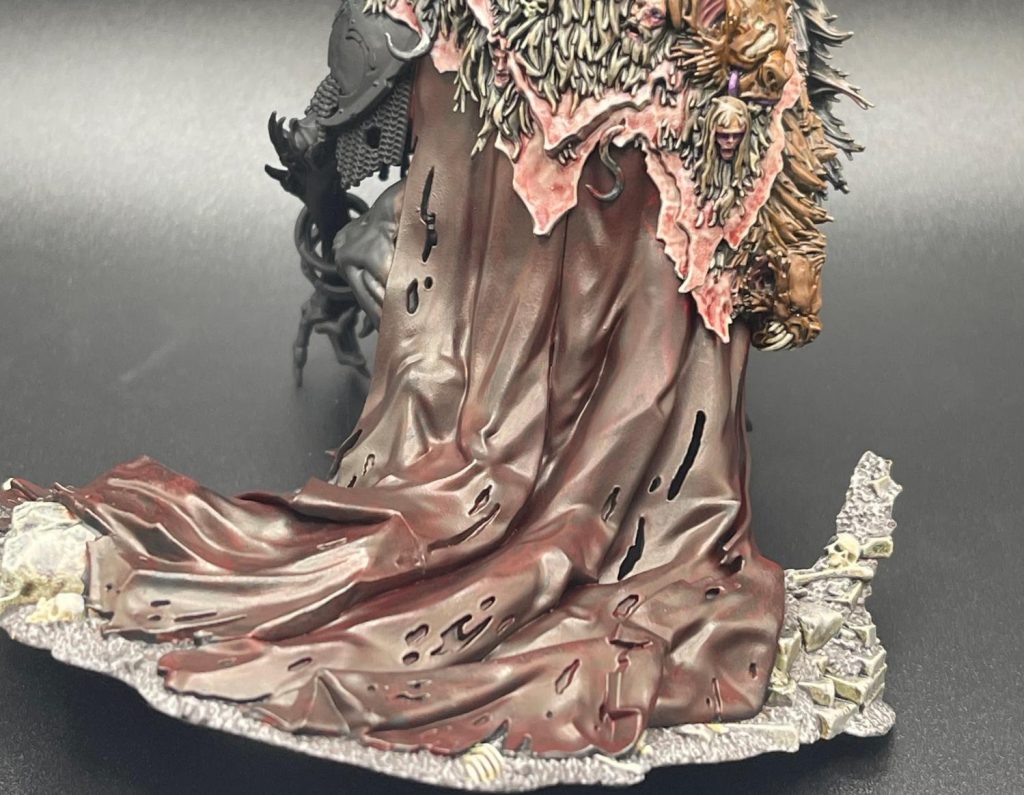
Next I applied thinned Black Templar into the recesses, old formula Nuln Oil would work the same. Feel free to exaggerate the shadows here, I made mine pretty large and deep.
Next I layered thinned out Khorne Red onto all the raised areas, feathering it into the shadows.
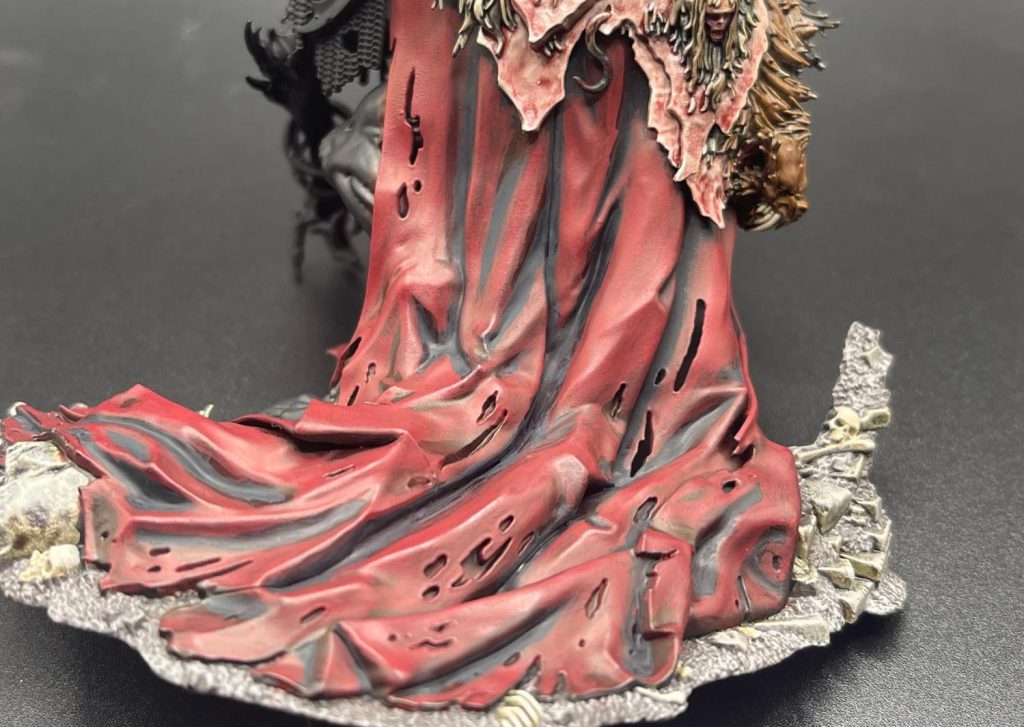
Next I mixed Mephiston Red 50/50 with Khorne Red and layered up the cloth.
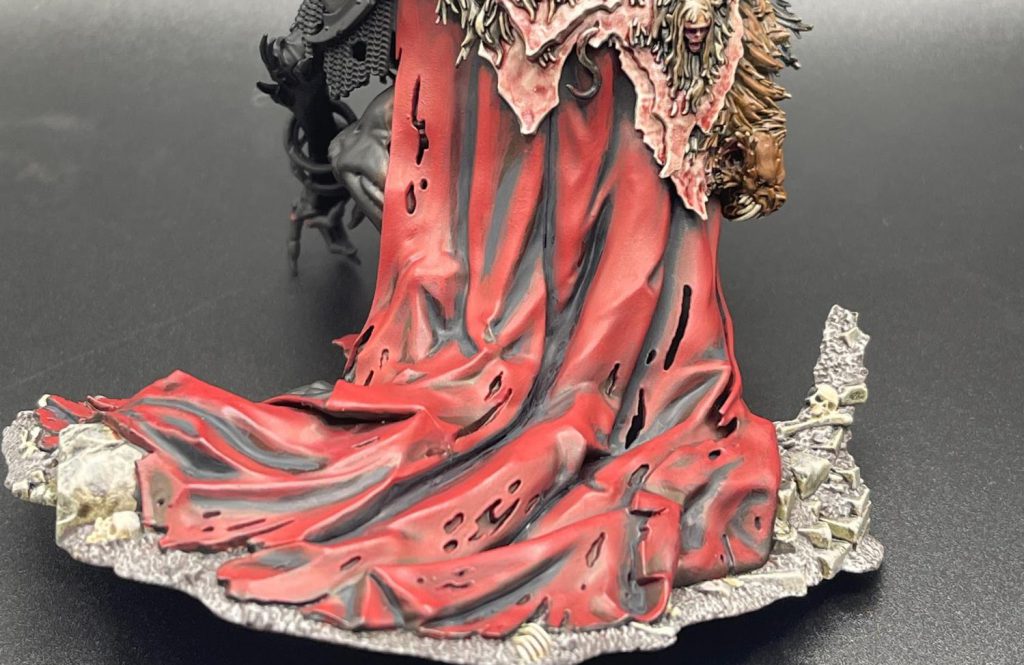
Then another highlight of pure Mephiston Red.
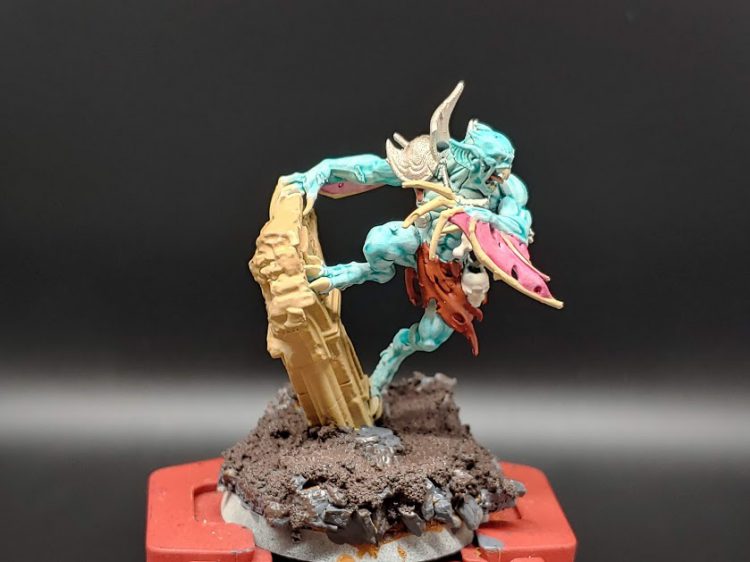
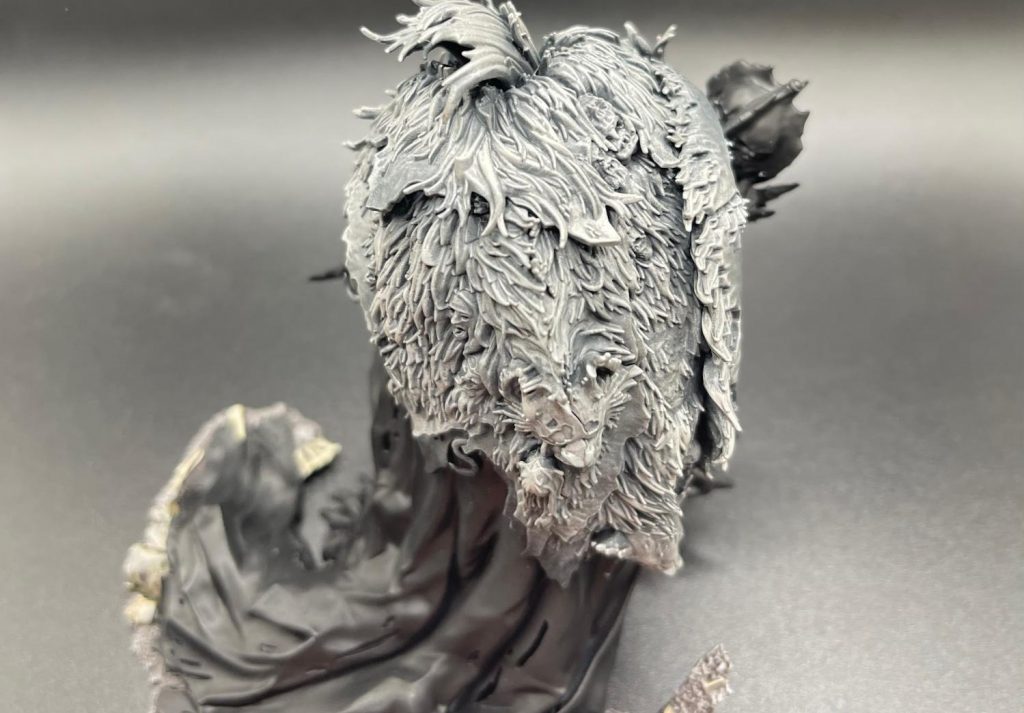
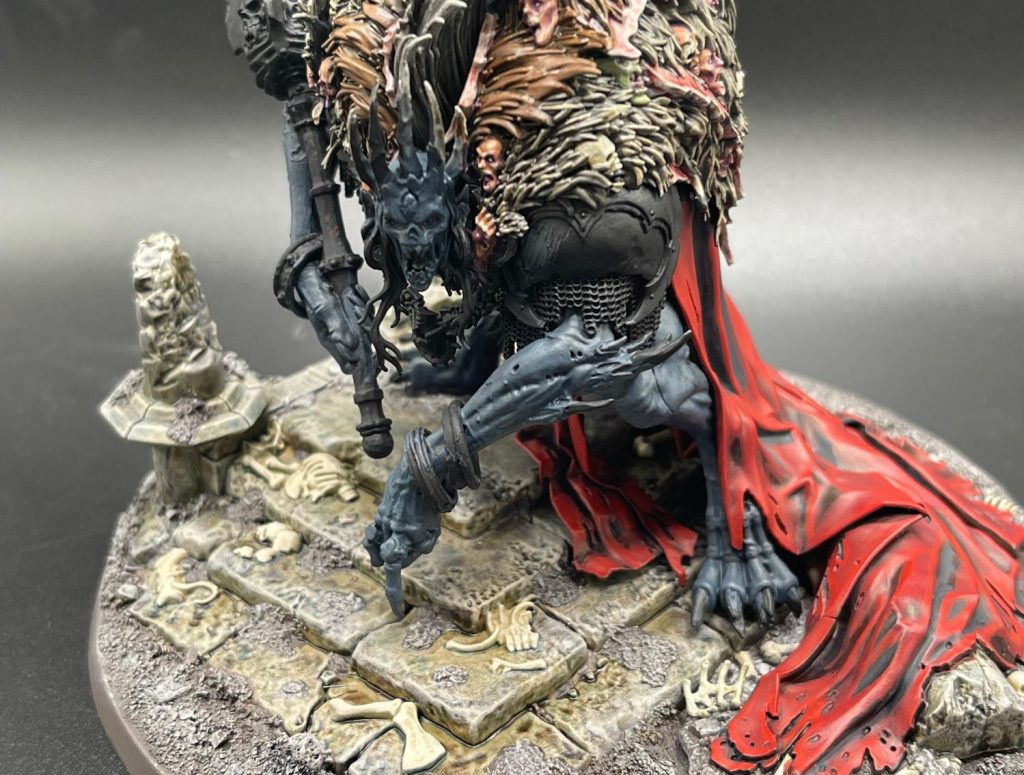
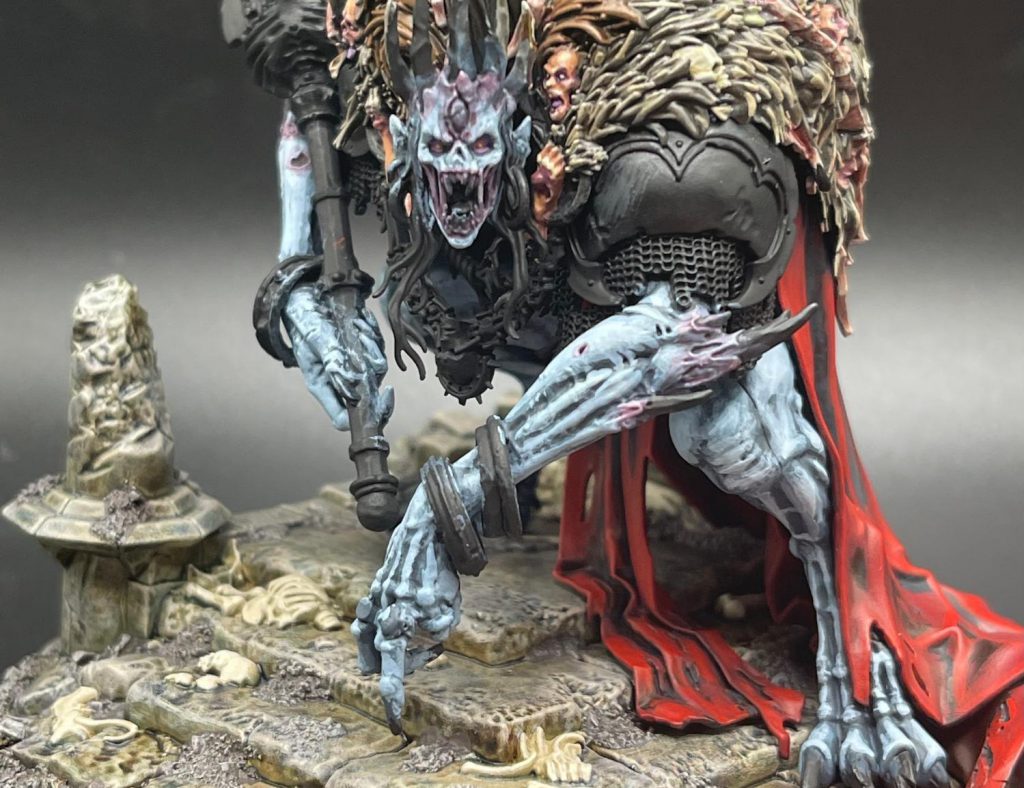
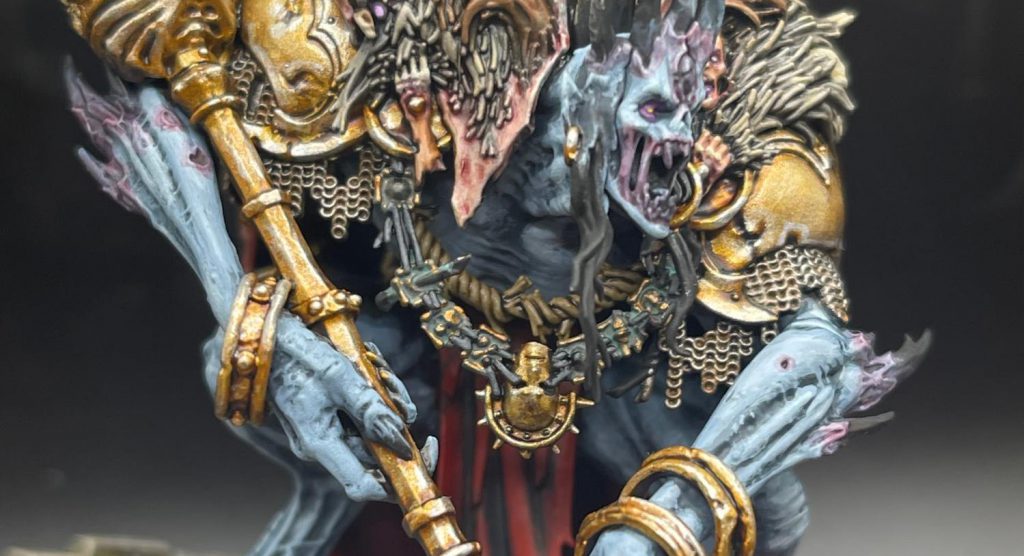
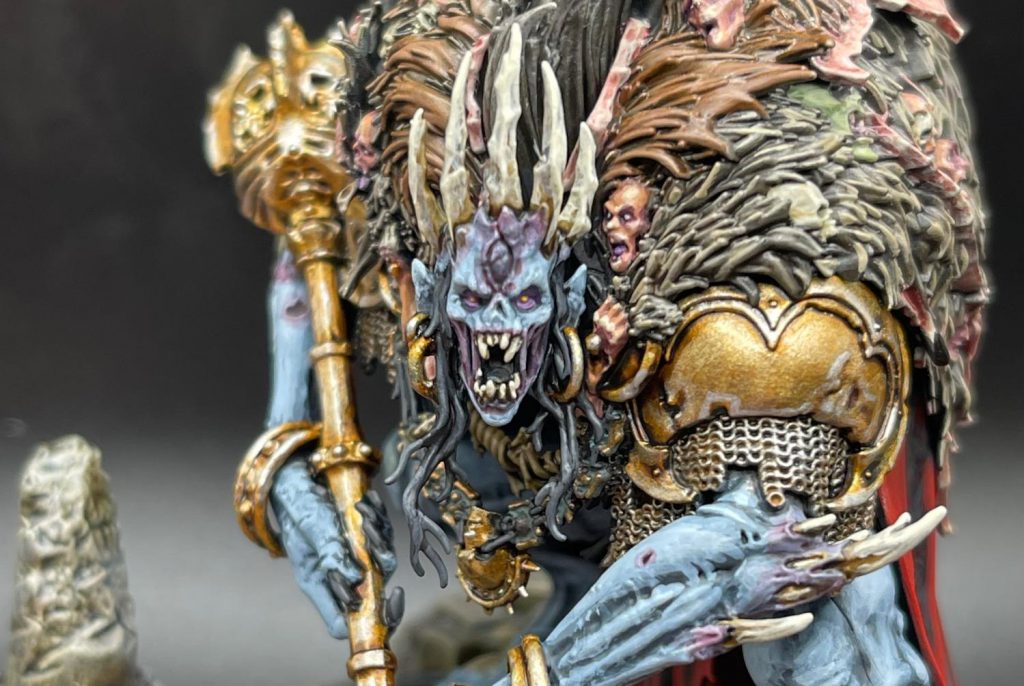
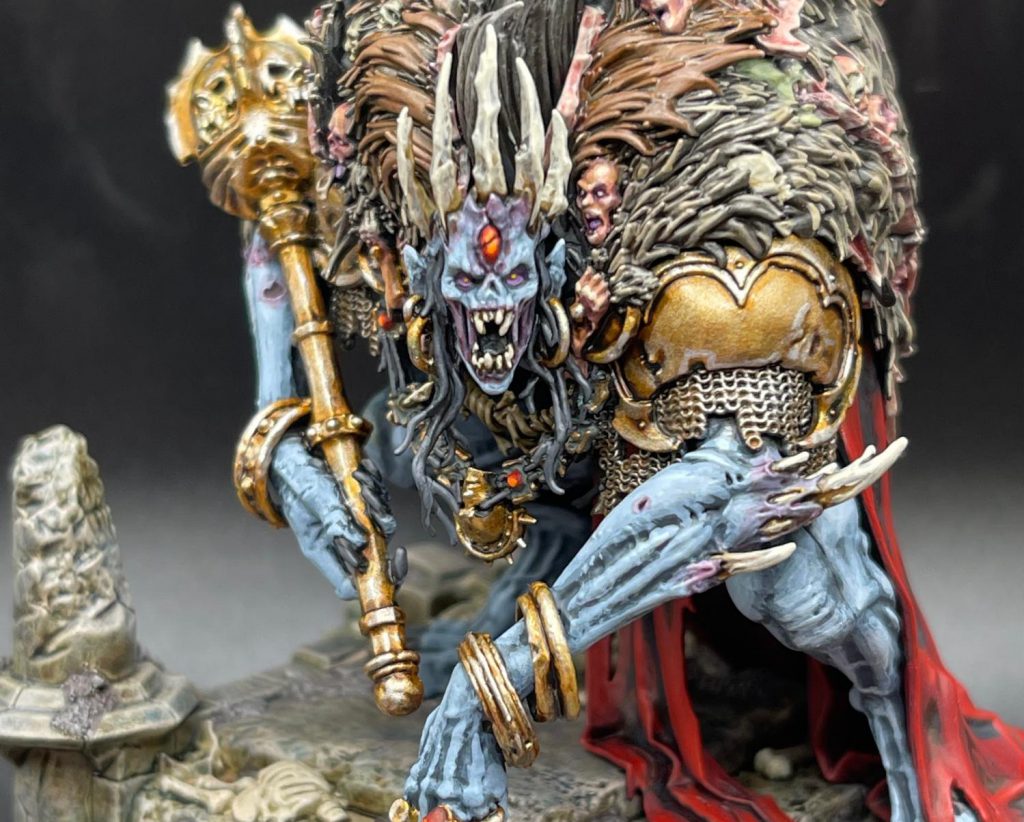
Ushoran’s Skin
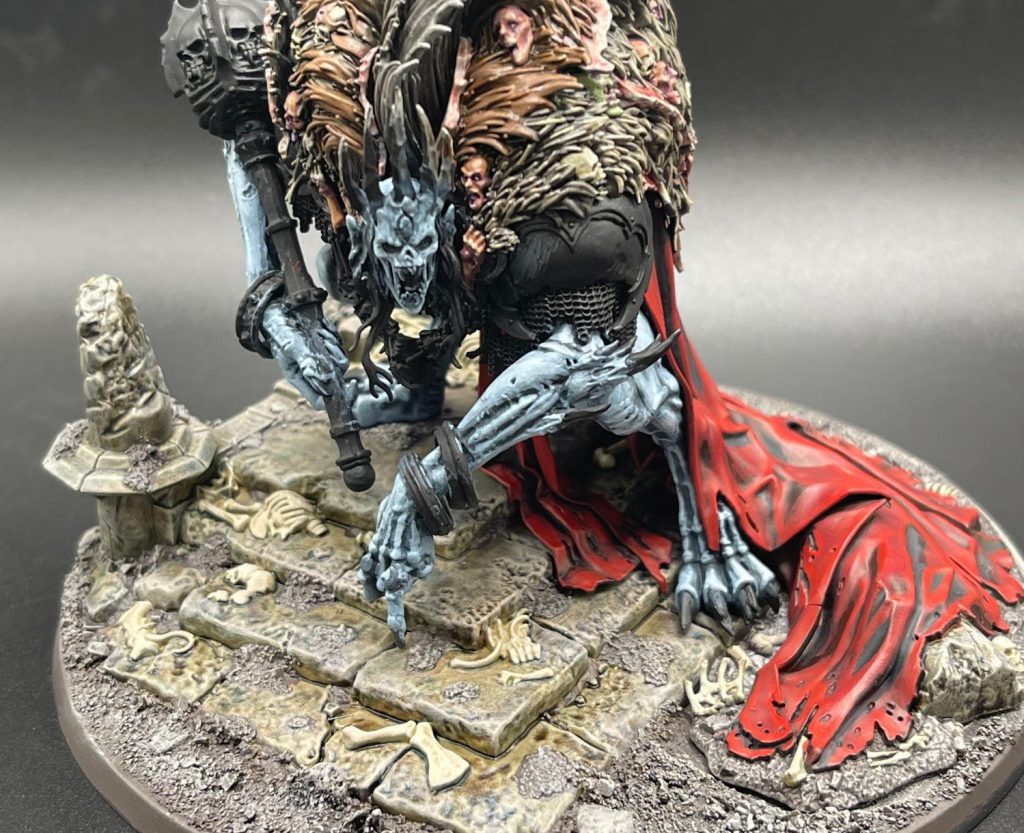
I wanted to paint this model's skin to match the old Warhammer Fantasy Strigoi color scheme, as Ushoran is the original Strigoi. This also helped make him really pop off the base, with all the muted tones there and on his fur cloak it really draws the eye.Start with a basecoat of Dark Reaper.
 (He’s not glued down just yet, making getting a picture of him was difficult)
Next apply a 50/50 mix of Fenrisian Grey and Dark Reaper as a layer across the skin.
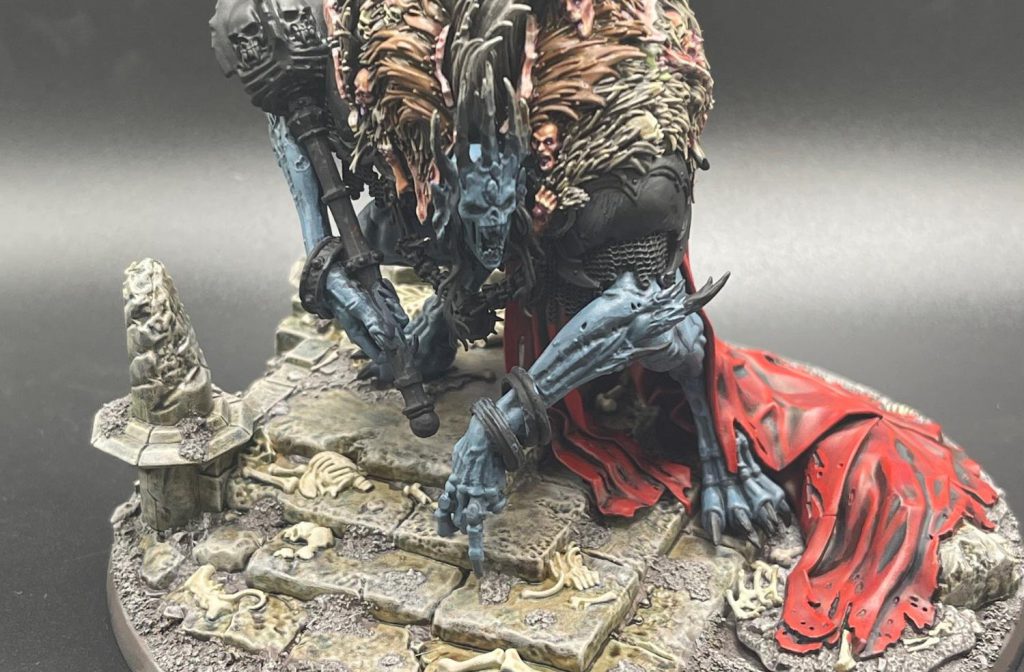
Next is a layer of pure Fenrisian Grey across the skin, making sure to hit all the veins popping up across the model.
 (At this point I glued the model to the base)
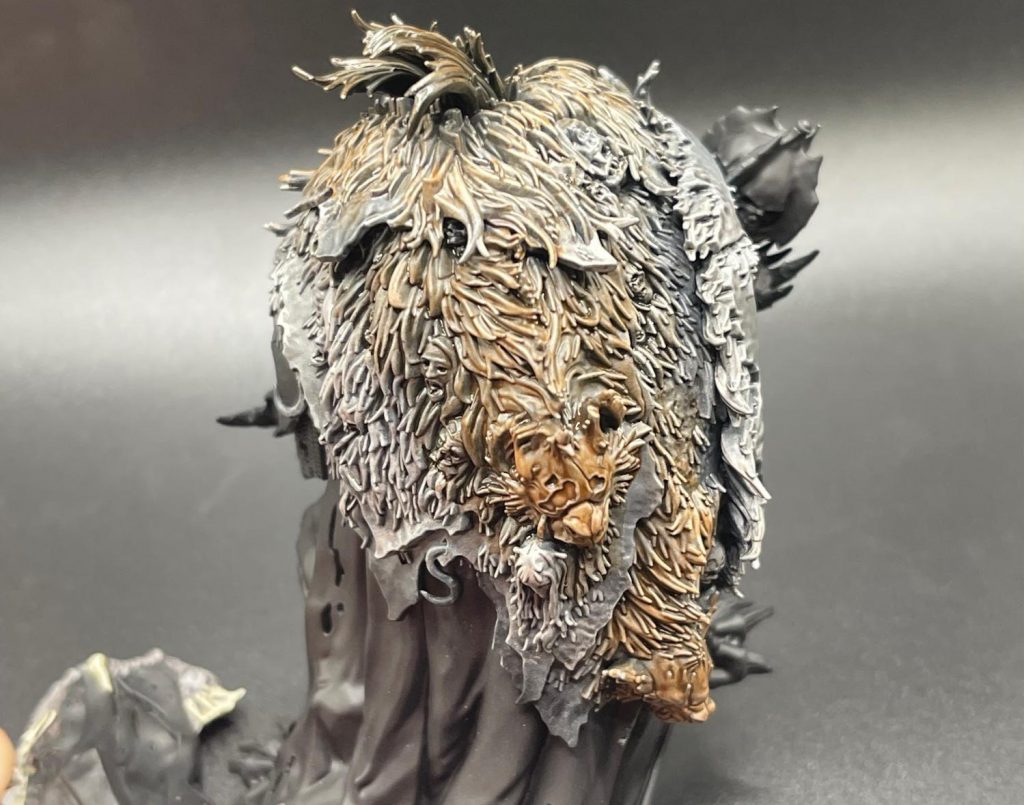
Next is a highlight of 50/50 Blue Horror and Fenrisian Grey. Focus this on the hard edges around the model, and use it to push the monstrous form of his musculature.
To finish the base skin tone, apply a small highlight of pure Blue Horror to high points across the model.
I painted the eye sockets with Naggaroth Night and highlighted with Kakophoni Purple, then dotted the eyes with Flash Gitz Yellow.
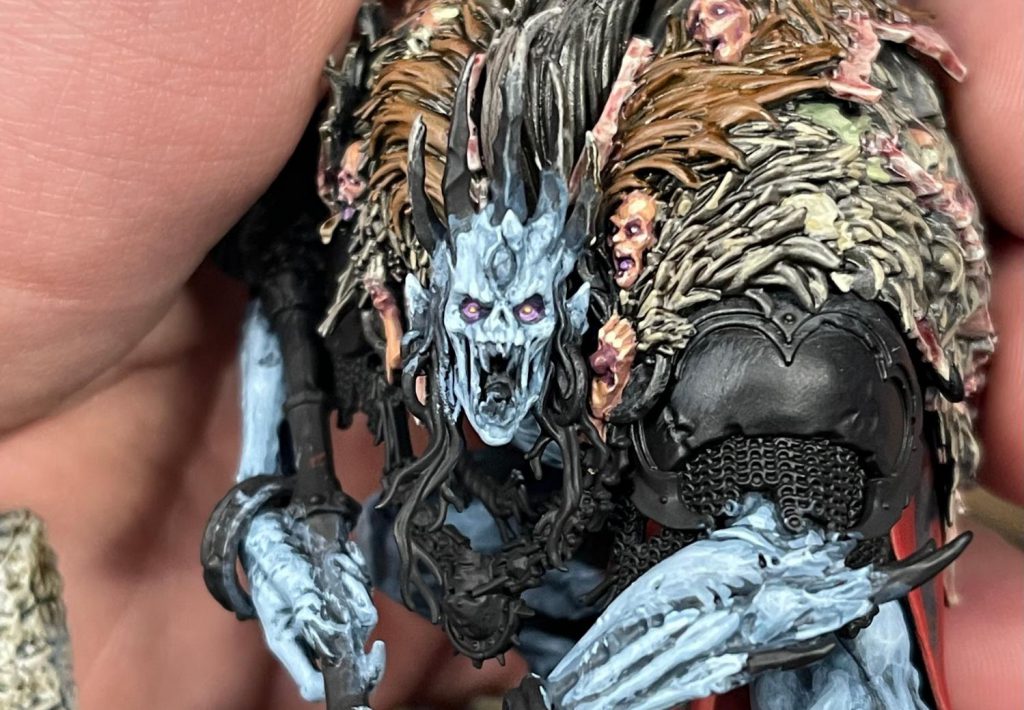
Next apply Carroburg Crimson to all the tears in the skin, the stretched mouth, and any holes in the skin.
 Metals
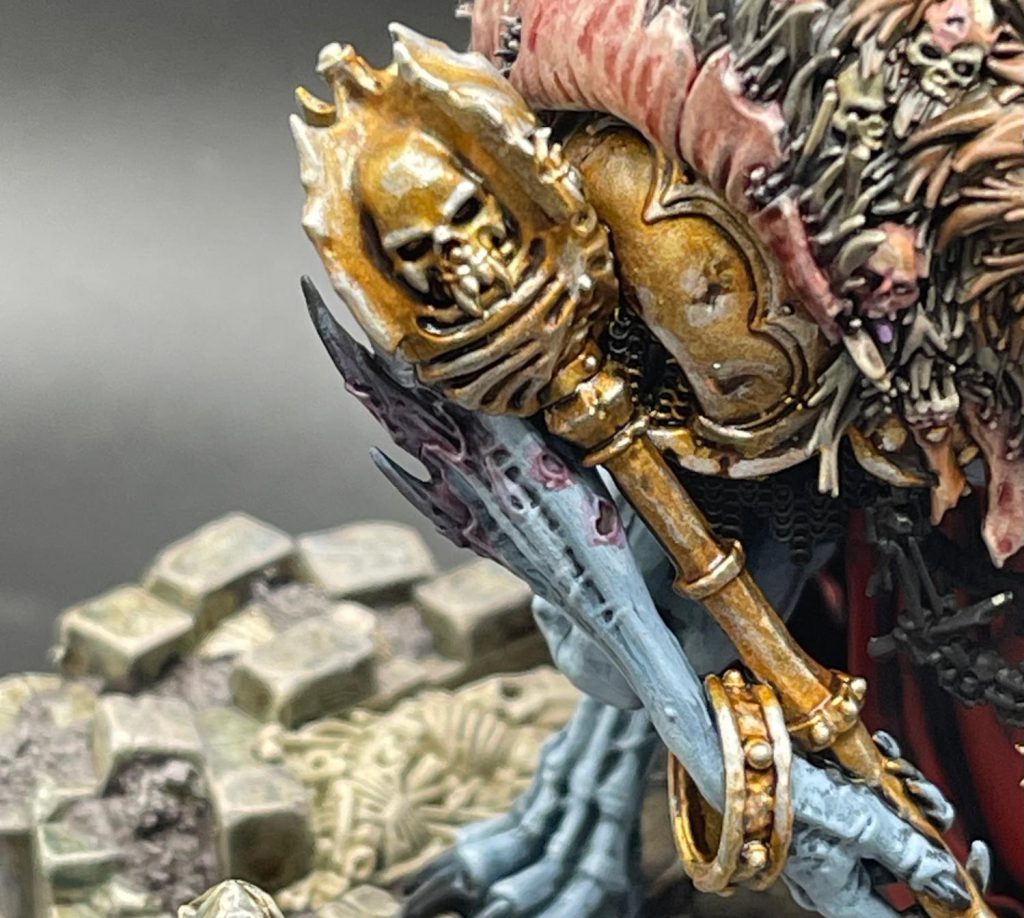
Start by base coating everything metal that isn’t chainmail with Retributor Armor. This includes a sneaky little tooth cover on the Orruk head on his back. 
Next apply a wash of Agrax Earthshade to all the gold, get a little bit of pooling into the deep sockets of the mace as well as in the pits of the shoulder armor.
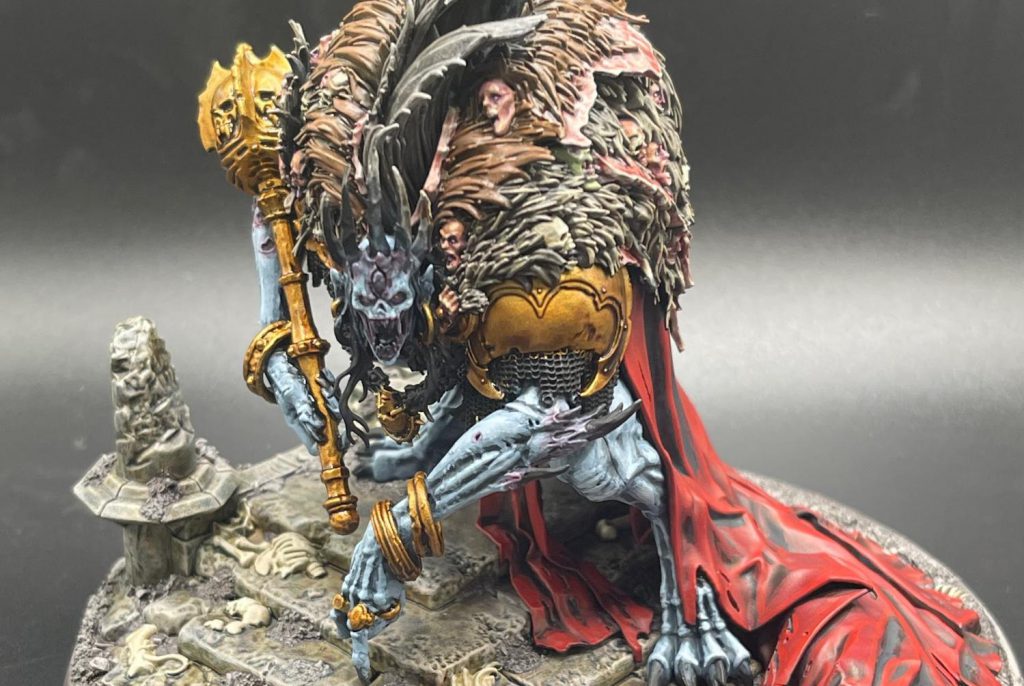
Next apply a highlight of Retributor Armor across the gold.
Now apply a layer of Liberator Gold.
Finally apply a highlight of Runefang Steel across the hard edges. I also applied this on the raised brows of the skulls on the mace and chalice.
Next apply a basecoat of Leadbelcher to all the chainmail hanging from his shoulders.
Next apply Agrax Earthshade to the chainmail.
Next drybrush a small amount of Ironbreaker onto the raised areas of the chainmail, focusing on the centers of the area. This is just to give a bit of volume to the tone.
Next I thinned out Skrag Brown and applied it to some of the edges/wherever I think will be visually interesting to give it a slightly rusted look. This is super thin so this is a detail that won’t be seen until up close, and I like those type of details a lot.
Now around his necklace there are some trinkets which I base coated in Warplock Bronze.
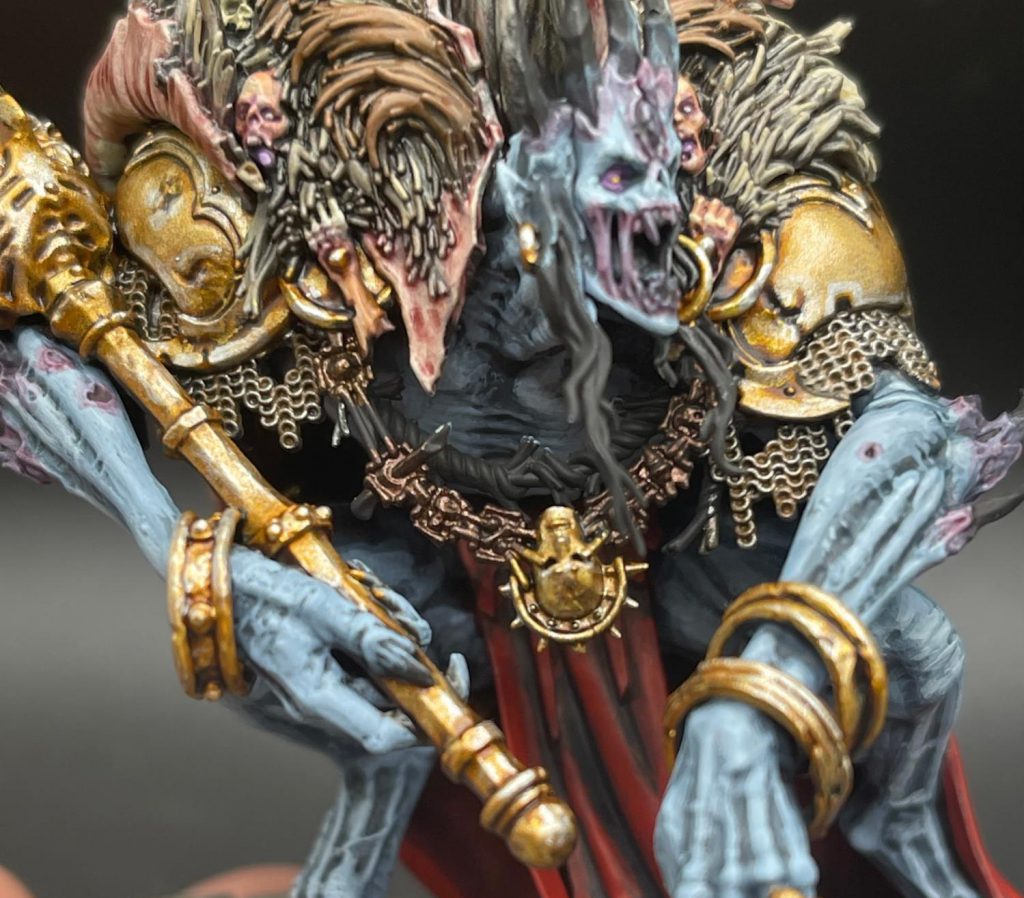
Next I applied a coat of Nihilakh Oxide over this.
Finally I highlighted this with Hashut Copper.
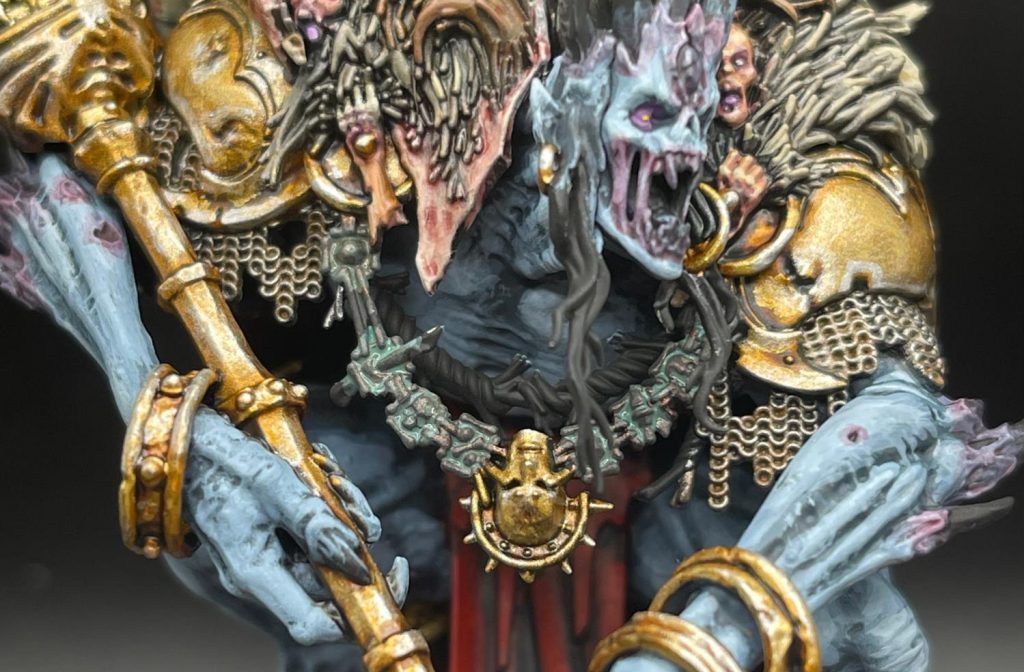
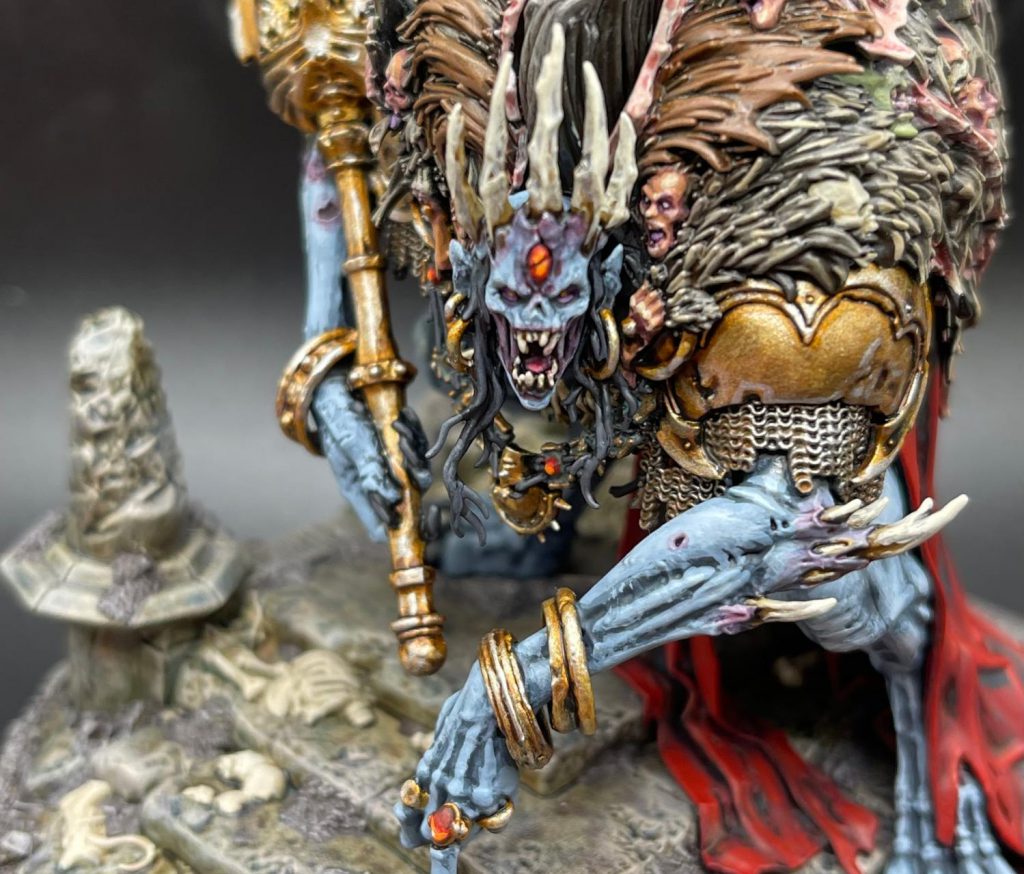
Rope and Cords
Next I applied a base coat of Tallarn Sand to the rope around his neck, waist, chalice, and under his right arm.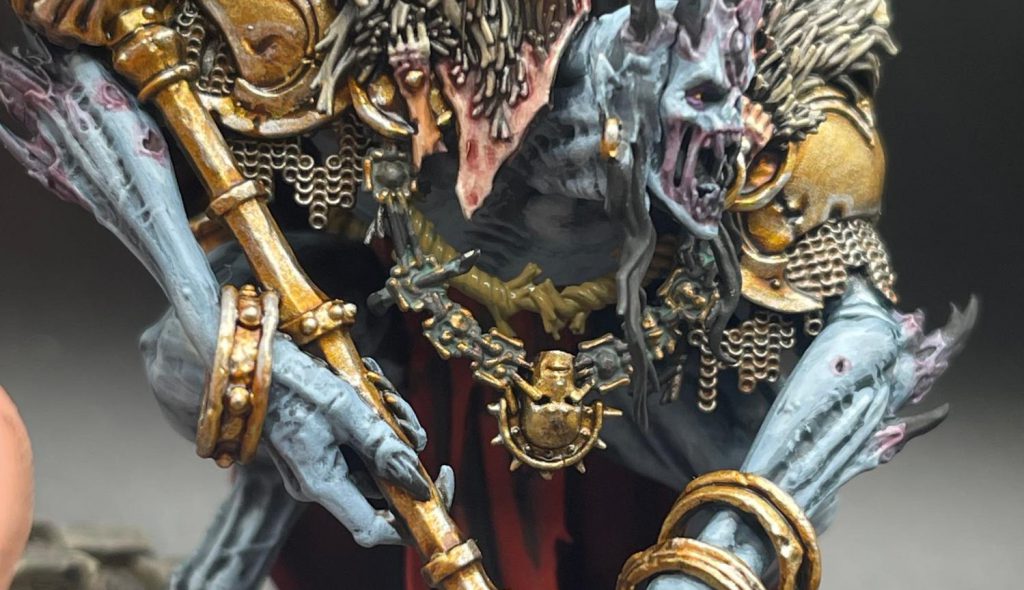
Next I layered the ridges with Karak Stone.
This is followed by a wash of Agrax Earthshade over all the rope, trying to get a small amount of pooling in the creases.
 (Still wet but this is so you can see the pooling I’m looking for)
Now for the cords attached to the trinkets. I applied a coat of pure black and highlighted the edges with Mechanicus Standard Grey.
 Bones and Bone-Related Accessories
I worked my way around the model with a base coat of Zandri Dust to all the bone protrusions, the bone in his necklace, and his teeth. 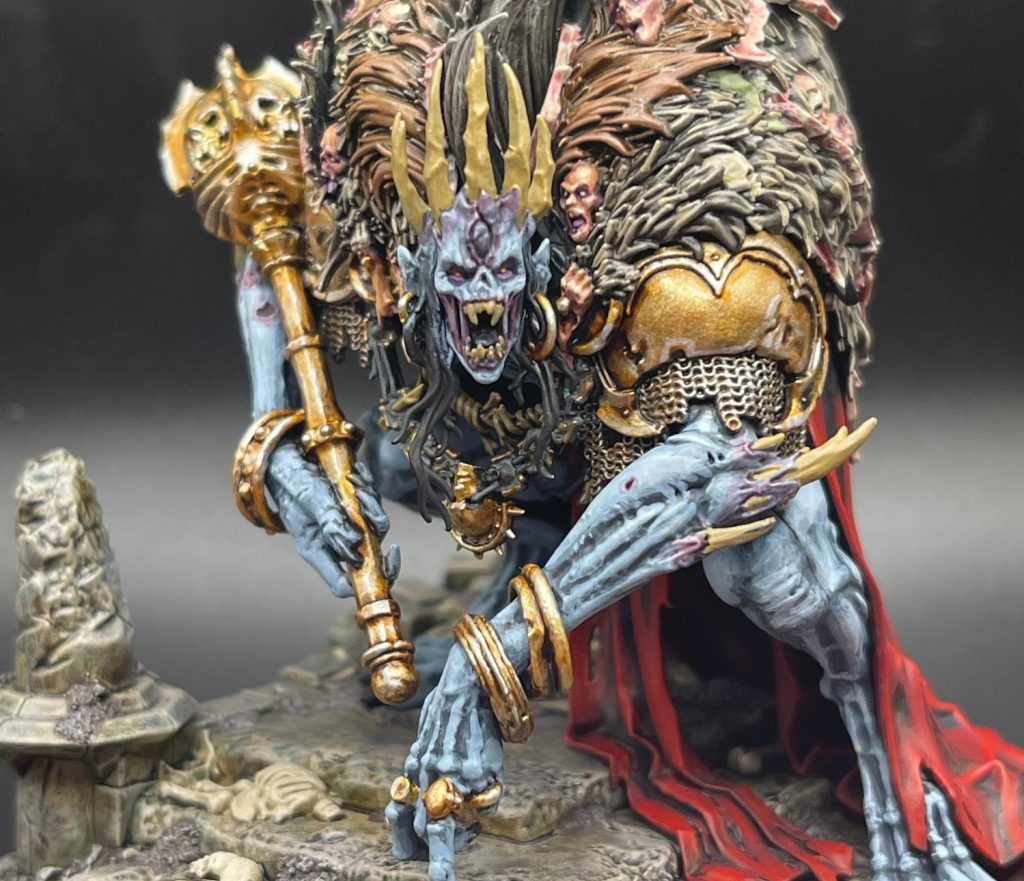
Next I applied a layer of Morghast Bone.
Next I applied a wash of Agrax Earthshade across the bones, pushing small pools into the cracks and crevices.
Then I layered it with Screaming Skull.

Details
Hair and Nails: I blacked out the nails on Ushoran’s hands and feet and layered them with Corvus Black and Mechanicus Standard Grey. This was then repeated on the hair around his face. It was at this stage I realized he has a second big hoop earring that I hadn’t painted, so I did that following the steps from before.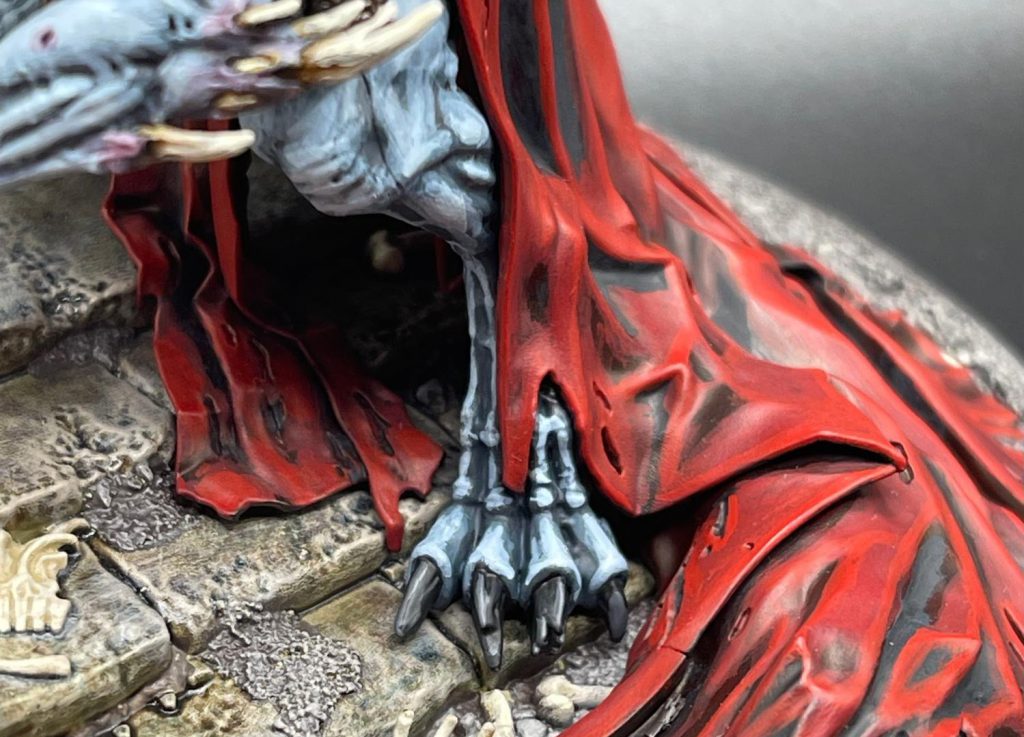
Gems: For the gems around the model, I started with by base coating them with Mephiston Red, followed by a layer of Evil Suns Scarlet, Wild Rider Red, and Fire Dragon Bright. The gem on his ring was then hit with a little dot of pure white to give it the gleam, and I added a shadow using a thinned out mix of Mephiston Red and black. I also used this mix to define the crack in the gem in his forehead.
Tongue: I hit the tongue with Barak-Nar Burgundy and highlighted it with Screamer Pink and a small amount of Pink Horror.
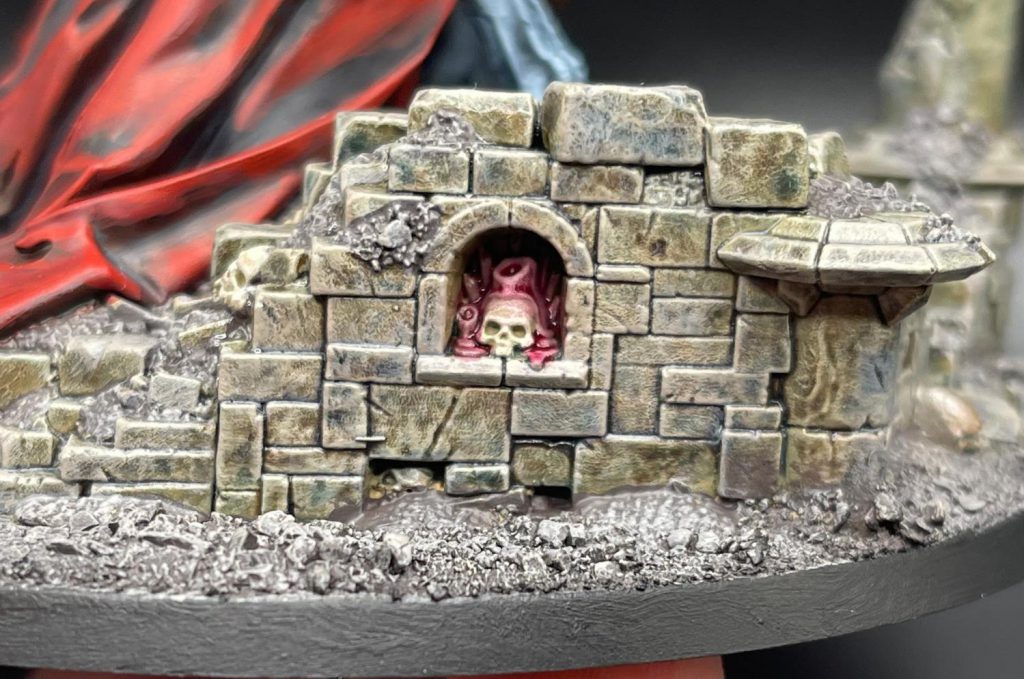
Hooks and Helmet: In the fur cloak there are a few hooks as well as one attached to some fleshy bones on the base and on the base there’s a skull wearing a beat up helmet. I hit these with Leadbelcher and then used watered down Skrag Brown to give it a rusty effect.
Candles: In a little cloister on his base there’s a skull covered in candles, this was left in the bone drybrush earlier so a coat of Volupus Pink will give it a nice pop of color.
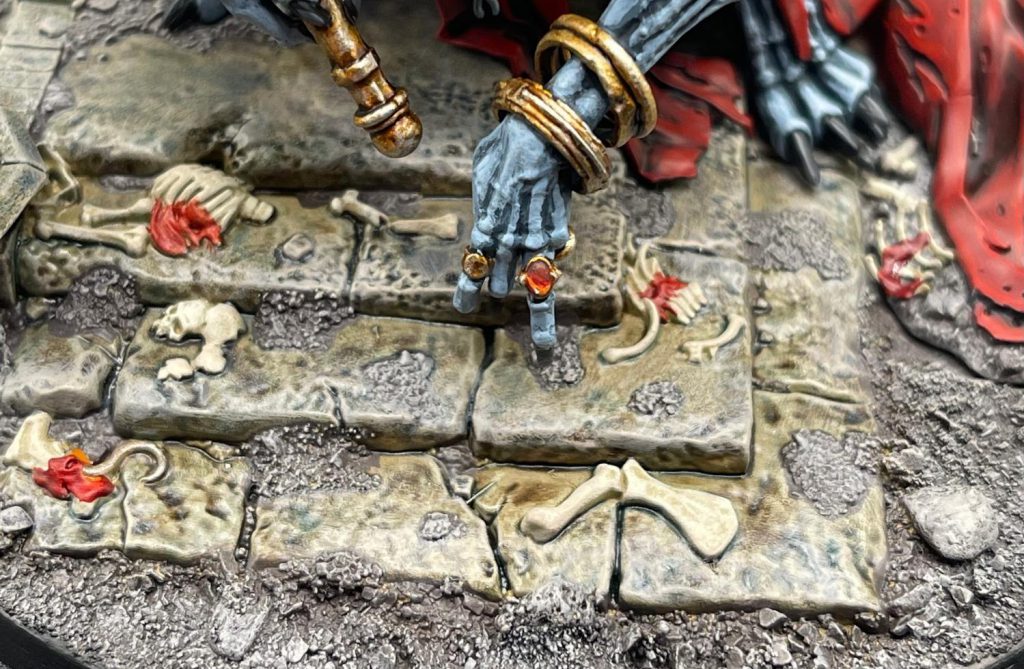
Fleshy Bones: A few of the bones of the base have flesh still attached, these areas I hit with Flesh Tearers Red.
Finishing Touches
At this point I black out the base rim and sealed the model, and once that was dry I added a paint on gloss varnish onto the gems and nails. I added my tufts, and added some Blood For The Blood God to the chalice and the base. This step is optional, but I like my Court nice and gross.Final Thoughts
That does it for our look at the Flesh-Eater Courts but there are of course many more ways to paint them, from the gruesomely realistic to the more bright and cartoony. Hopefully we've given you some good inspiration for painting yours, and they'll be as frightening to play against as they are to gaze upon.Have any questions or feedback? Drop us a note in the comments below or email us at contact@goonhammer.com. Want articles like this linked in your inbox every Monday morning? Sign up for our newsletter. And don’t forget that you can support us on Patreon for backer rewards like early video content, Administratum access, an ad-free experience on our website and more.